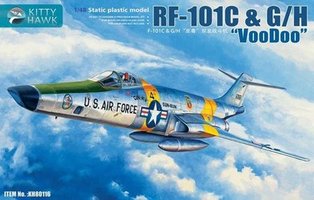
Kitty Hawk (KH80116)
Scale: 1:48
Review |
www.scalespot.com |
|
McDonnell RF-101C & G/H - Review Kitty Hawk (KH80116) Scale: 1:48 |
|
|
|||||||||||||||||||||||||||||||||||||||||||||||||||||||||
 |
|||||||||||||||||||||||||||||||||||||||||||||||||||||||||
| The RF-101C saw service during the Cuban Missile Crisis and soon followed the North American F-100 Super Sabres in October 1961, into combat when RF-101s from the 67th Tactical Reconnaissance Wing deployed to Vietnam. The RF-101C was deployed operationally during the Vietnam War, sustaining losses with the first F-101 being lost in November 1964 to ground fire. From 1965 through November 1970, its role was gradually taken over by the RF-4C Phantom II. In some 35,000 sorties, 39 aircraft were lost, 33 in combat, including five to SAMs, one to an airfield attack, and one in air combat to a MiG-21 in September 1967. | |||||||||||||||||||||||||||||||||||||||||||||||||||||||||
 |
|||||||||||||||||||||||||||||||||||||||||||||||||||||||||
| The RF-101C's speed made it largely immune to MiG interception. Twenty-seven (27) of the combat losses occurred on reconnaissance missions over North Vietnam. In April 1967, ALQ-71 ECM pods were fitted to provide some protection against SAMs. Although the Voodoo was again able to operate at medium altitudes, the added drag and weight decreased the speed enough to make RF-101 vulnerable to the maneuverable (and cannon-equipped) MiGs and thus requiring fighter escort. | |||||||||||||||||||||||||||||||||||||||||||||||||||||||||
 |
|||||||||||||||||||||||||||||||||||||||||||||||||||||||||
|
INTRODUCTION - KittyHawk 1:48 McDonnell RF-101C & G/H (KH80116) |
|||||||||||||||||||||||||||||||||||||||||||||||||||||||||
|
|||||||||||||||||||||||||||||||||||||||||||||||||||||||||
|
|||||||||||||||||||||||||||||||||||||||||||||||||||||||||
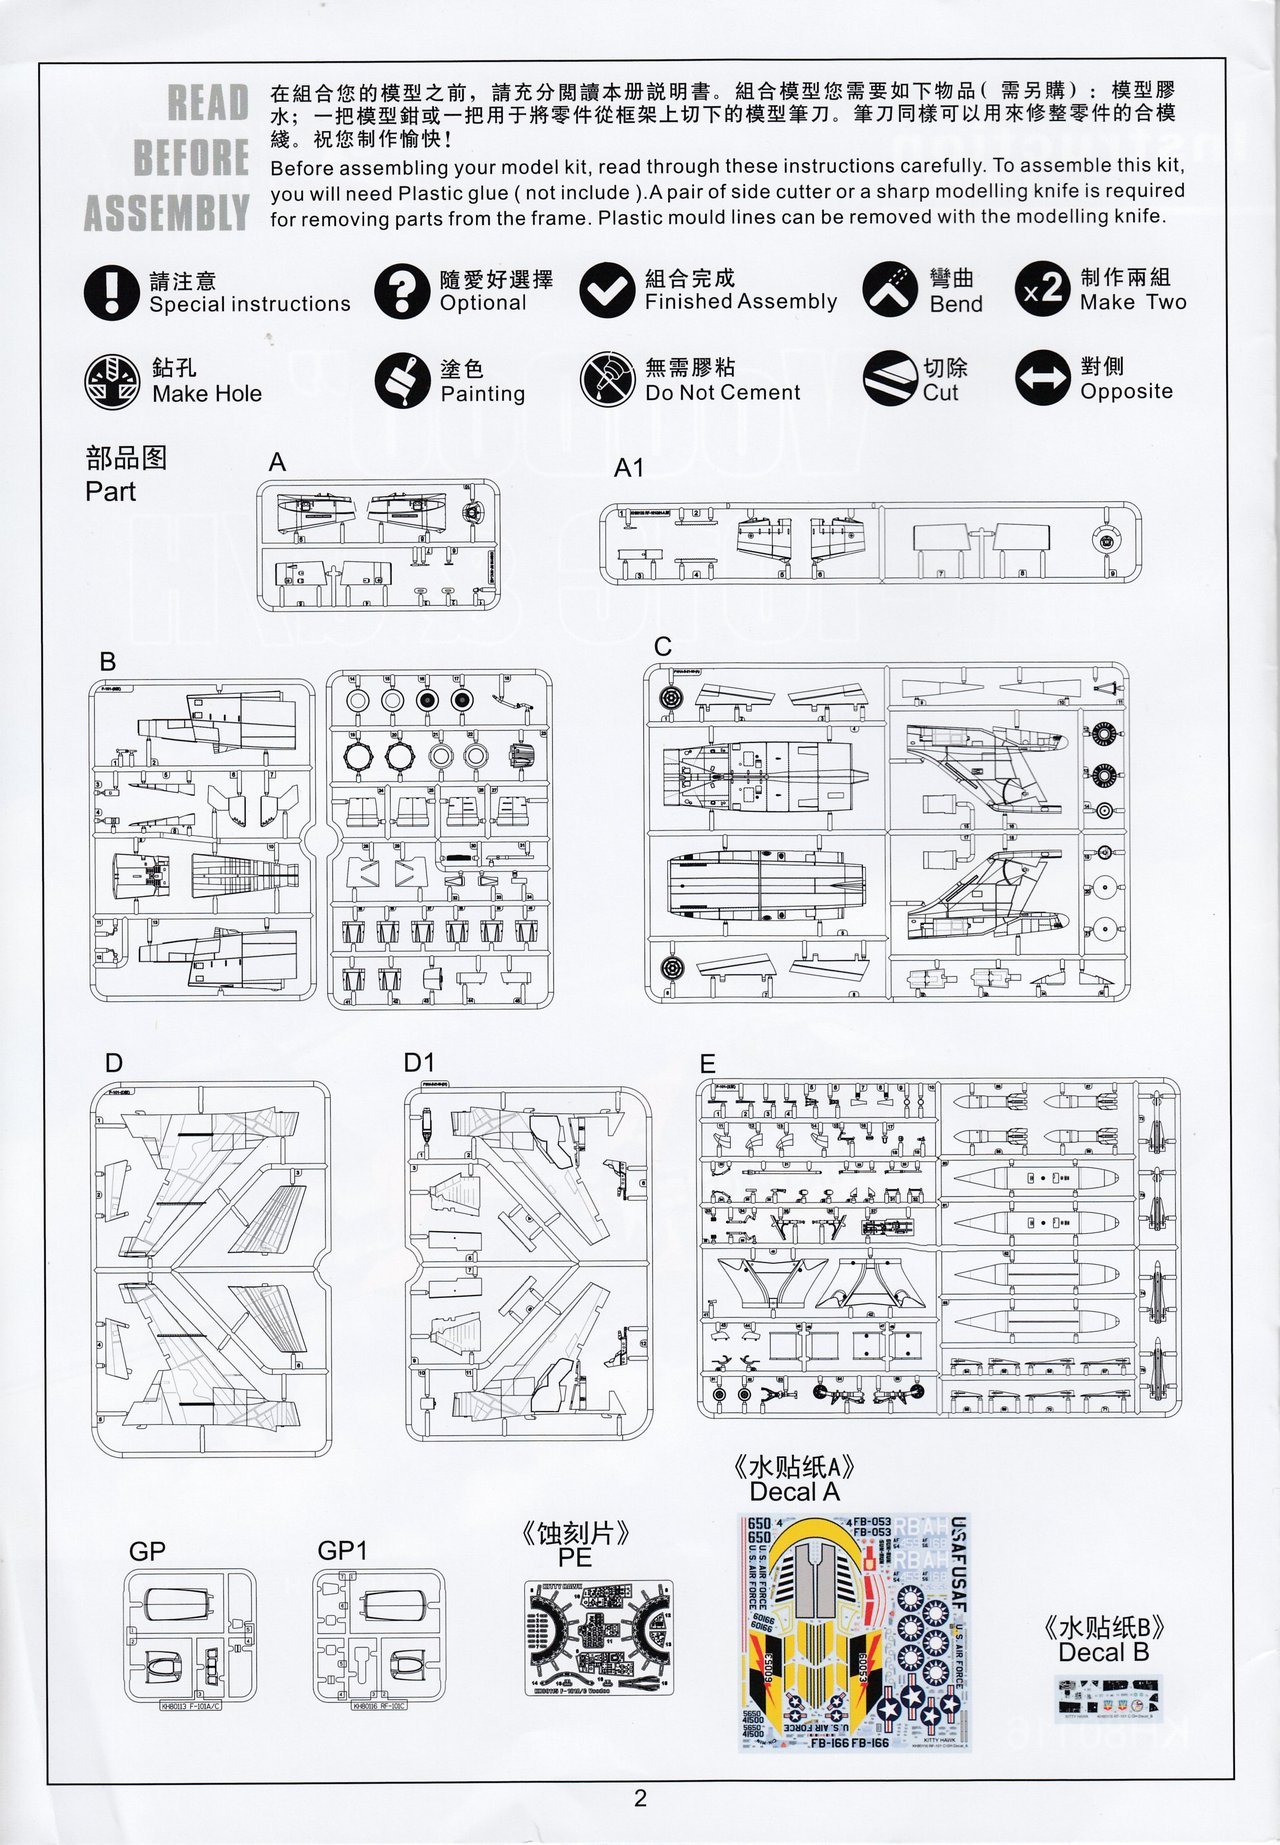
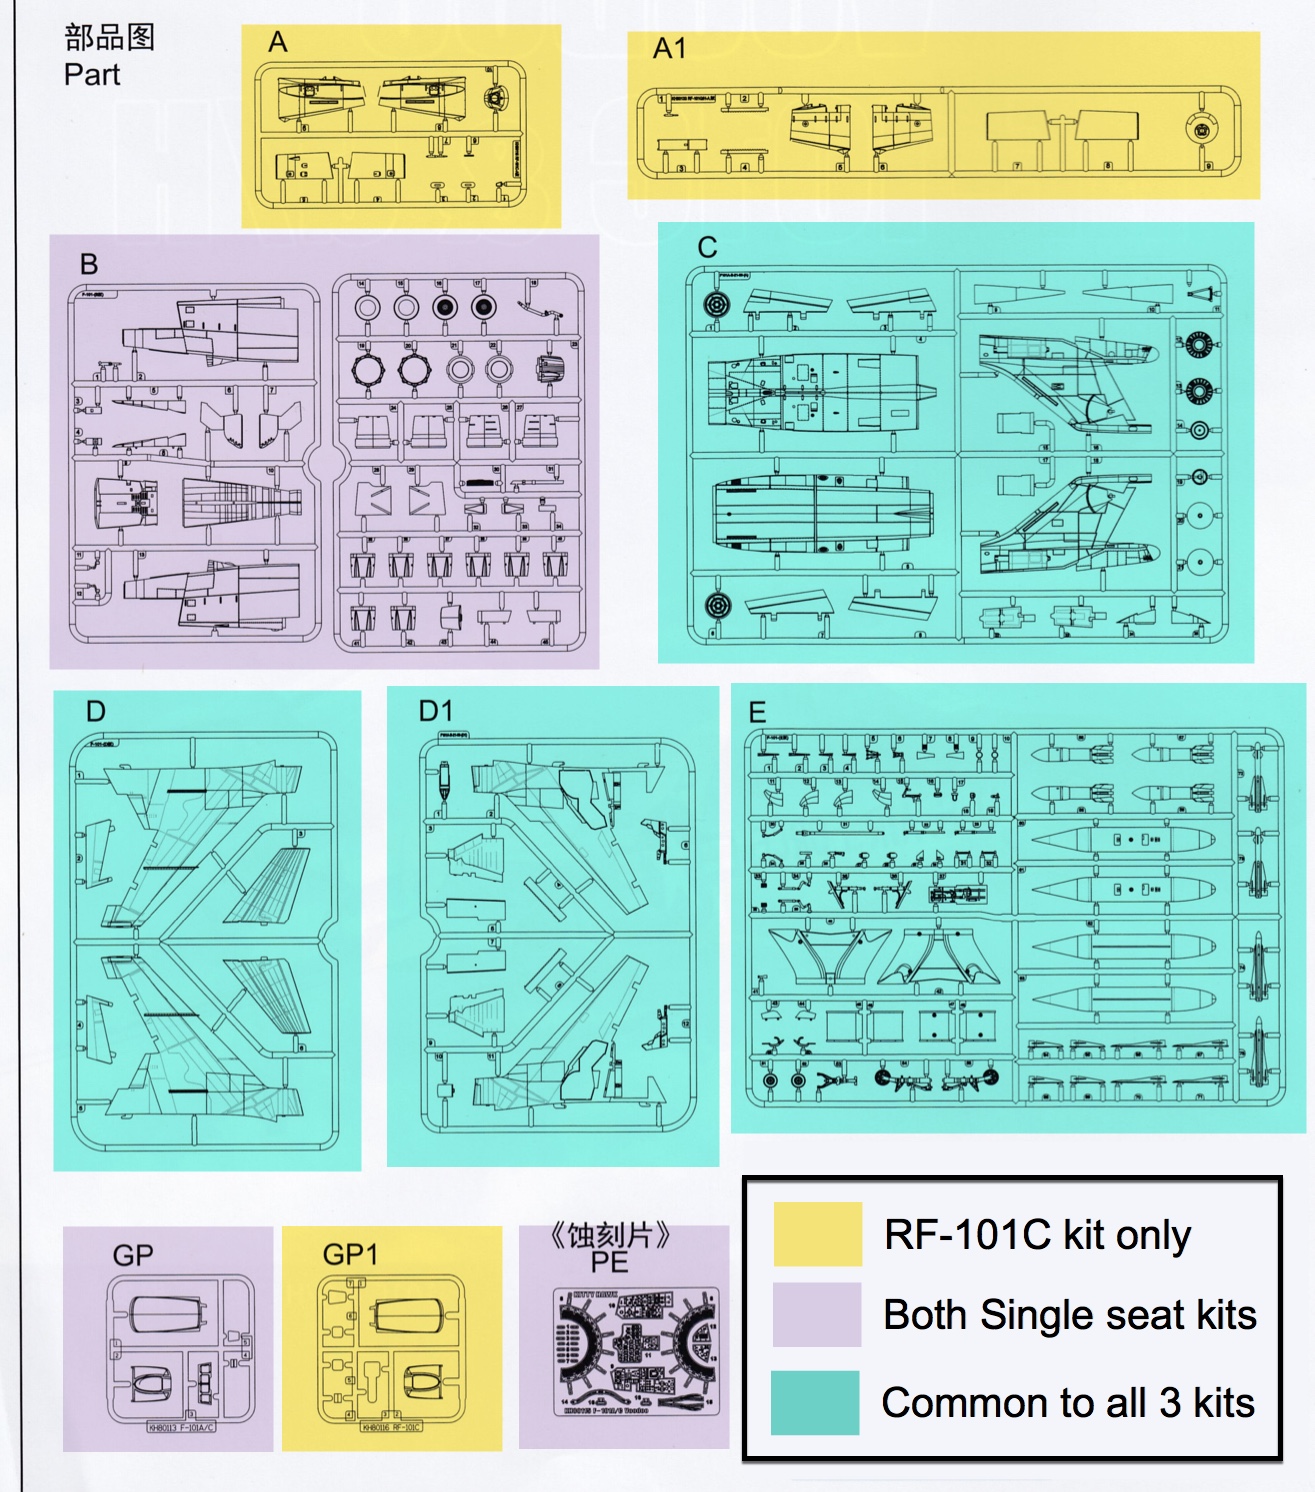
| As expected, Kittyhawk have once again re-purposed several of the sprues found in the previous releases and due to their modular engineering approach only the nose (excluding the cockpit) have been updated with two new sprues (A & A1) for this RF-101C/G/H boxing. As I observed with the F-101B release, it's unfortunate that the cockpits were not treated to a better update than just more PE and decals. Sprue B is common with the first single seater (F-101A/C) kit and has been provided with no changes for this release. | |||||||||||||||||||||||||||||||||||||||||||||||||||||||||
 |
|||||||||||||||||||||||||||||||||||||||||||||||||||||||||
|
DRY BUILD - KittyHawk 1:48 McDonnell RF-101C & G/H (KH80116) |
|||||||||||||||||||||||||||||||||||||||||||||||||||||||||
| As this new RF-101C/G/H boxing has so many parts in common with the earlier kits I am not going to go over old ground and review these again. As mentioned above, the rear fuselage/tail and wings/undercarriage are all common to the three kits, so if you are interested in more than specifically the new RF-101C/G/H parts in this kit then I'd suggest you first check out my full Kitty Hawk F-101B Review for a complete end to end dry build and assessment. After that come back here to see what the RF specific parts are like. | |||||||||||||||||||||||||||||||||||||||||||||||||||||||||
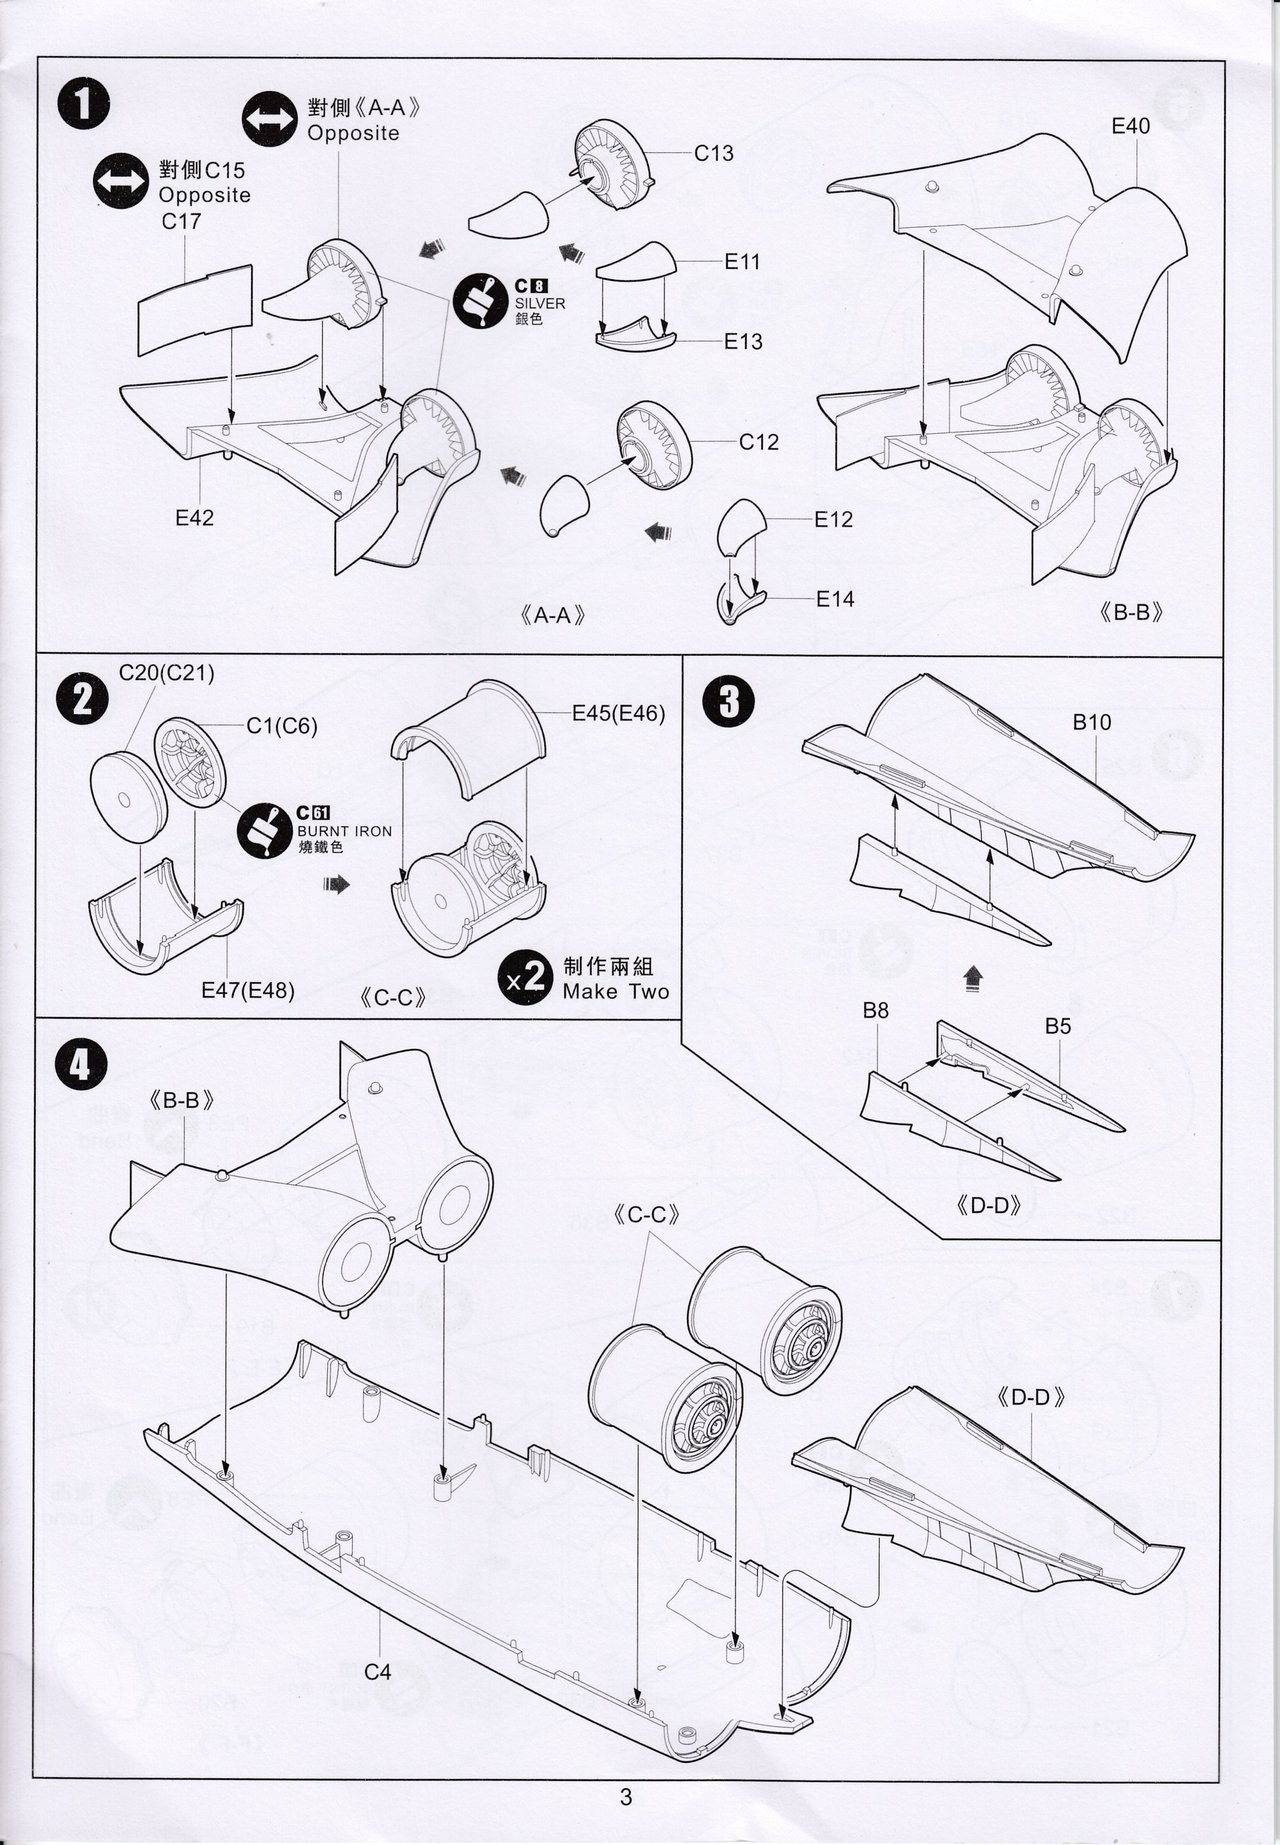
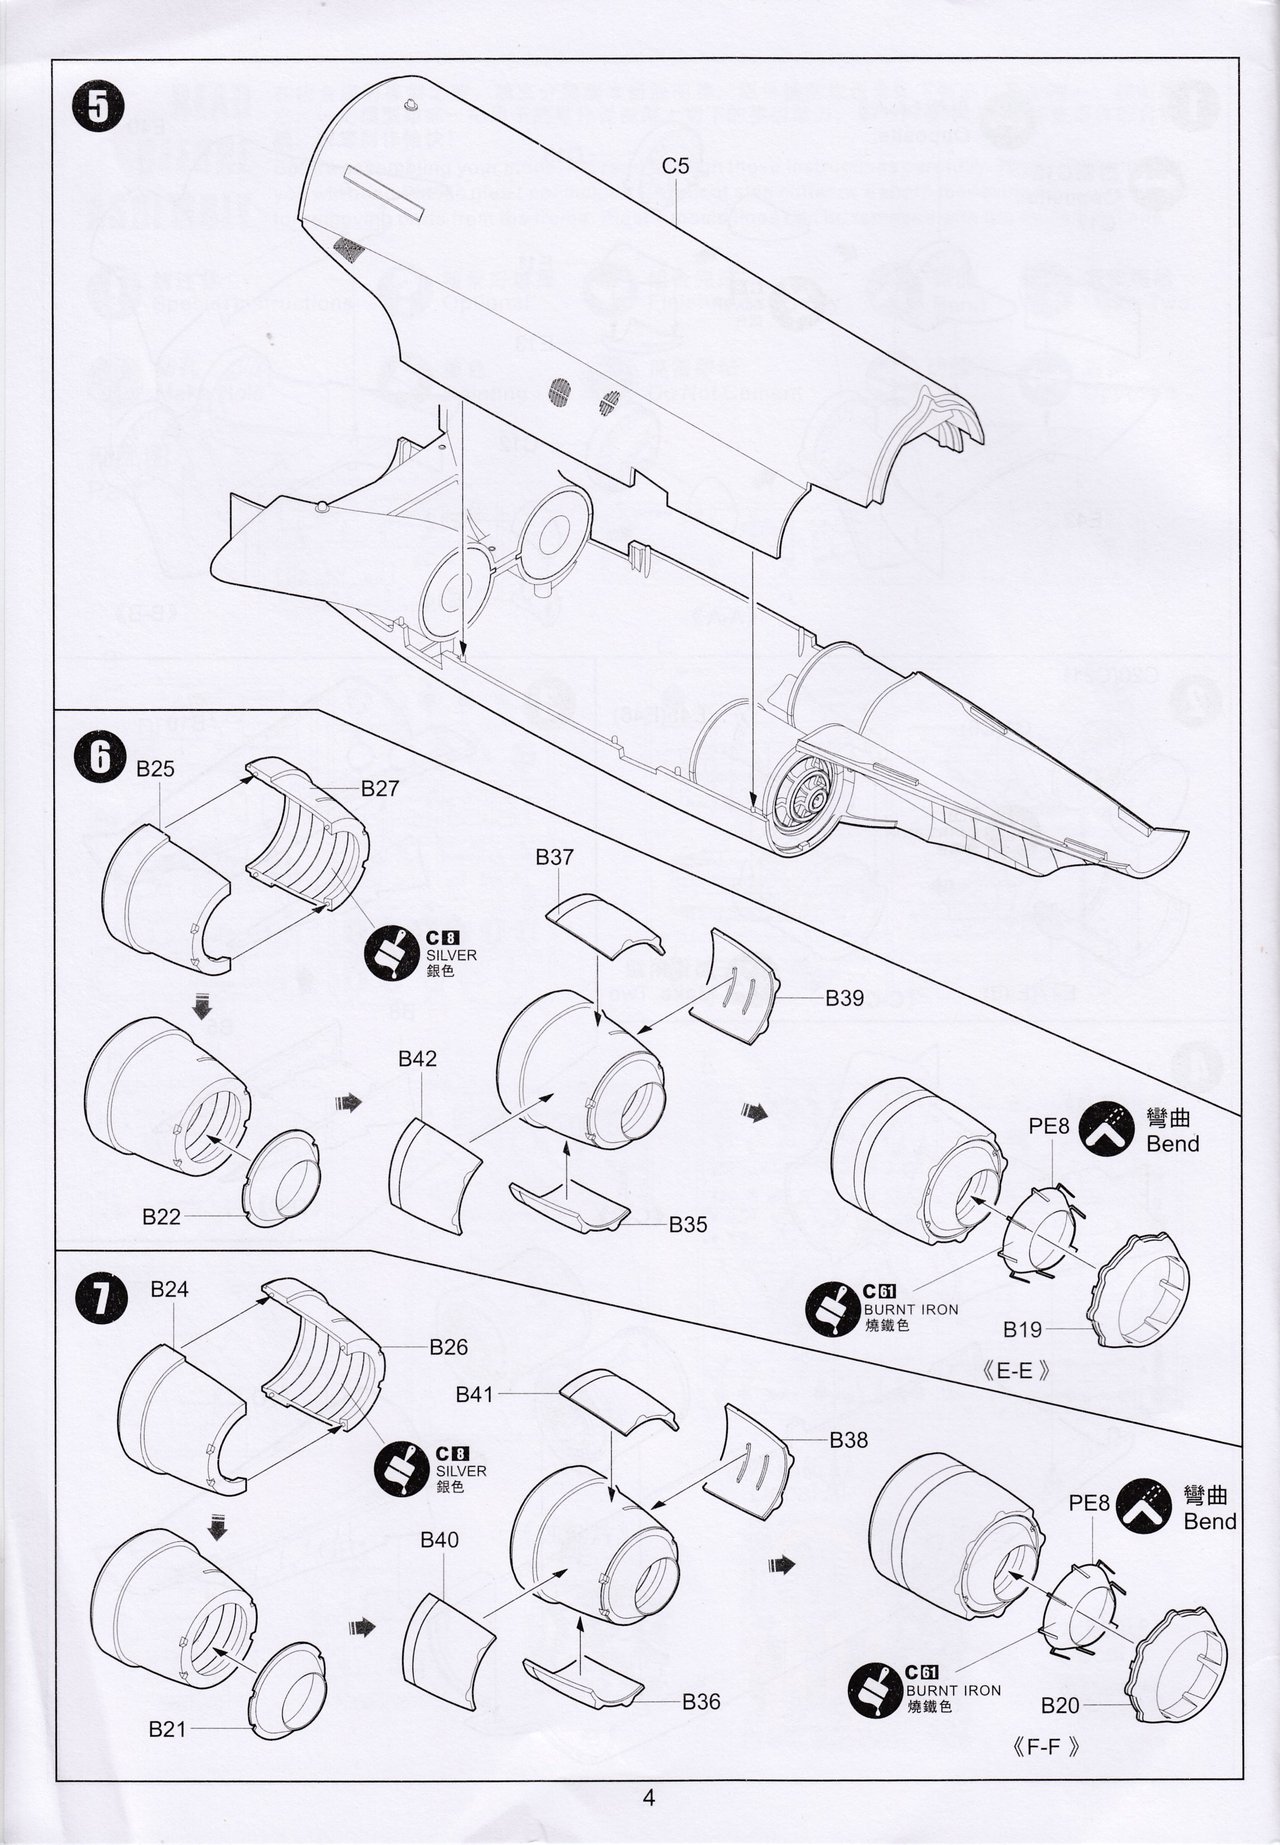
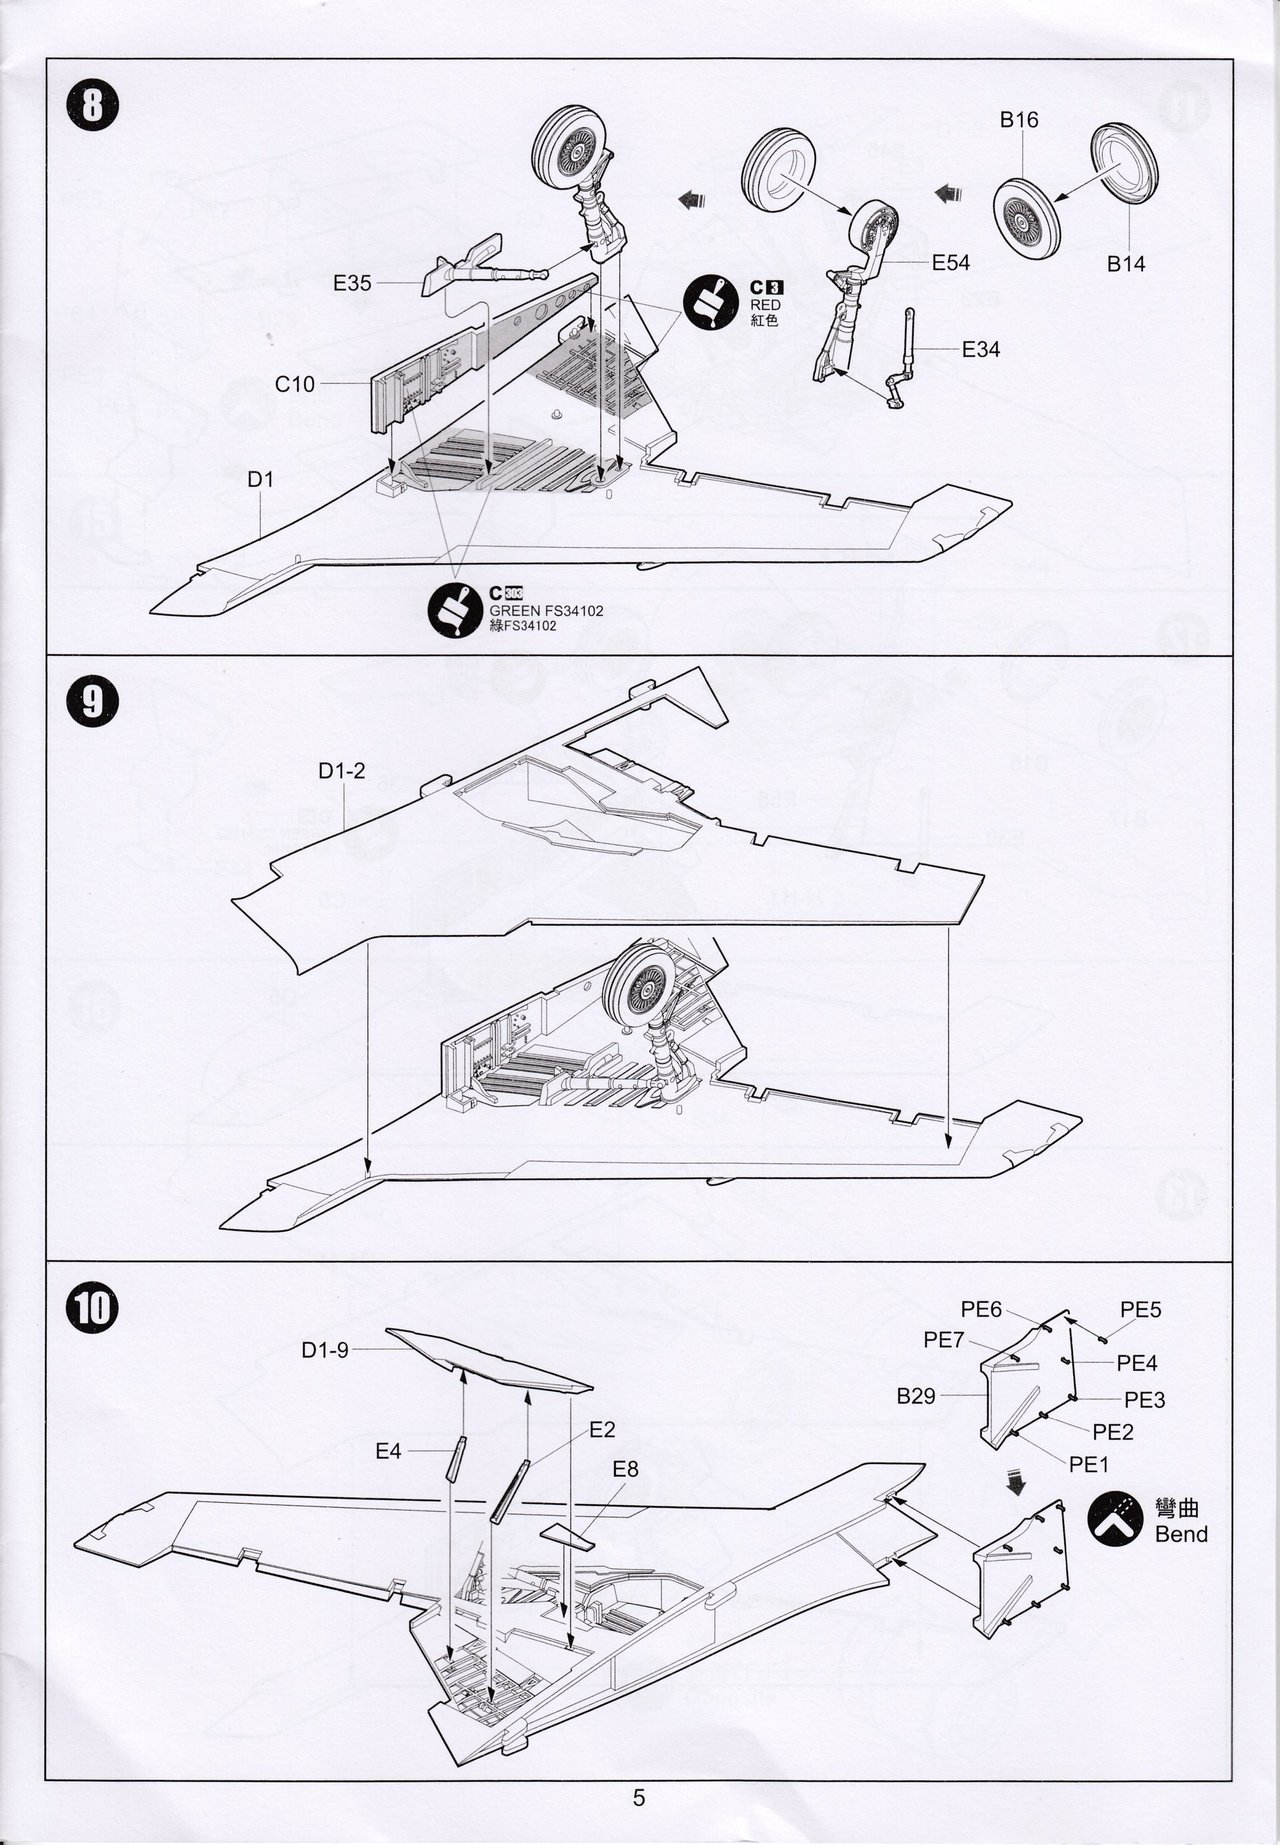
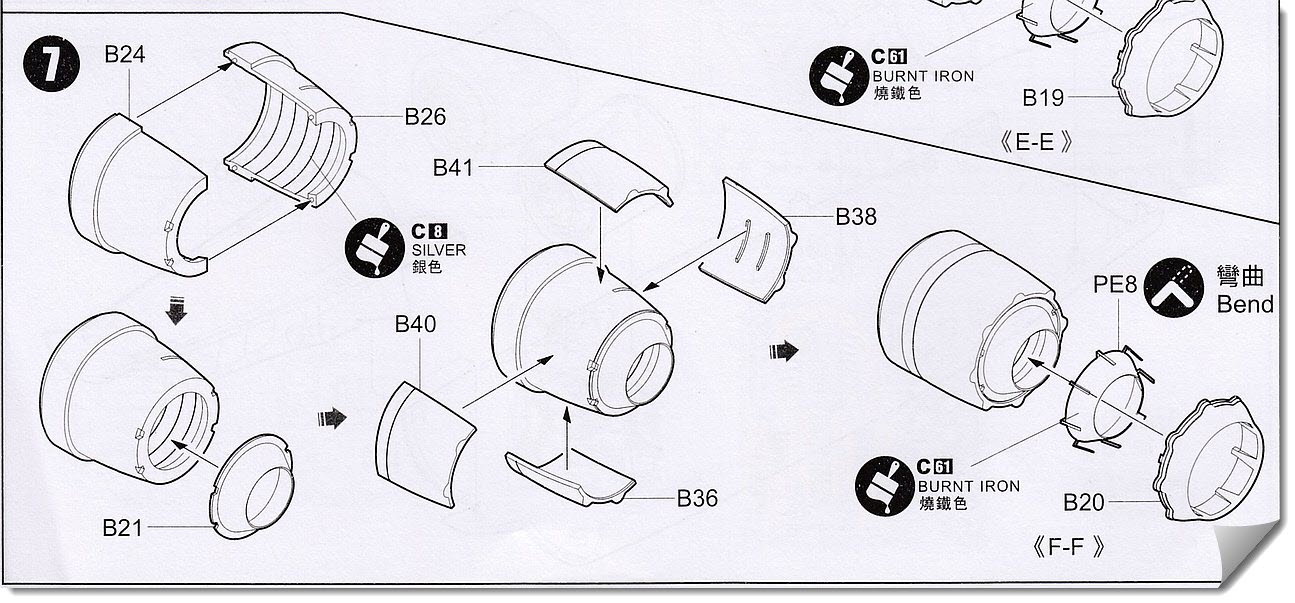
| The purpose built RF-101C and the converted RF-101G/H aircraft were all fitted with the Pratt & Whitney J57-P-13 engines. Kittyhawk (KH) provided the exhausts for this engine in the initial F-101A/C kits and it is included in this kit unchanged. To my knowledge no after market replacements for the nozzles have been manufactured so you have to make the best of the kit offerings. Photo Etch is provide by KH to represent the petals and actuators in the very rear of the nozzle. This takes a bit of careful bending to get it sit properly so take your time. | |||||||||||||||||||||||||||||||||||||||||||||||||||||||||
 |
|||||||||||||||||||||||||||||||||||||||||||||||||||||||||
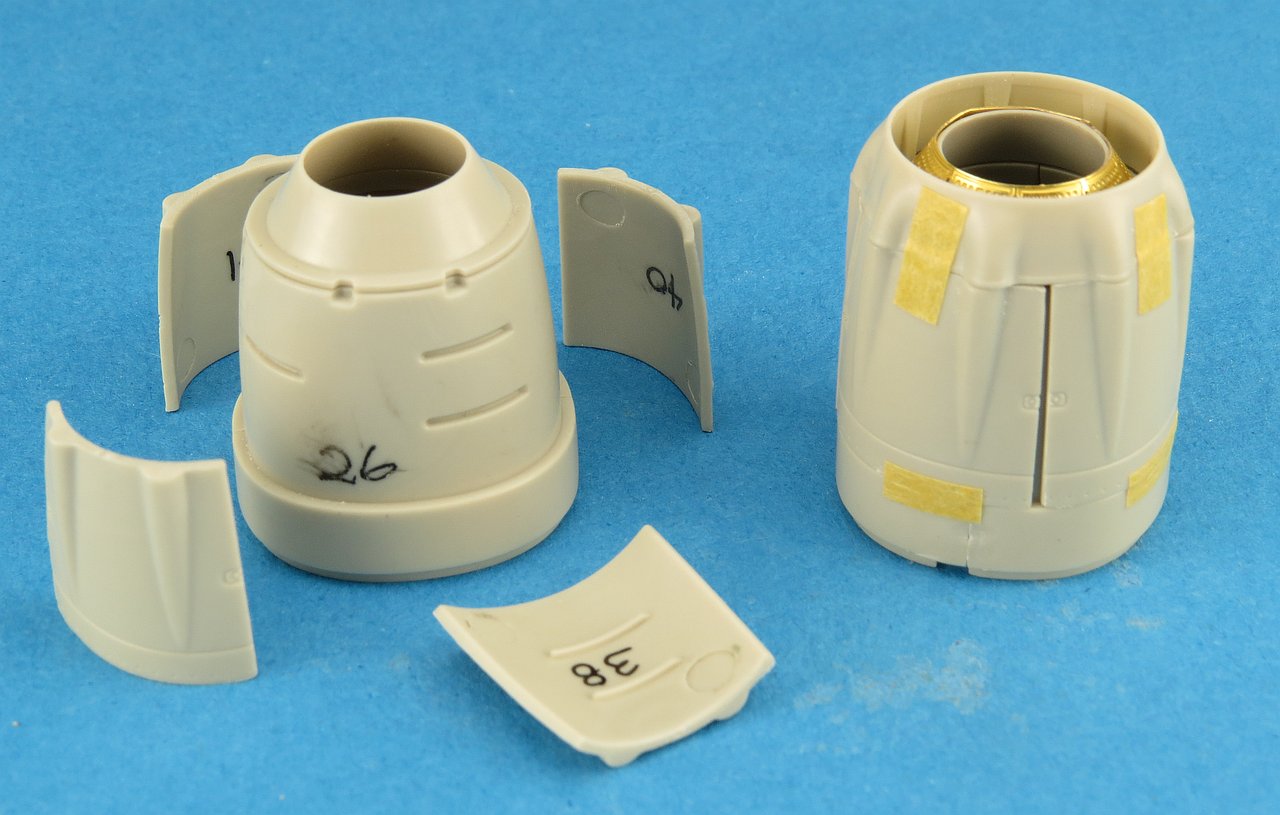
| Pay close attention to the assembly sequence of the outer parts of each engine as they are not interchangeable. I made that mistake with the first engine (assuming I could apply the outer parts in any order) and so before I cut out the second engine I used a pen to mark each part with its corresponding number. | |||||||||||||||||||||||||||||||||||||||||||||||||||||||||
 |
|||||||||||||||||||||||||||||||||||||||||||||||||||||||||
| The fit of the engine parts is pretty good. Once I apply glue I will eliminate any small gaps that result from dry fitting using only tape. A quick test fit to the fuselage ended in a gap free join which is encouraging. | |||||||||||||||||||||||||||||||||||||||||||||||||||||||||
 |
|||||||||||||||||||||||||||||||||||||||||||||||||||||||||
| The general shape and size of the KH nozzles seem to be OK when compared to the real aircraft. | |||||||||||||||||||||||||||||||||||||||||||||||||||||||||
 |
 |
||||||||||||||||||||||||||||||||||||||||||||||||||||||||
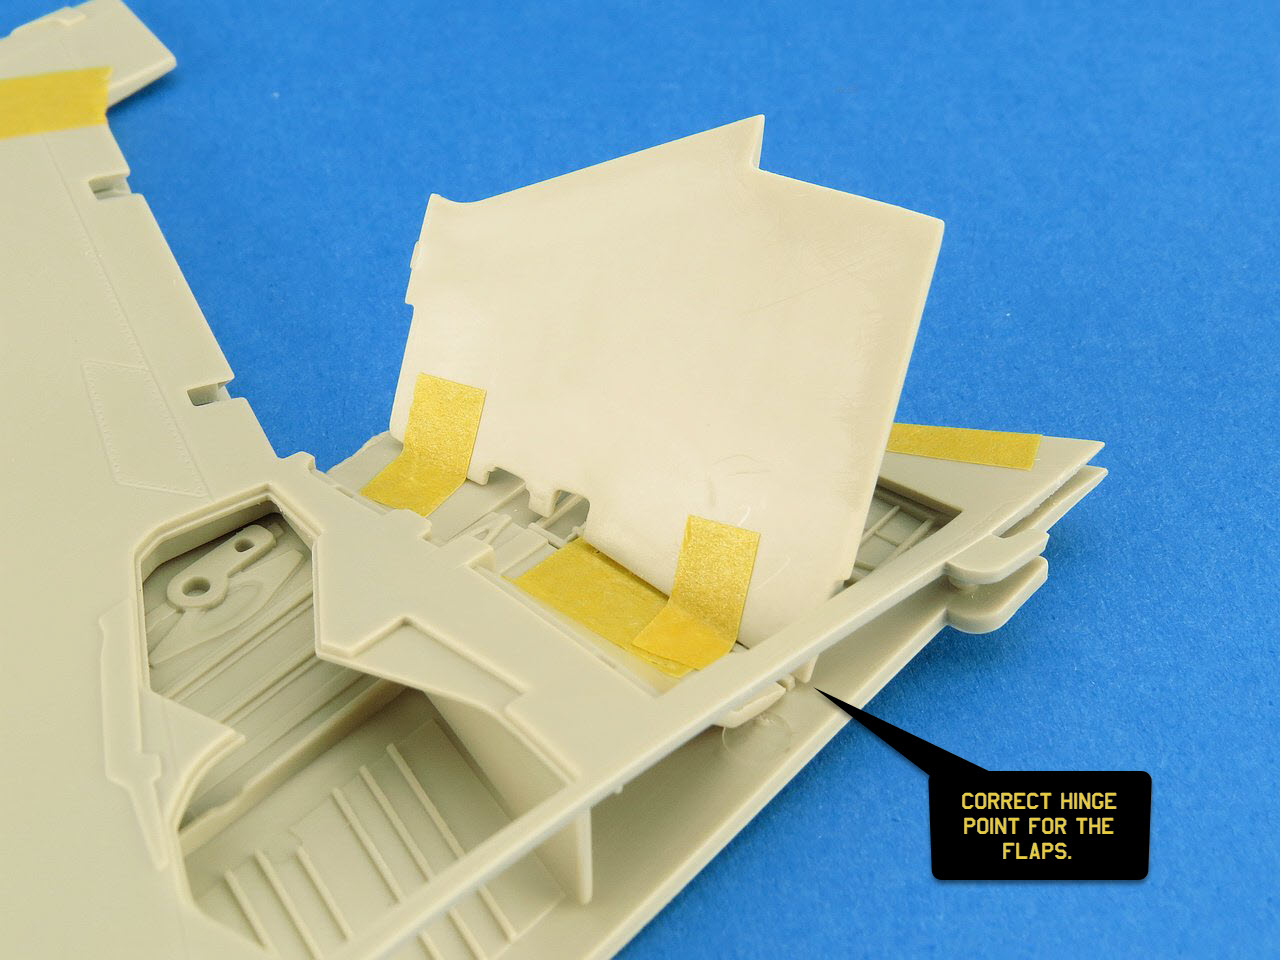
| A simple mistake that KH made (on all three Voodoo kits) was the position of the flaps in the open (extended) position. The fix is super simple once you realize what the problem is. | |||||||||||||||||||||||||||||||||||||||||||||||||||||||||
 |
|||||||||||||||||||||||||||||||||||||||||||||||||||||||||
| Kittyhawk have assumed that the flaps simply swing down when deployed from a fixed hinge. They would have you attach them to the model in this fashion. Turns out that this is incorrect. | |||||||||||||||||||||||||||||||||||||||||||||||||||||||||
 |
|||||||||||||||||||||||||||||||||||||||||||||||||||||||||
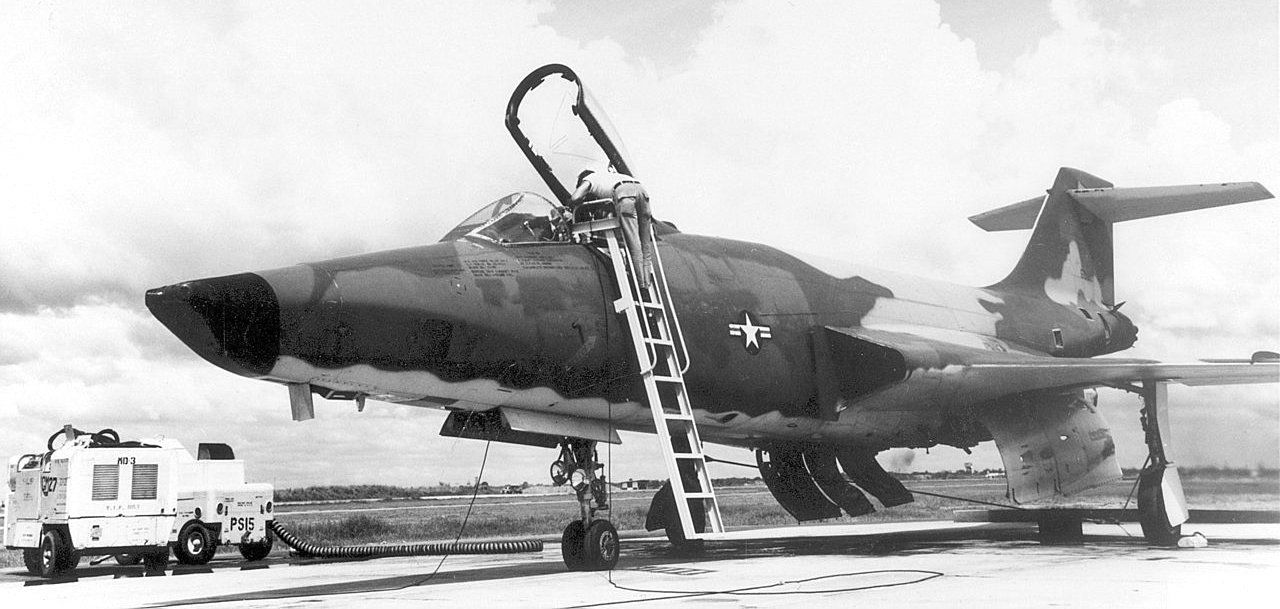
| Take a close look at both these photos of Voodoo with flaps extended. You can clearly see a gap between the front edge of the flap and the wing surface. This is because when extended the flap leading edge is hydraulically pushed backwards and this causes the flap to pivot down and out. | |||||||||||||||||||||||||||||||||||||||||||||||||||||||||
 |
 |
||||||||||||||||||||||||||||||||||||||||||||||||||||||||
| To show the flaps in the correct extended position all you need to do is attach them as shown below. This will mean you need to modify parts E1 and E3 to better fit the new (sharper) angle. If you are keen you can also use some plastic rod to reproduce the actuator ram at the front of the flap. | |||||||||||||||||||||||||||||||||||||||||||||||||||||||||
 |
|||||||||||||||||||||||||||||||||||||||||||||||||||||||||
| Another useful photo of the deployed flaps in which you can see just how close the forward edge of the flap sits to the support struts when deployed. | |||||||||||||||||||||||||||||||||||||||||||||||||||||||||
 |
|||||||||||||||||||||||||||||||||||||||||||||||||||||||||
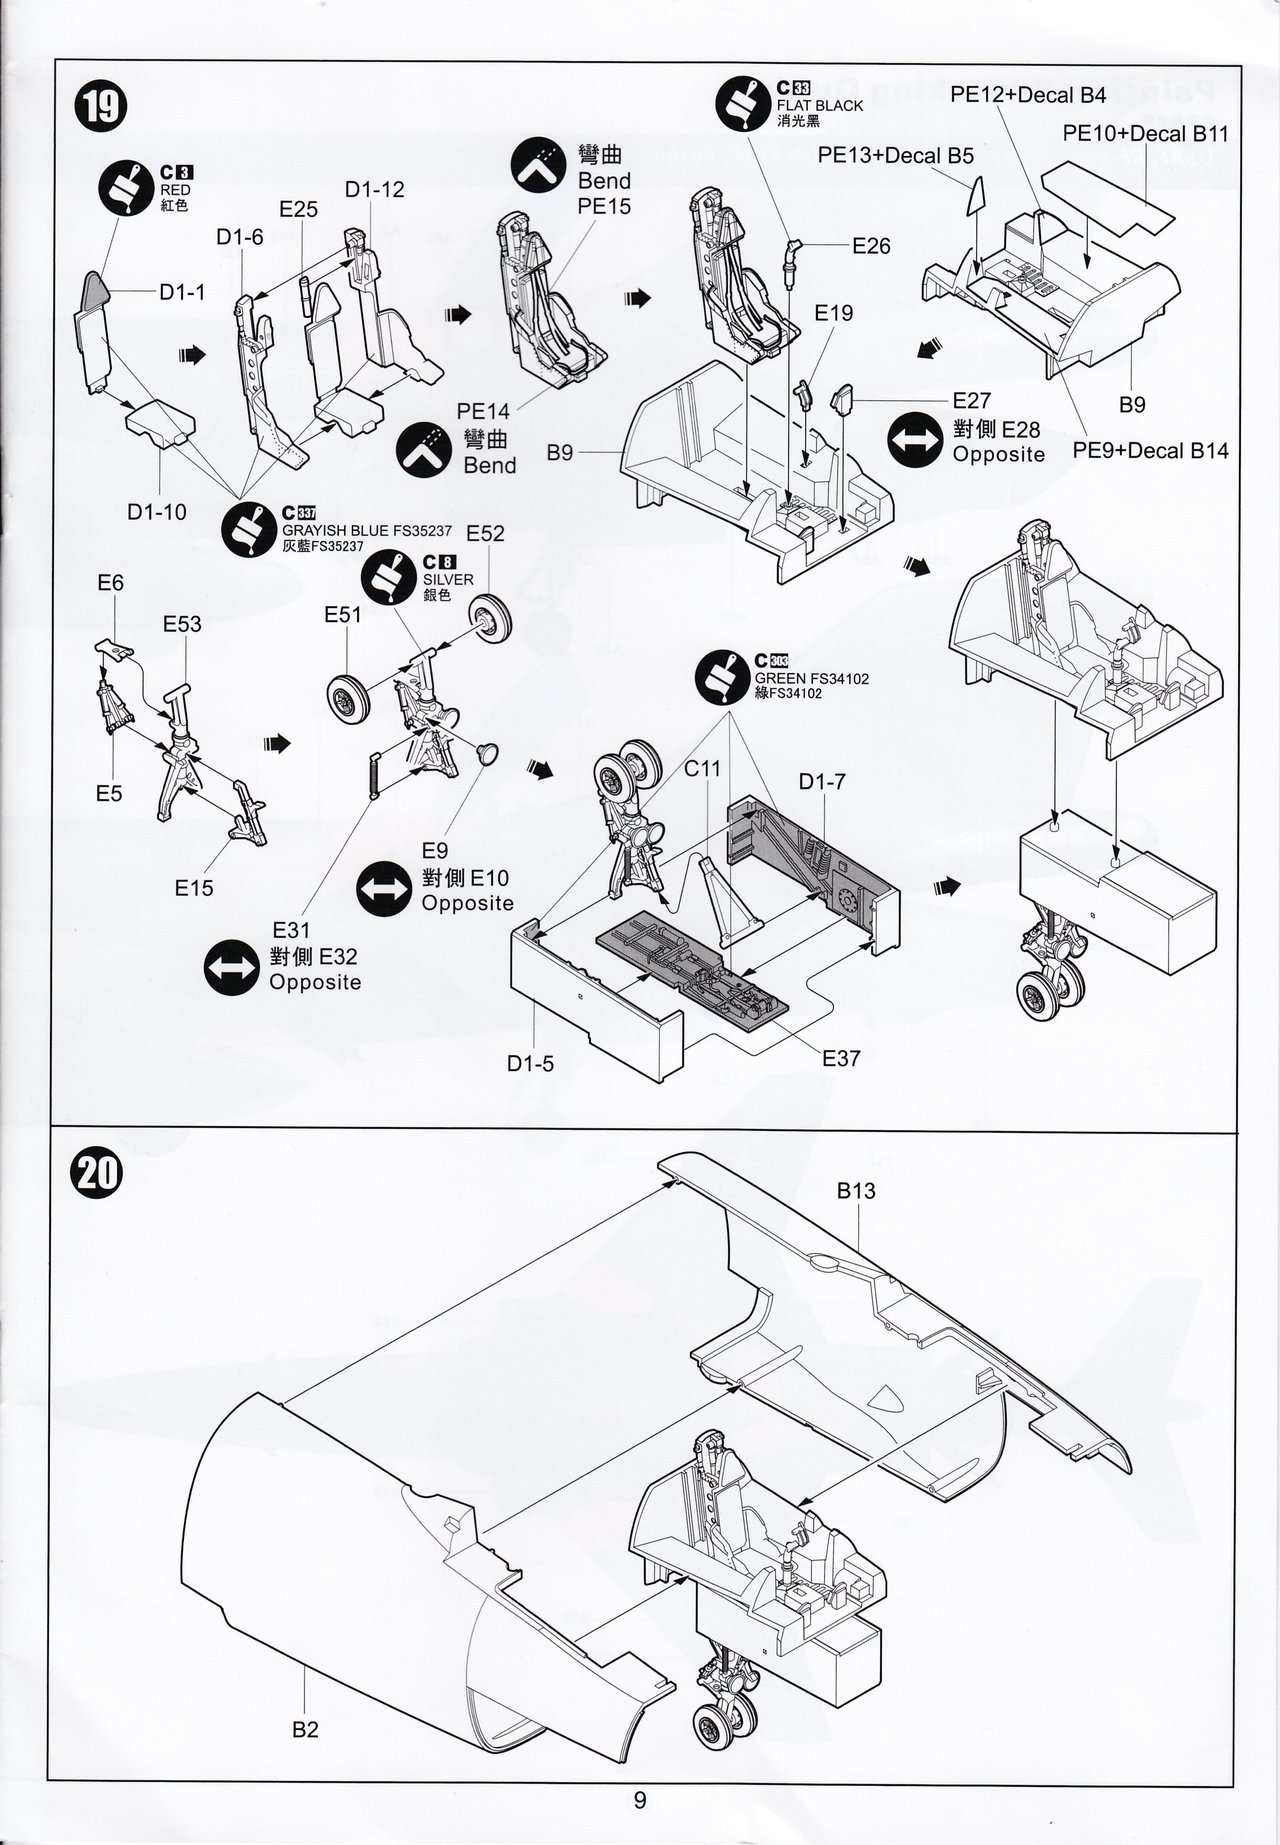
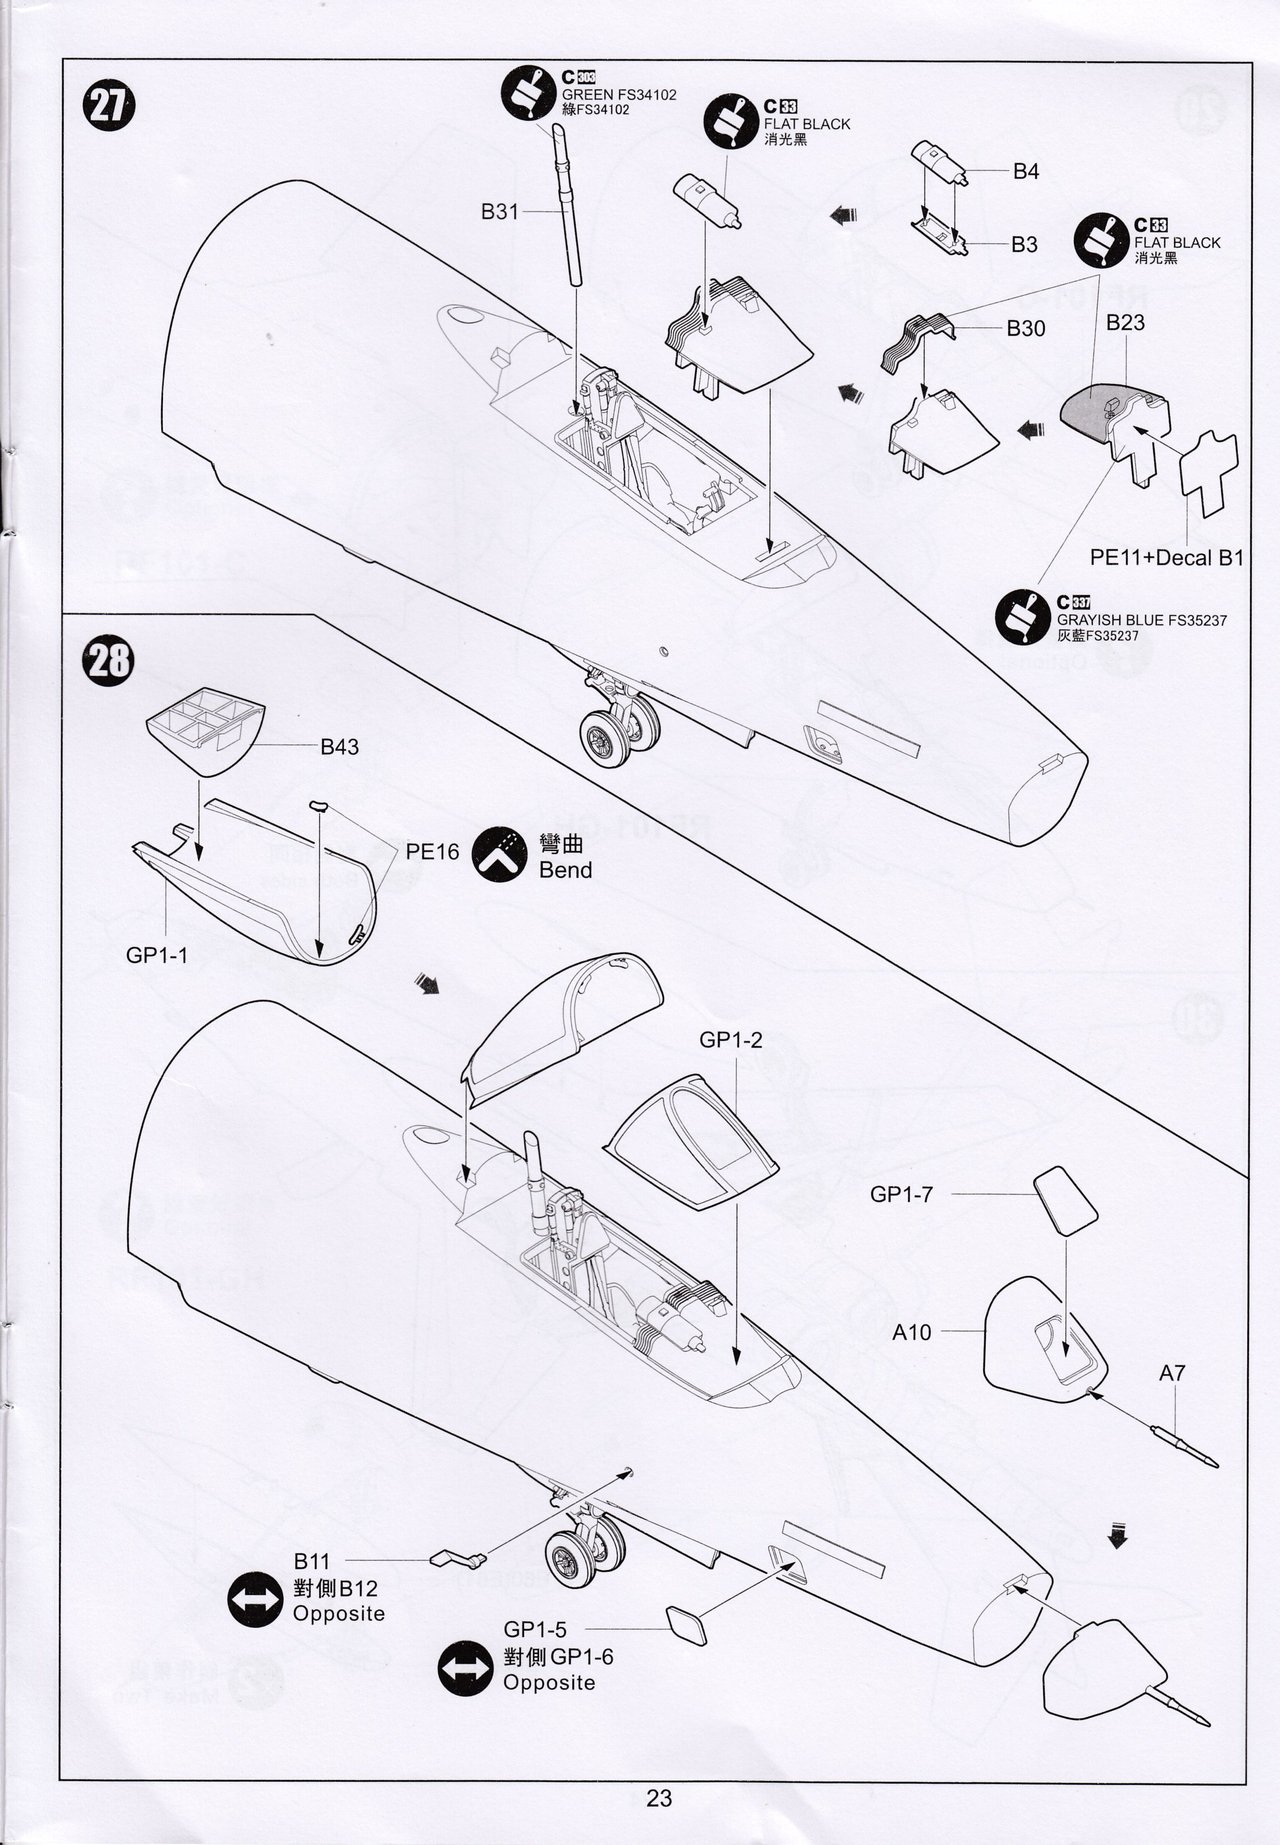
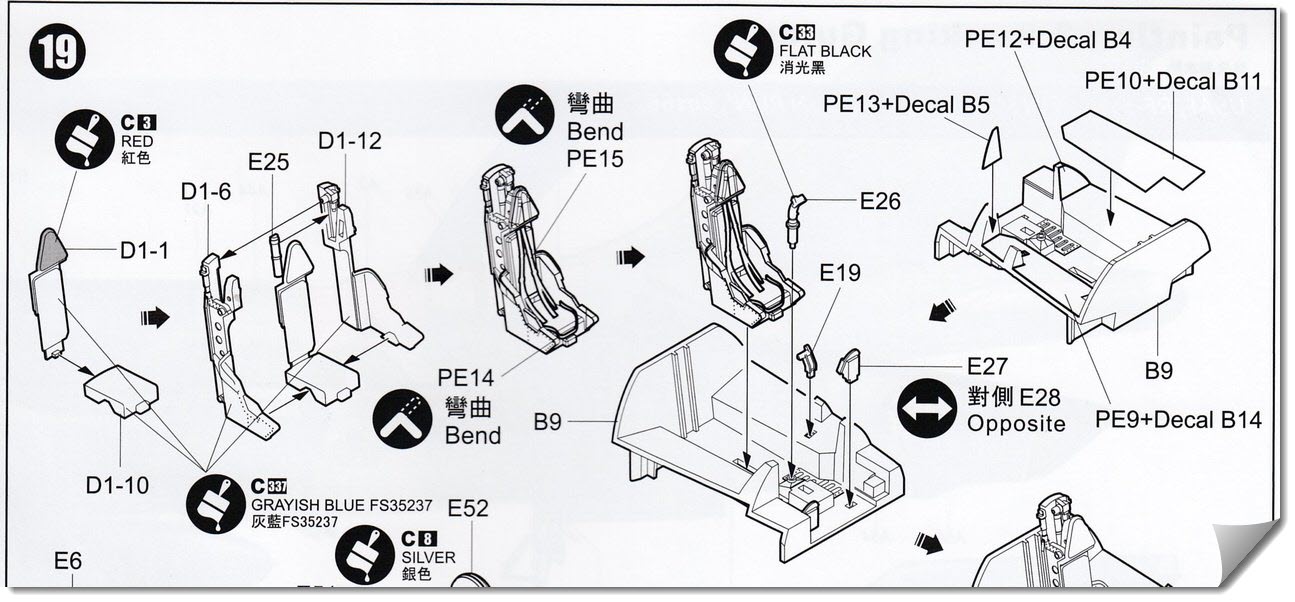
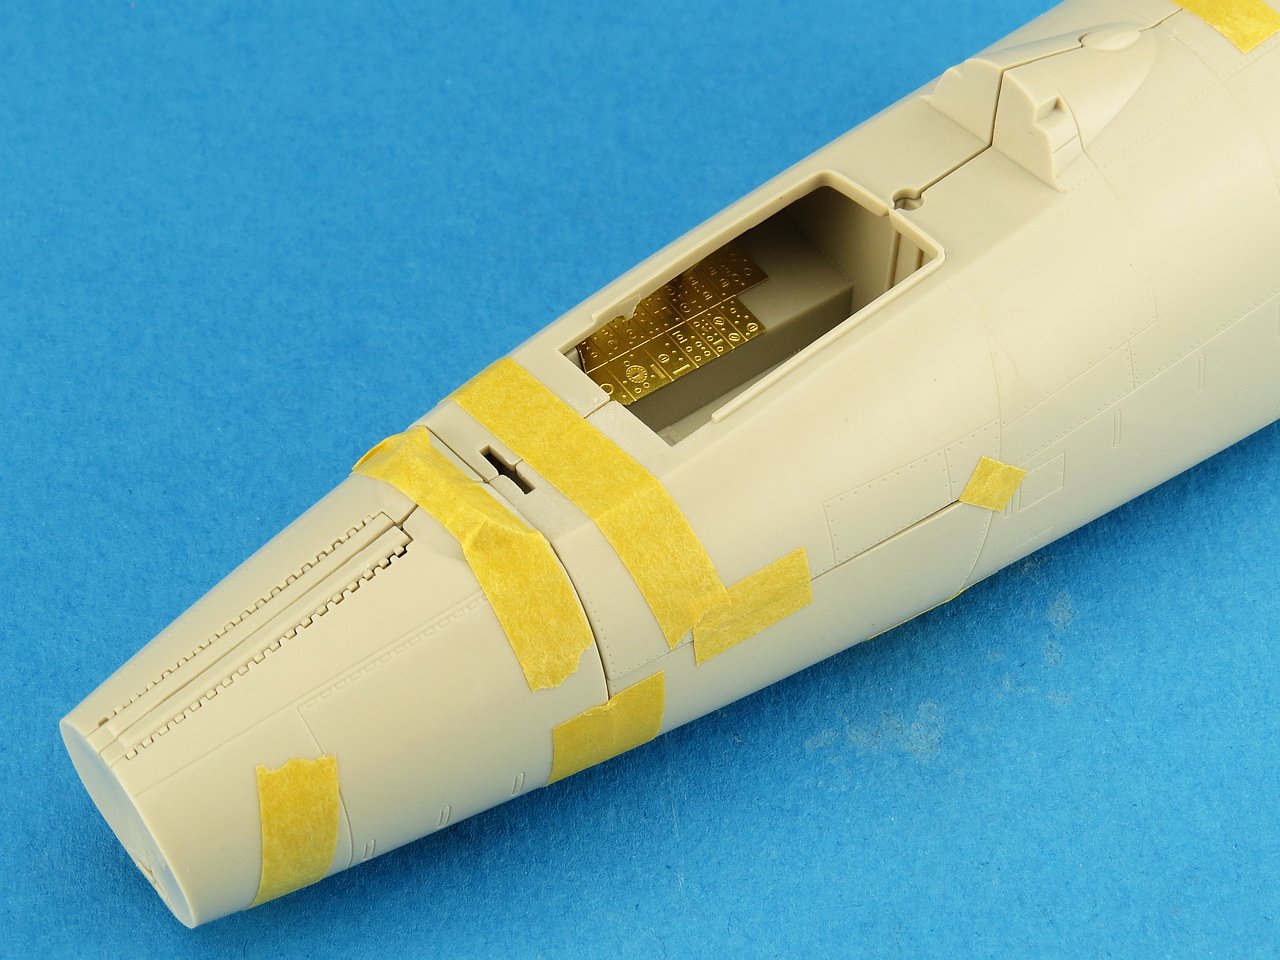
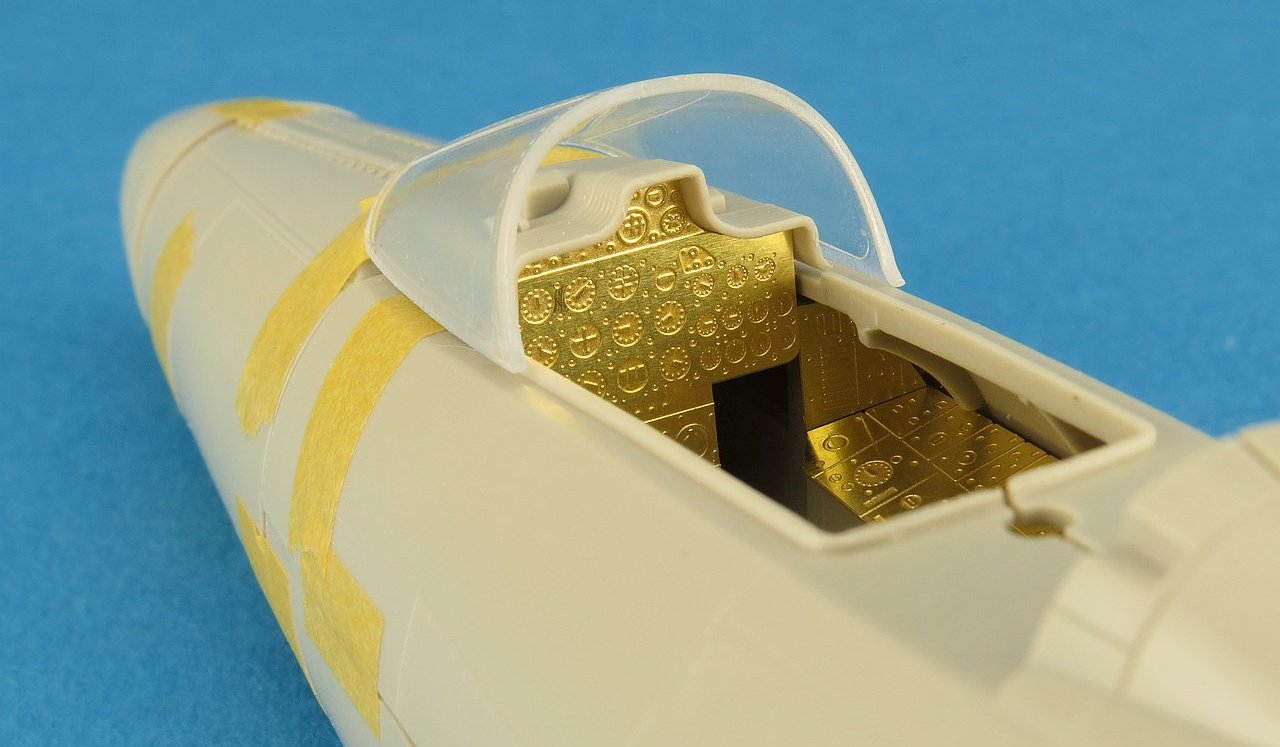
| Disappointingly, KH have made no effort what so ever to update the cockpit in the RF kit to correctly represent the differences in reconn versions. All they really had to do was include a new shroud and instrument panel. Instead they have just given us the exact same parts from the F-101A/C fighter kit. | |||||||||||||||||||||||||||||||||||||||||||||||||||||||||
 |
|||||||||||||||||||||||||||||||||||||||||||||||||||||||||
| Photo etch parts are provided to give some level of detail to the side consoles (and instrument panel). Decals are then provided to place over the PE parts. As I've said before this is far from good enough in a 2018 kit release. I'm confident that this is as a result of the original design and tooling for this Voodoo family being done back in 2014 (when the first kit was released). I myself will be parking this kit waiting for Aires to release a replacement resin cockpit, much like they did for the F-101A/C kit. | |||||||||||||||||||||||||||||||||||||||||||||||||||||||||
 |
 |
||||||||||||||||||||||||||||||||||||||||||||||||||||||||
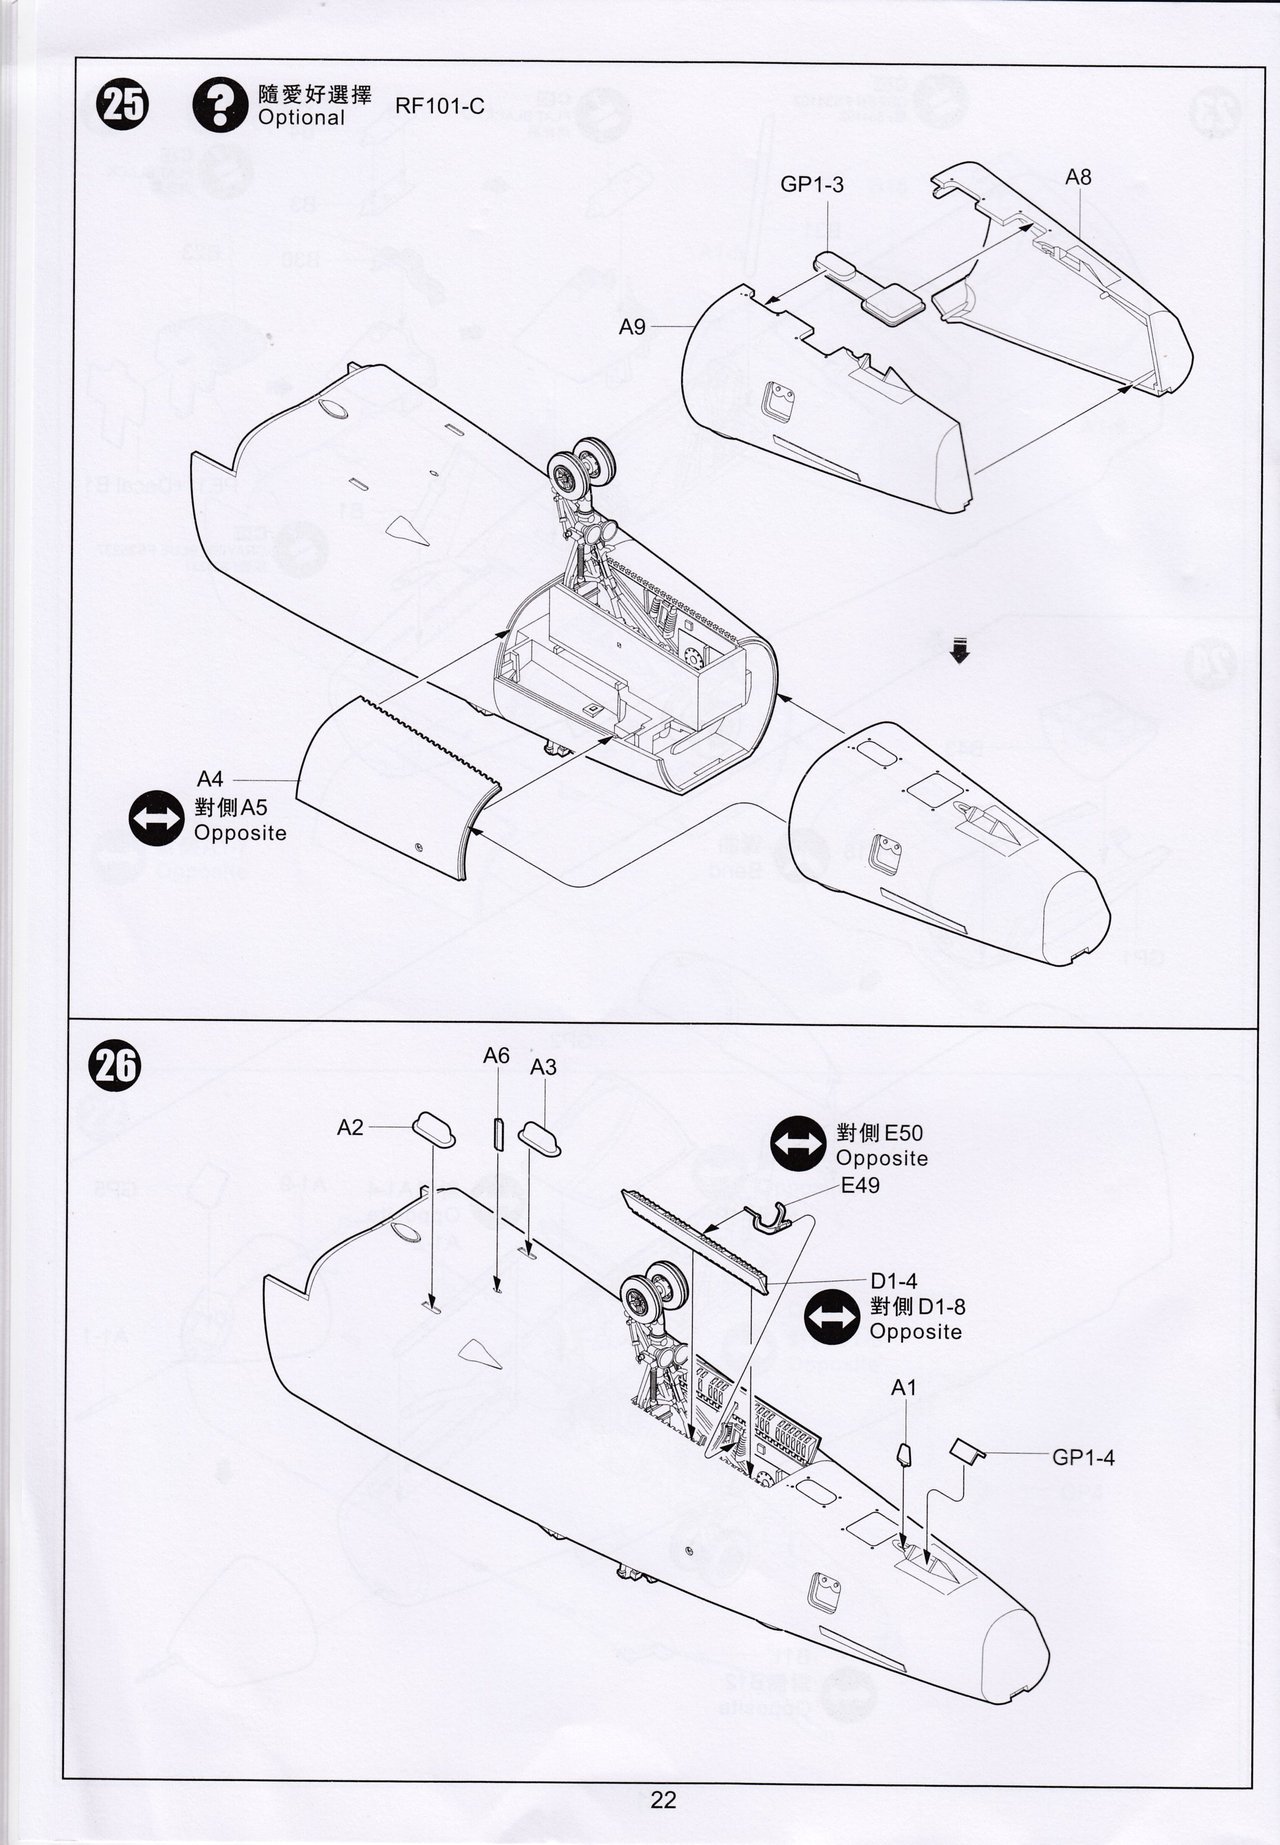
| Once you have assembled the cockpit (single piece tub) and the nose wheel well, these fit together and then slot into the front fuselage halves. No fit issues here. | |||||||||||||||||||||||||||||||||||||||||||||||||||||||||
 |
|||||||||||||||||||||||||||||||||||||||||||||||||||||||||
| The front fuselage clicks together nicely with no gaps or mis-alignment problems. The nose landing gear can be safely left off during assembly and attached at the end. | |||||||||||||||||||||||||||||||||||||||||||||||||||||||||
 |
 |
||||||||||||||||||||||||||||||||||||||||||||||||||||||||
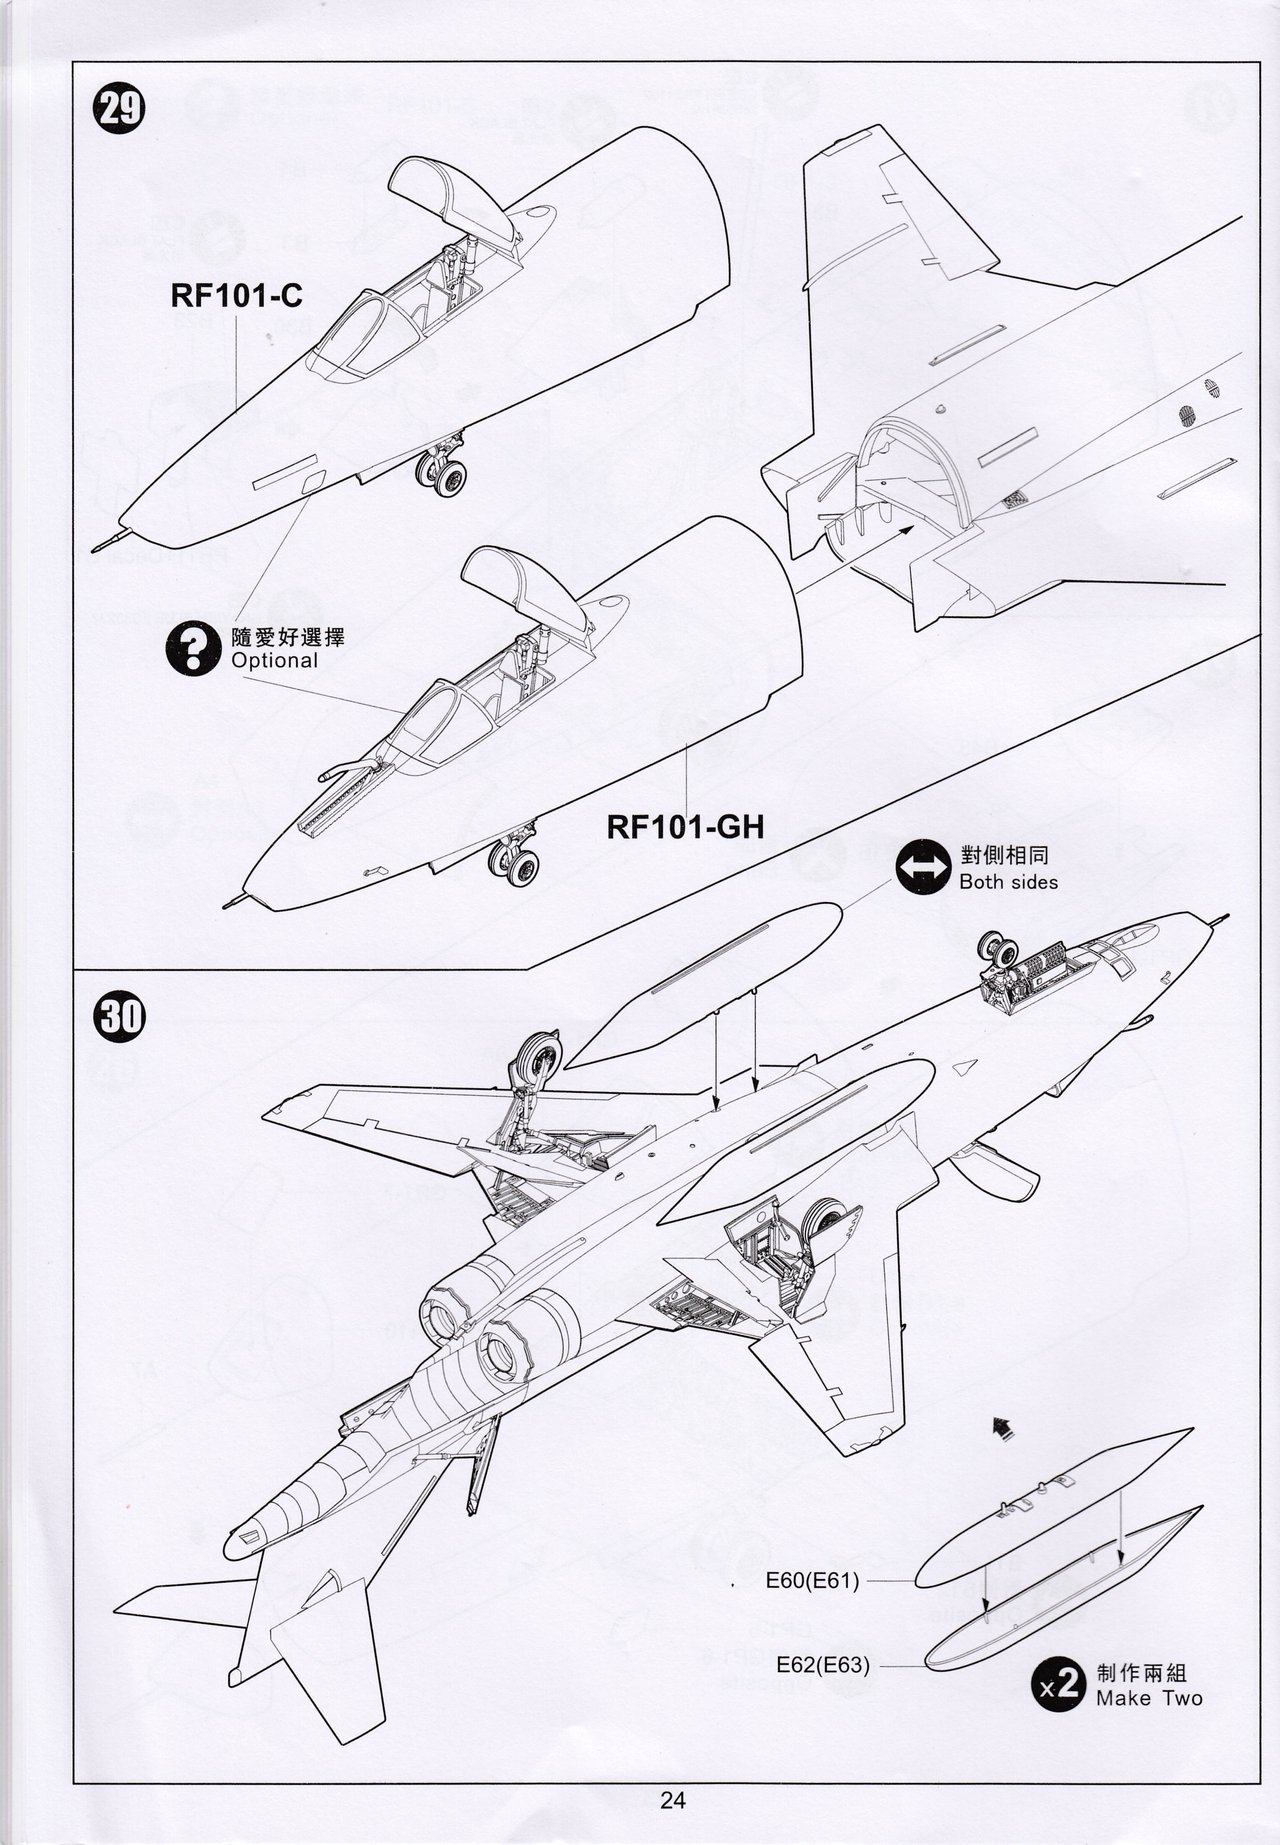
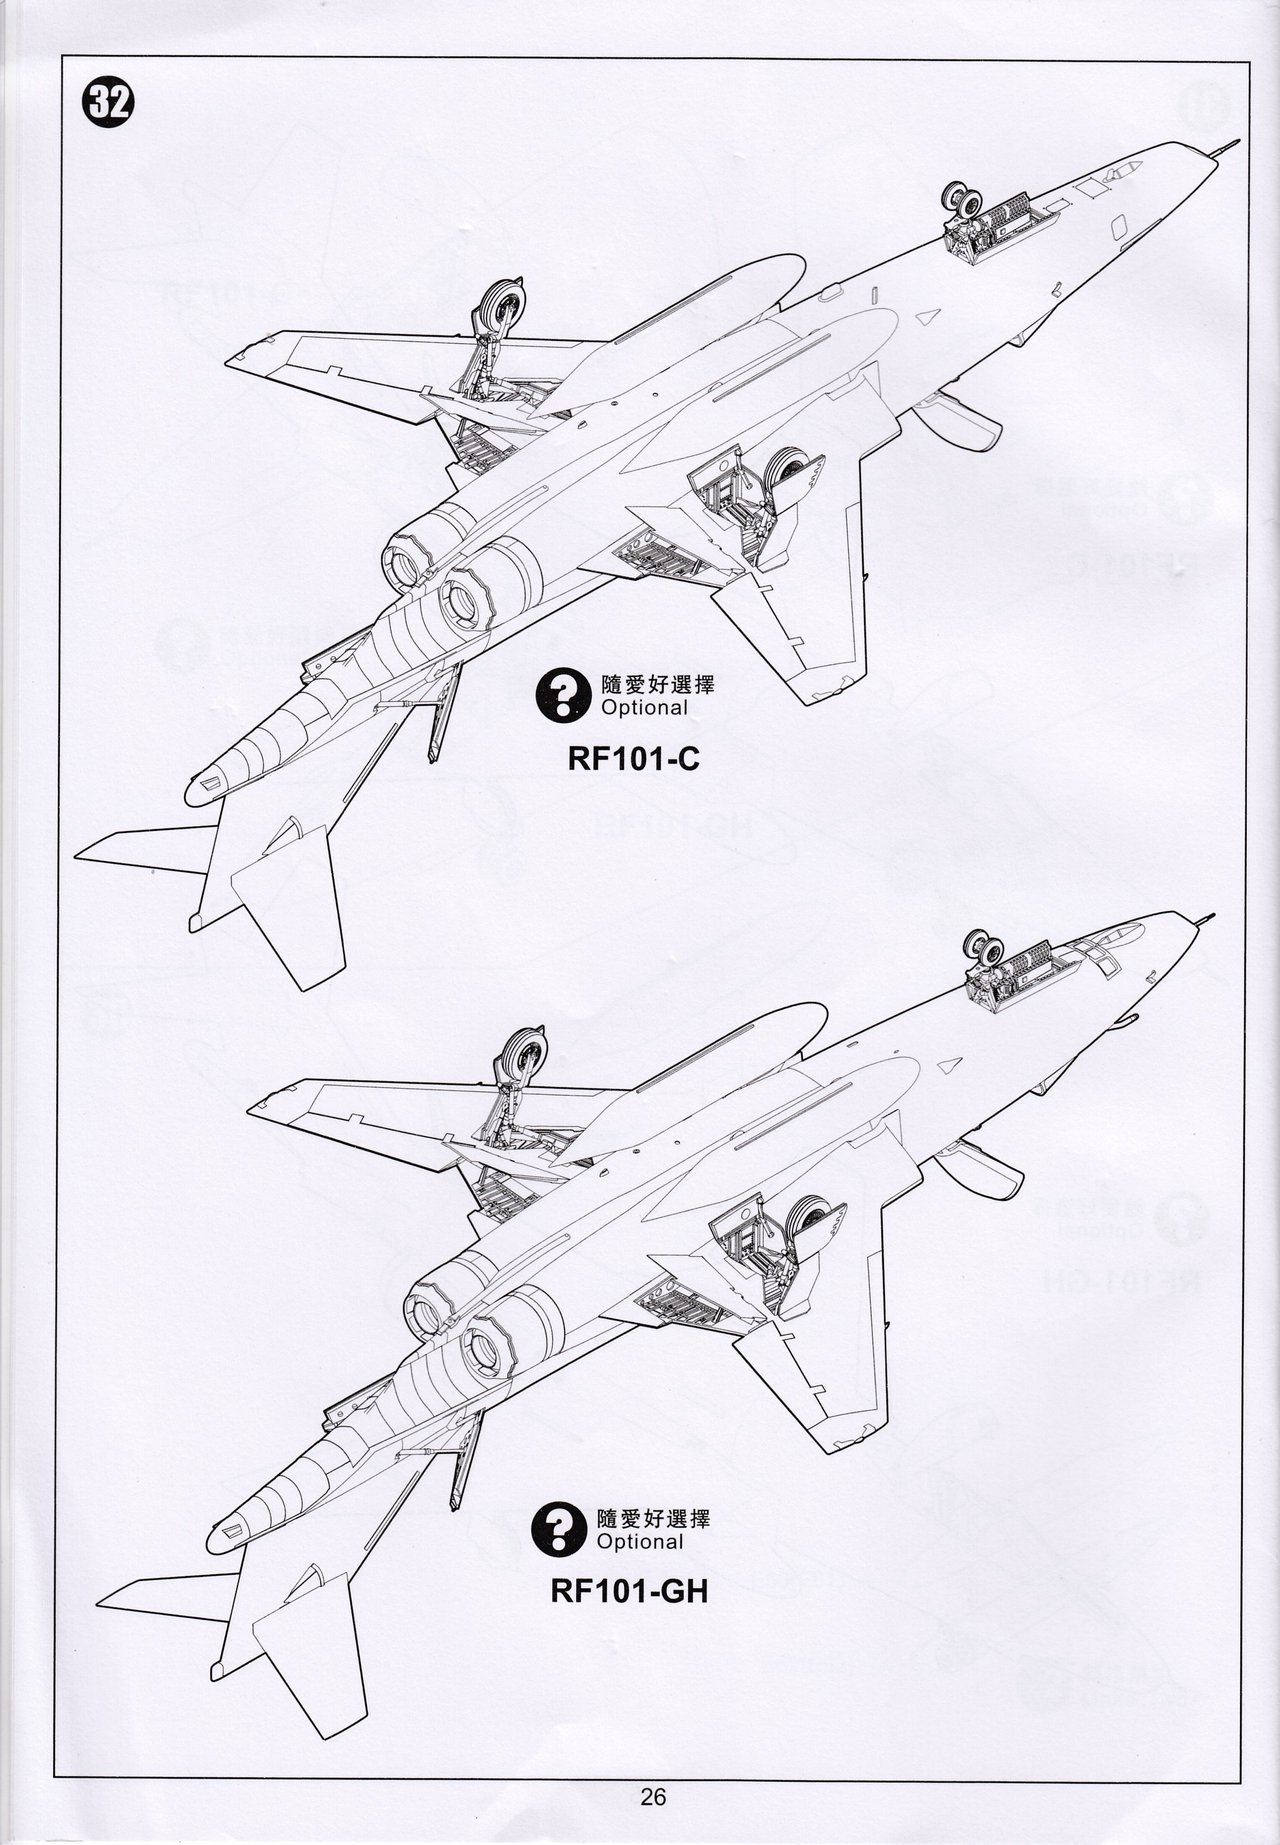
| Now is the time to decide which variant you wish to build. First lets look at the RF-101G/H option, remembering that these versions were converted F-101A's and F-101C's fighters. | |||||||||||||||||||||||||||||||||||||||||||||||||||||||||
 |
|||||||||||||||||||||||||||||||||||||||||||||||||||||||||
| Not sure if this was only a glitch on my kit but as you can see both halves of the nose were molded with holes and no pins. It was an easy fix with some 35thou rod glued into the port half to give me the alignment pins. | |||||||||||||||||||||||||||||||||||||||||||||||||||||||||
 |
 |
||||||||||||||||||||||||||||||||||||||||||||||||||||||||
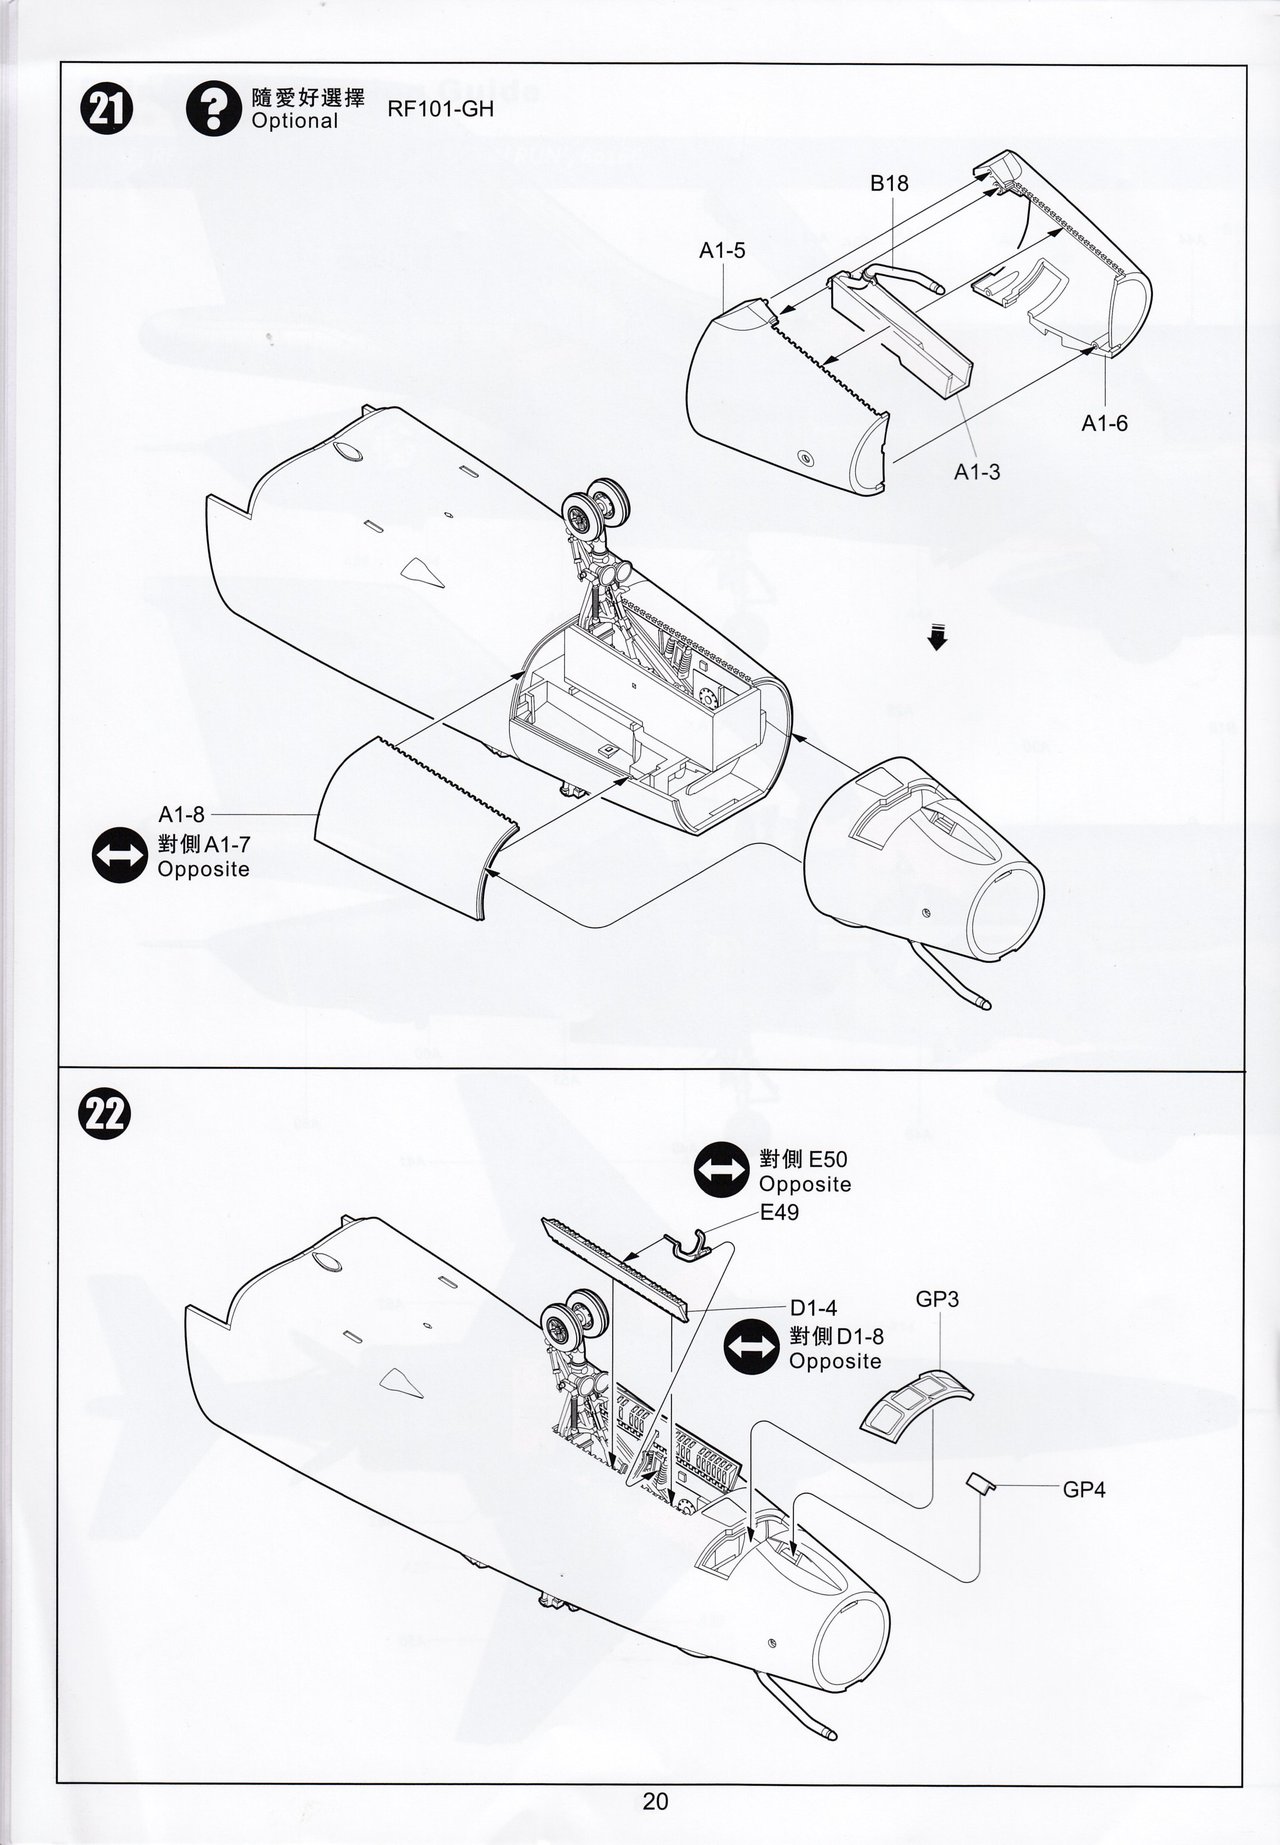
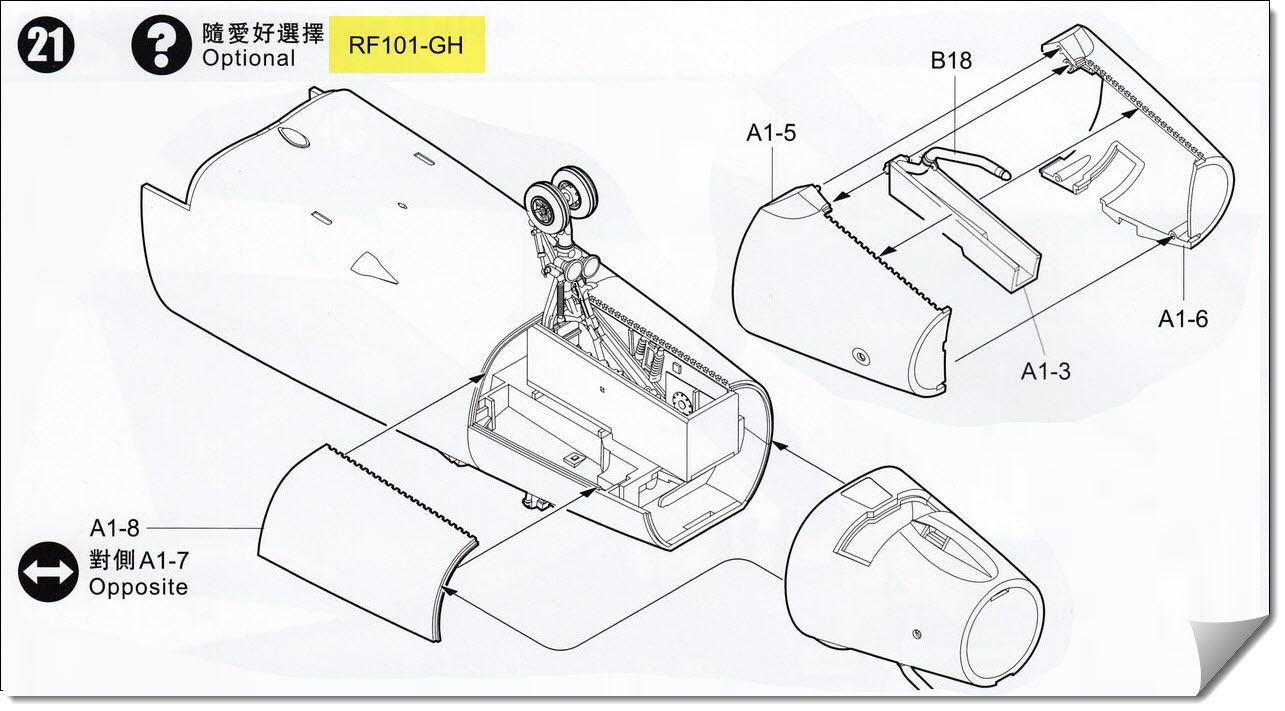
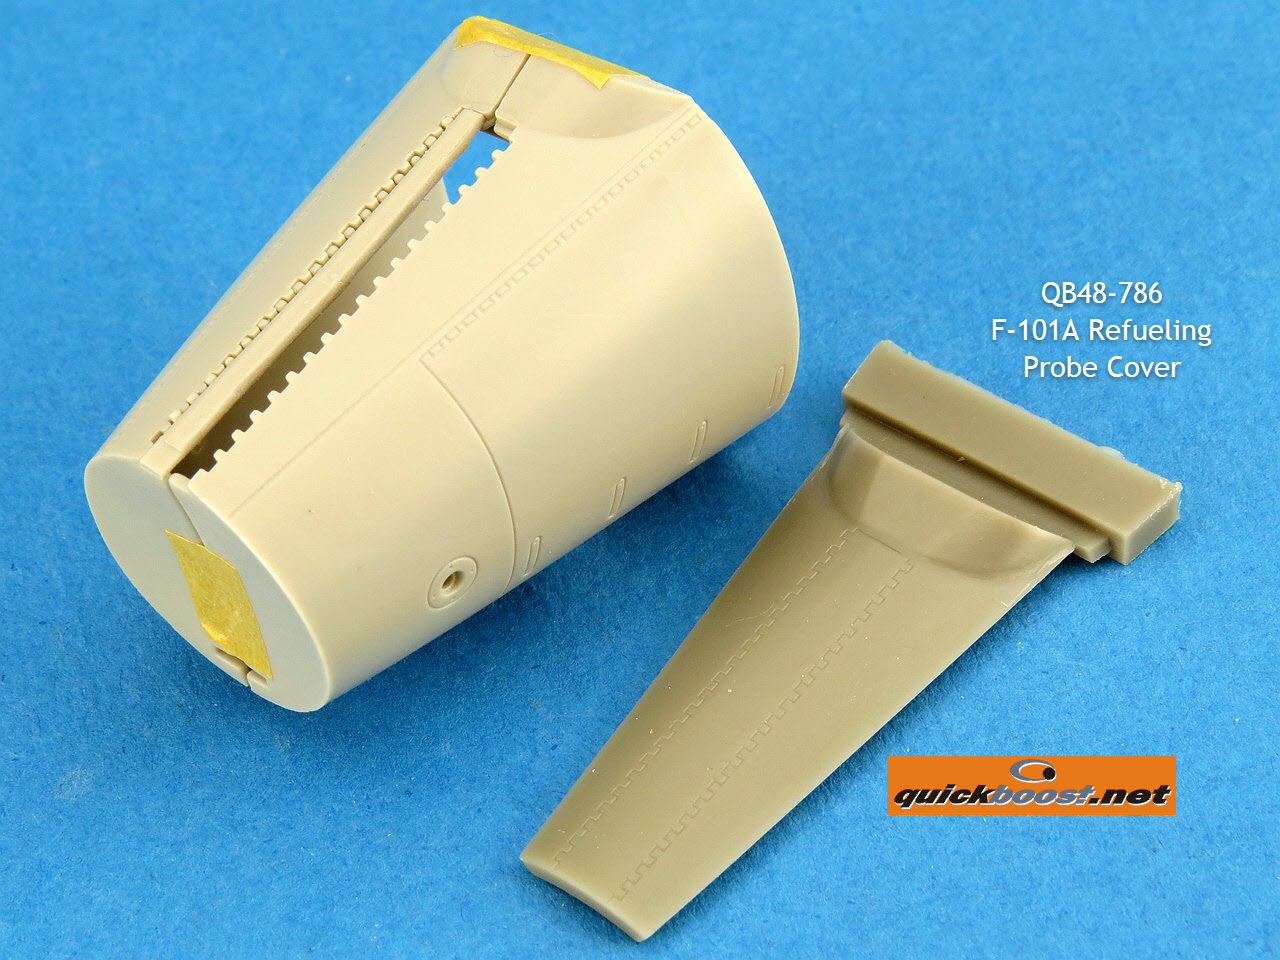
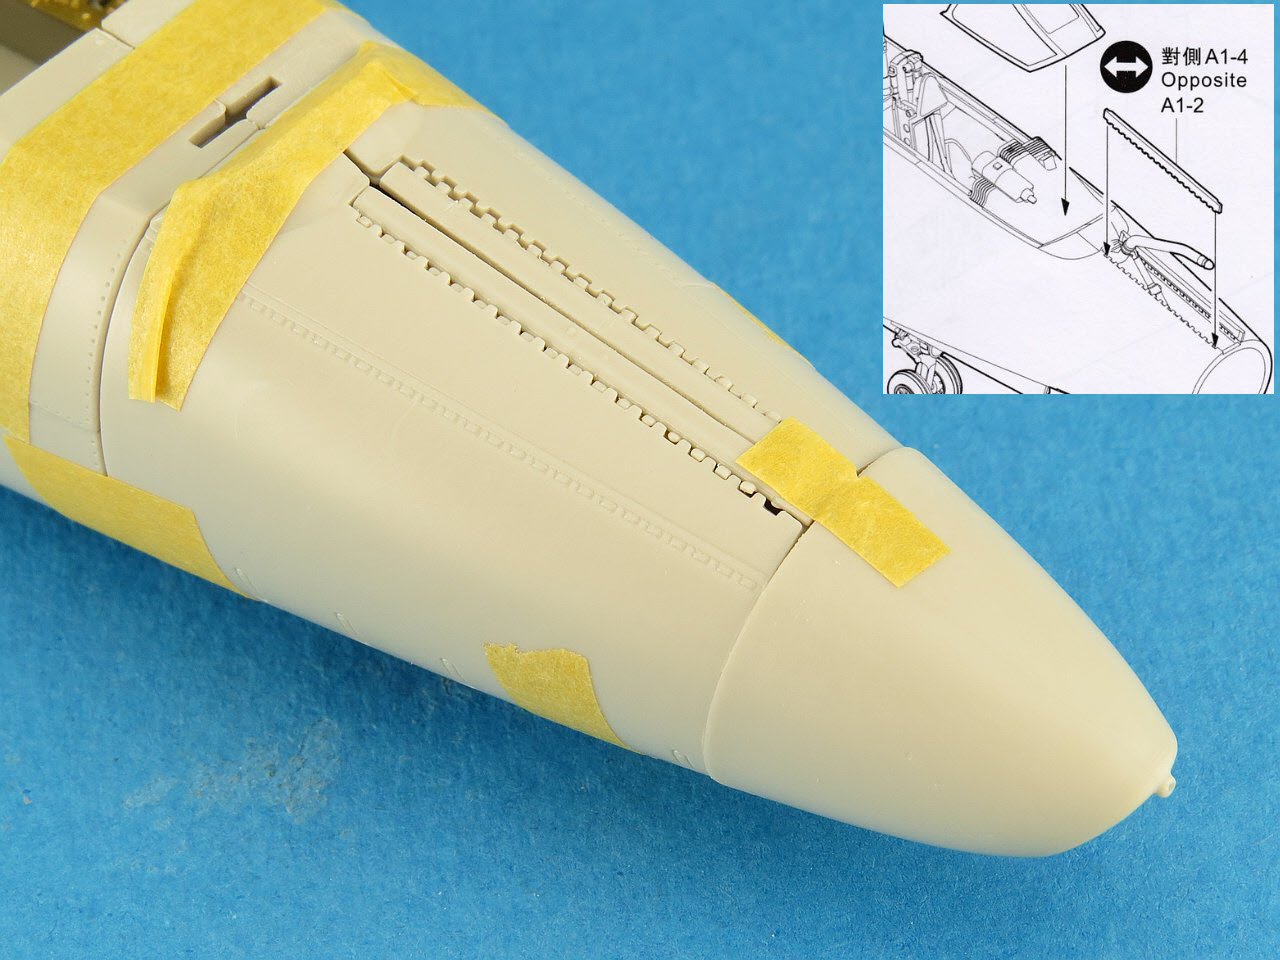
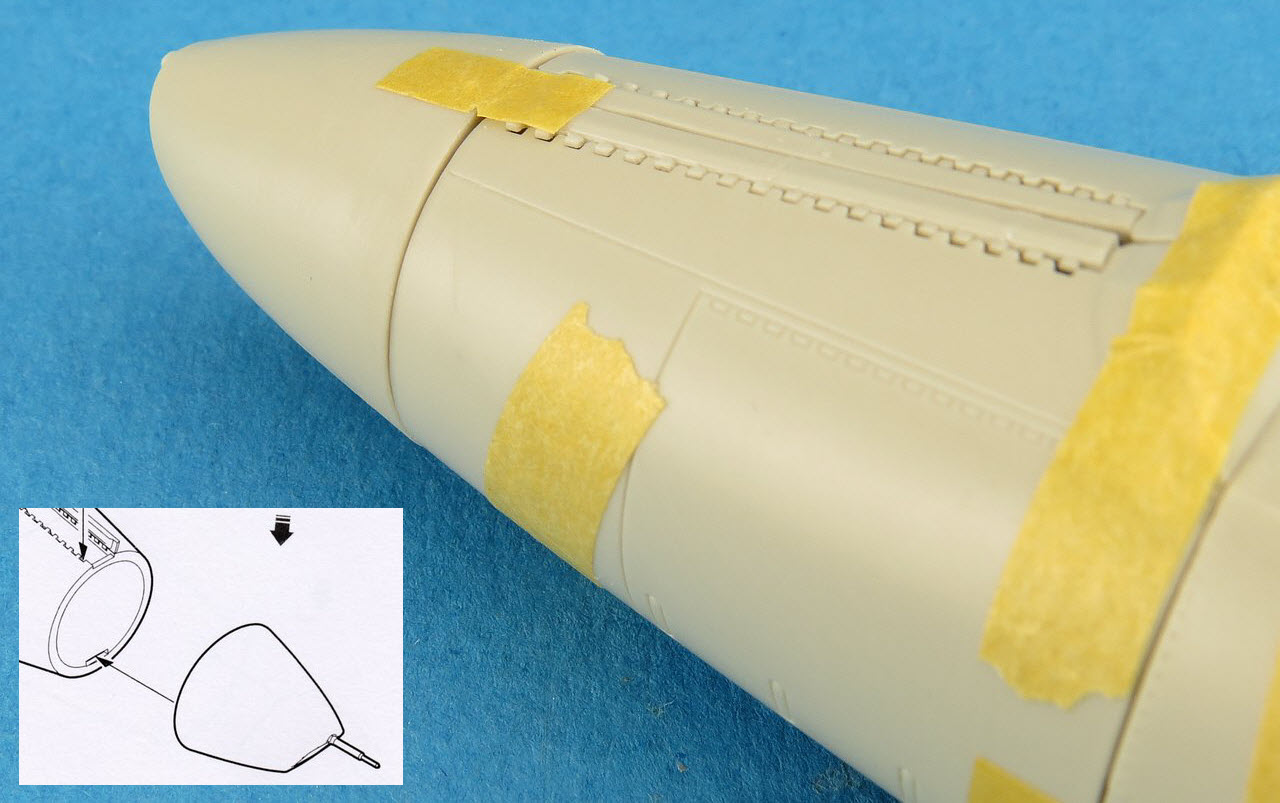
| All variants of the Voodoo were fitted with a retractable refueling probe in the nose (the exception to this was the IRST capable F-101B aircraft). Unfortunately Kittyhawk decided to provide the refueling probe doors as separate parts. The fit here is pretty bad and Quickboost previously released a single piece resin replacement for the earlier F-101A/C kit. This QB part can be used with the RF-101G/H parts as shown here. It will require you to carefully cut the kit along the panel lines but will end in a much better result than trying to deal with the kit doors. Of course another way around the poor fit of the kit doors when closed is to shown them open with the probe extended. | |||||||||||||||||||||||||||||||||||||||||||||||||||||||||
 |
|||||||||||||||||||||||||||||||||||||||||||||||||||||||||
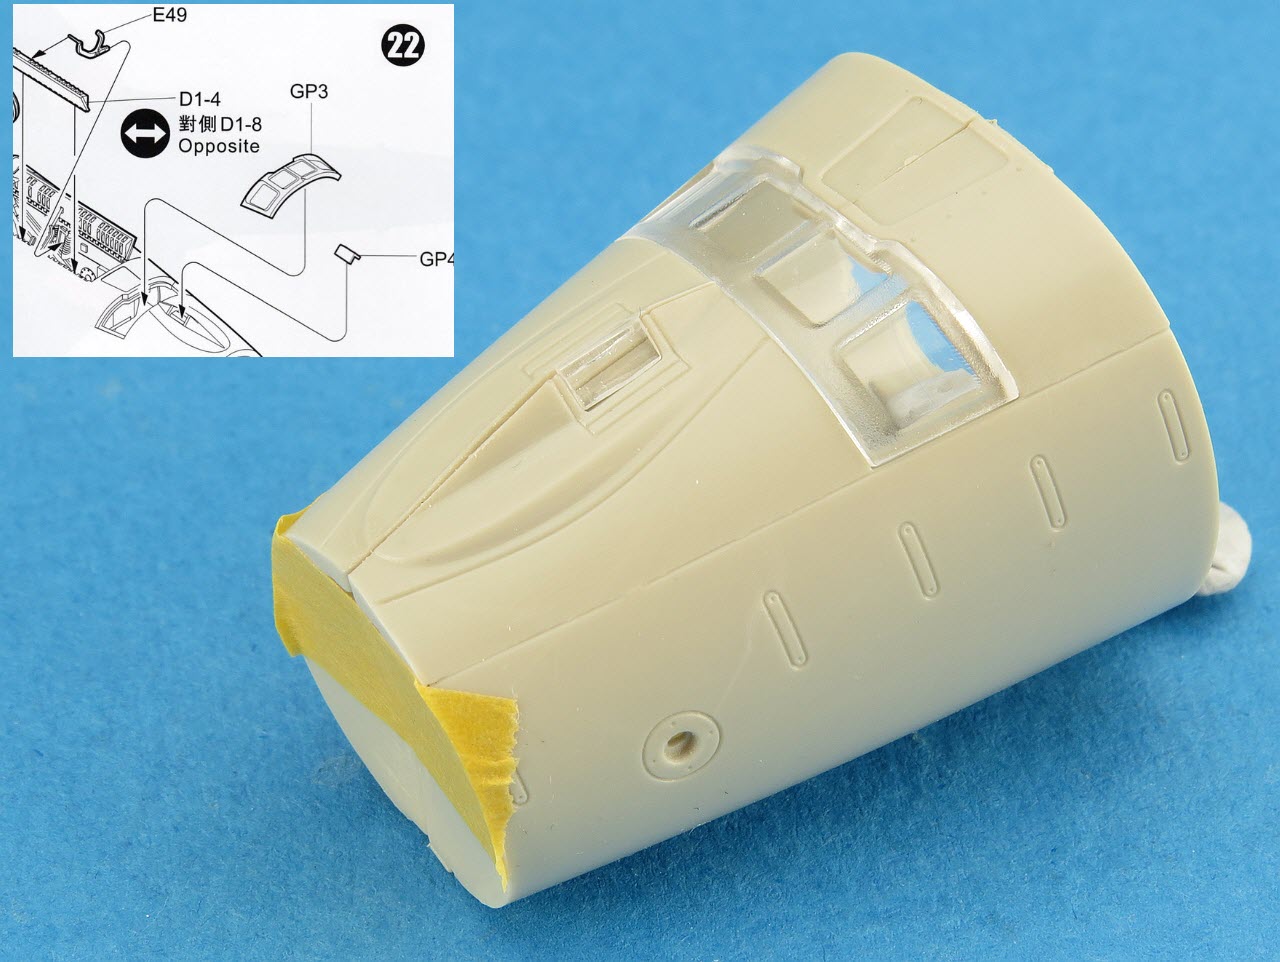
| Being a reconnaissance aircraft you would expect that these Voodoos had multiple camera ports. The upgraded G/H aircraft had a strip of such camera windows installed in the bottom of the nose just forward of the nose wheel well. Kittyhawk provide these as a single piece with the frames molded in. The fit of the clear part to the nose is actually very good as can be seen here the surface of the clear part sits flush with the fuselage. | |||||||||||||||||||||||||||||||||||||||||||||||||||||||||
 |
|||||||||||||||||||||||||||||||||||||||||||||||||||||||||
| Here is a photo of an RF-101H (converted F-101C) which shows the camera ports. Note the two blade antenna's installed just aft of the camera ports. These are NOT provided by Kittyhawk in the kit and so will need to scratch-built. | |||||||||||||||||||||||||||||||||||||||||||||||||||||||||
 |
|||||||||||||||||||||||||||||||||||||||||||||||||||||||||
| Offering up the nose to the forward fuselage requires a little bit of trimming and squeezing to get the parts to fit snugly, but once in place there does not seem to be any major steps or gaps to deal with. So far so good. | |||||||||||||||||||||||||||||||||||||||||||||||||||||||||
 |
|||||||||||||||||||||||||||||||||||||||||||||||||||||||||
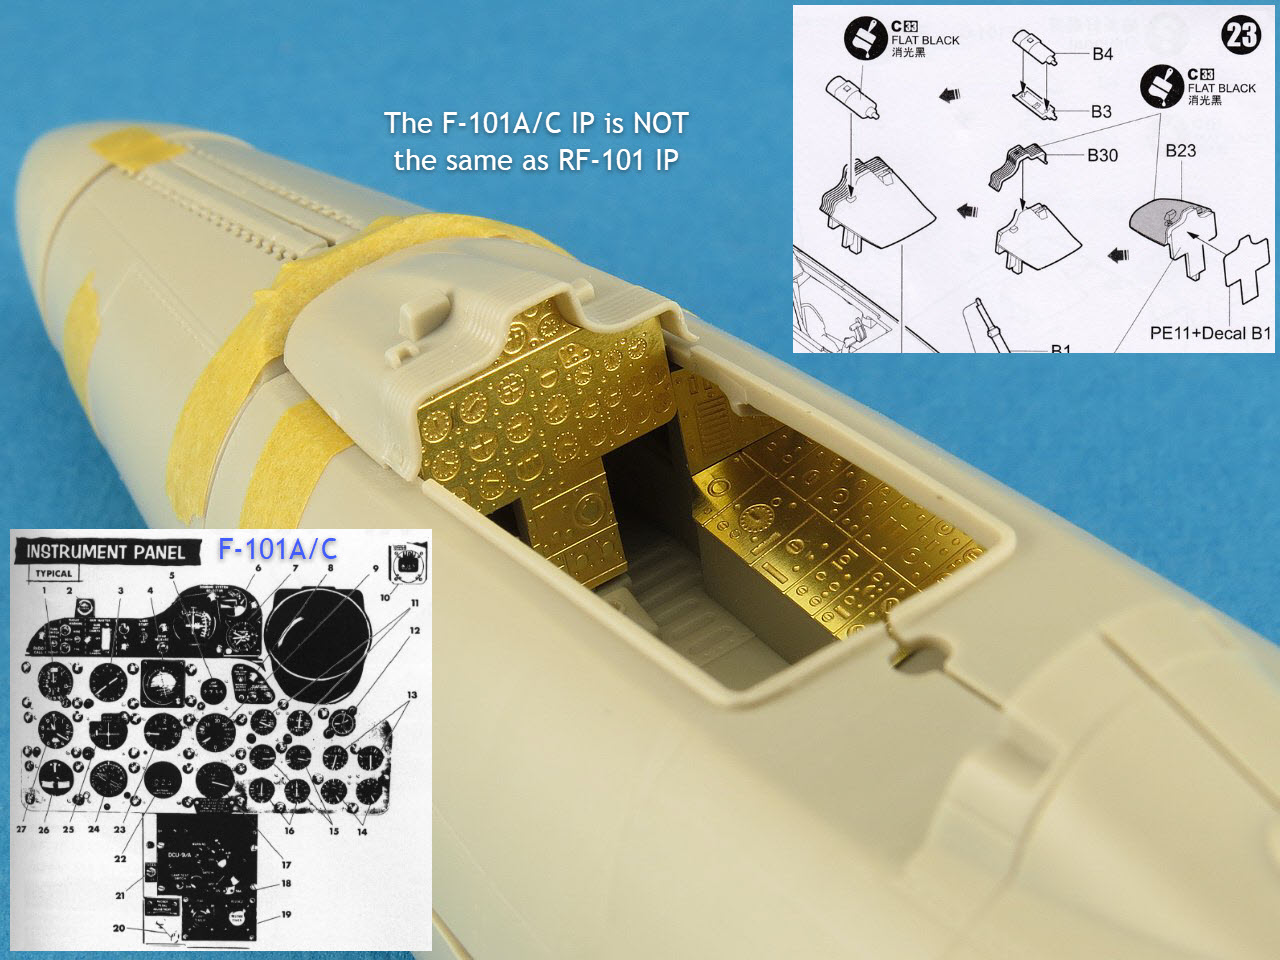
| Whether it was laziness or lack of research, Kittyhawk have incorrectly included the fighter style (F-101A/C) instrument panel. Unfortunately this is incorrect for the reconn versions. | |||||||||||||||||||||||||||||||||||||||||||||||||||||||||
 |
|||||||||||||||||||||||||||||||||||||||||||||||||||||||||
| As these photos show, the reconn Voodoos had the scope fitted in the very center of the main instrument panel and the forward shroud was reshaped (with a circular bulge in the middle) to accommodate the scope internally. This differs considerably to the fighter versions which had the scope on the right side and it sat on top of the shroud. I suspect the best option to correct this will be to wait for an aftermarket replacement from the likes of Aires. | |||||||||||||||||||||||||||||||||||||||||||||||||||||||||
 |
 |
||||||||||||||||||||||||||||||||||||||||||||||||||||||||
| A closeup of the nose refueling probe doors in the closed position reveals some visible gaps, which for the most part can be put down to the use of tape to hold things in place. I'm confident that once I use glue and some pressure many of these will disappear. I have also attached the nose cone which resulted in some steps which will need to be dealt with. I experimented with some spacers to spread the fuselage to match the size and shape of the nose cone, which worked, but in doing so made the probe door gaps much larger, so it was not the best option. | |||||||||||||||||||||||||||||||||||||||||||||||||||||||||
 |
|||||||||||||||||||||||||||||||||||||||||||||||||||||||||
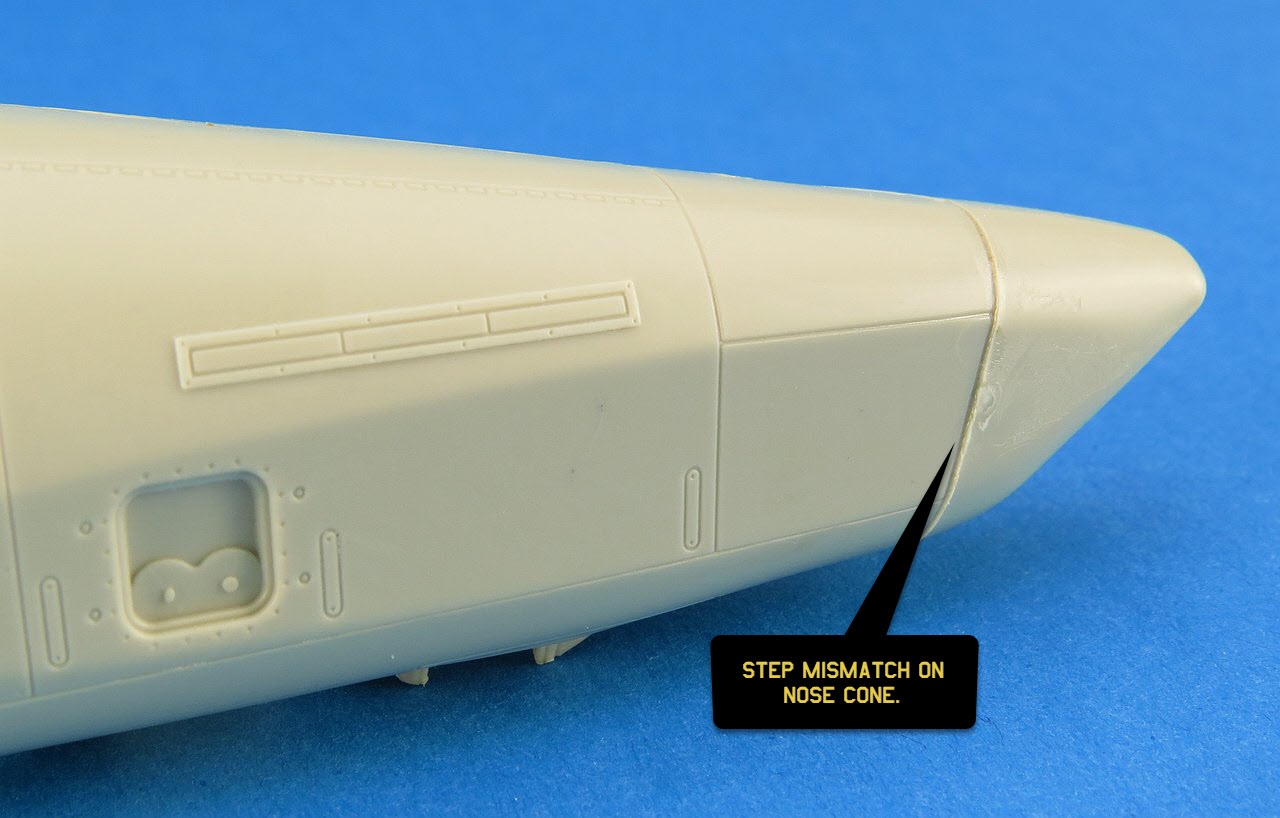
| This angle shows the nose cone step a little better. It does not look like much, but to deal with it you will need to either spread the fuselage (and deal with the resulting gaps in the refueling probe doors) or sand the nose cone down to match the size and shape of the fuselage. Either option does not appeal to me very much. | |||||||||||||||||||||||||||||||||||||||||||||||||||||||||
 |
|||||||||||||||||||||||||||||||||||||||||||||||||||||||||
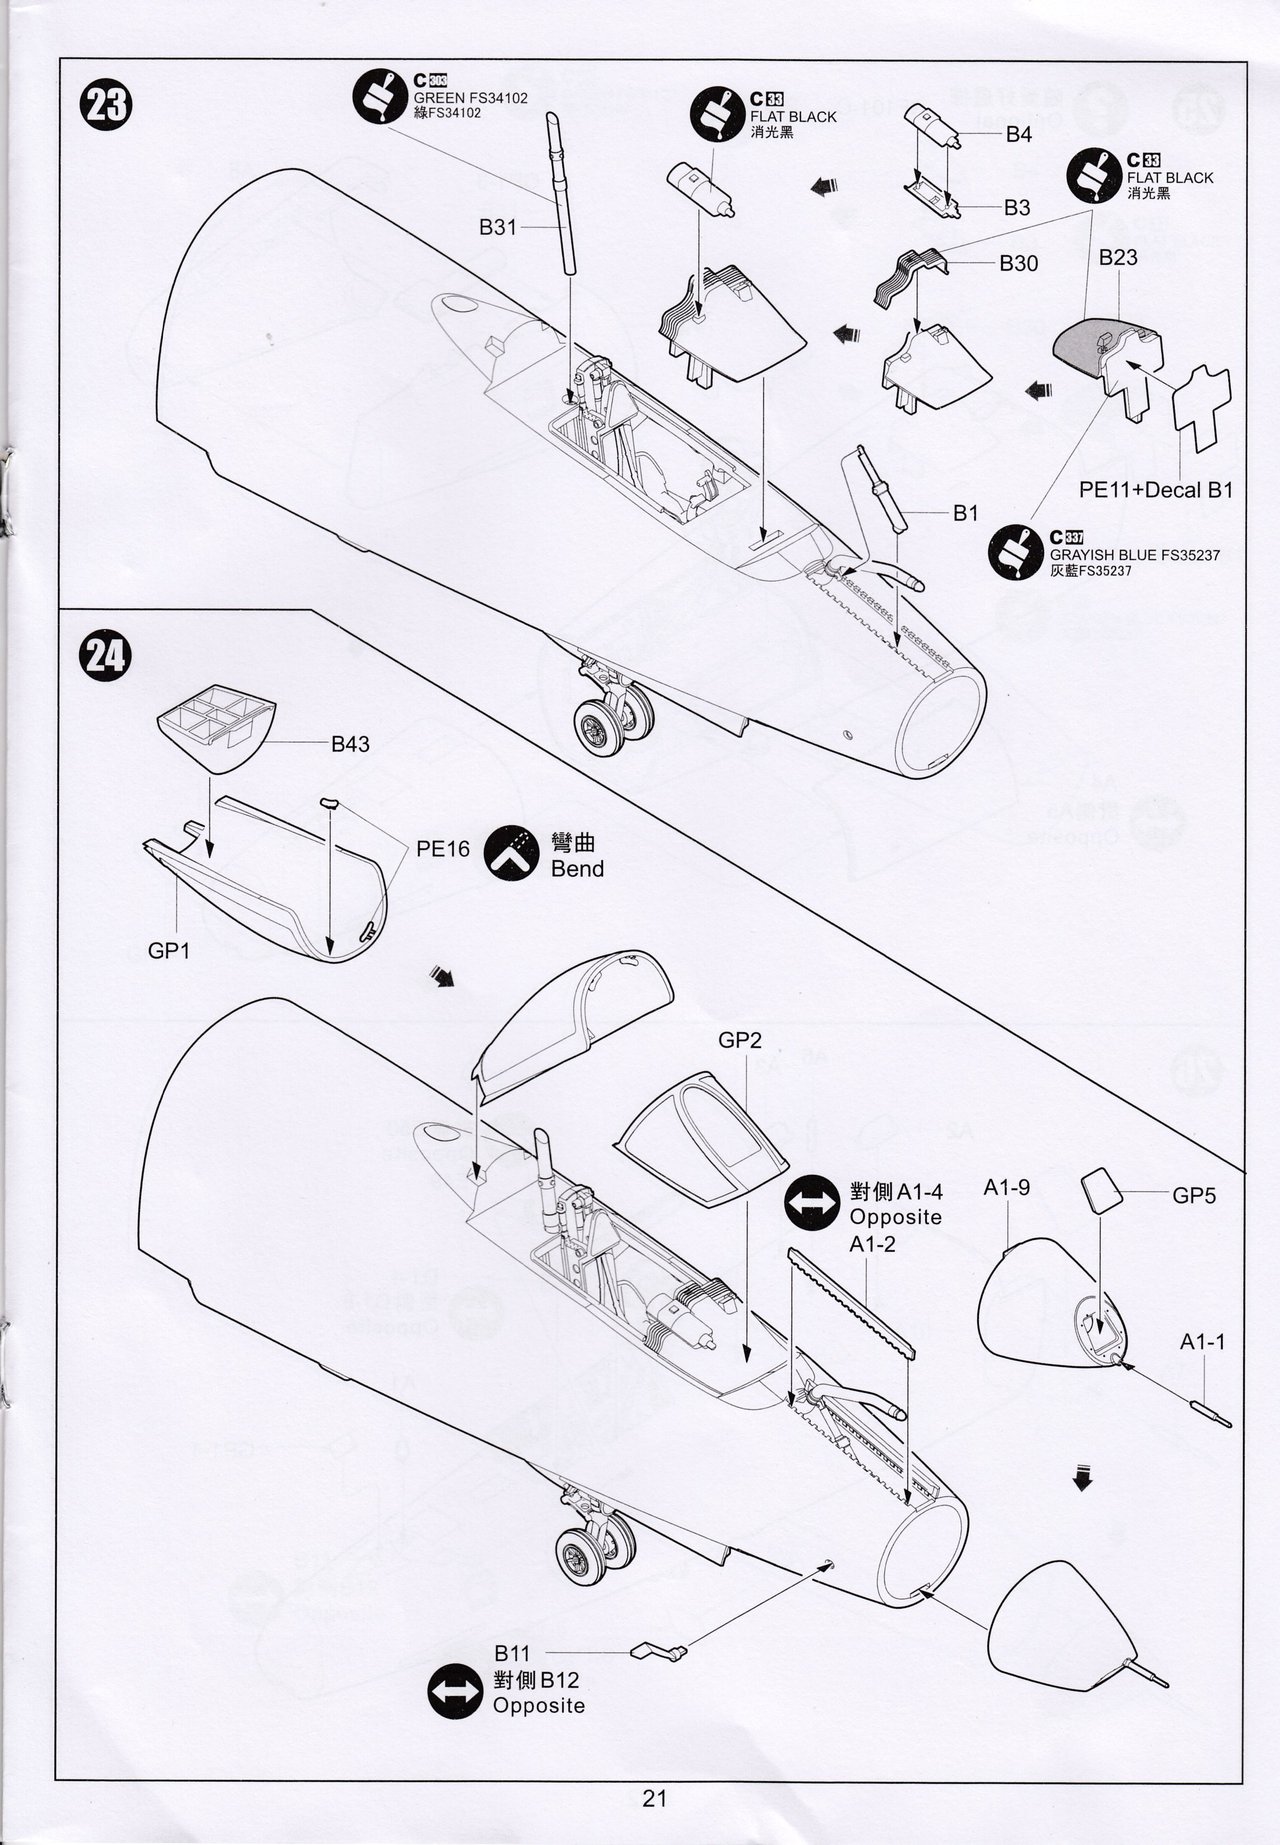
| The fit of the windscreen and canopy is quite good but I am not convinced about the shape. To my eye (and comparing it to photos) the windscreen (and canopy alike) appears not round enough (the top looks flat as if its been squashed). | |||||||||||||||||||||||||||||||||||||||||||||||||||||||||
 |
|||||||||||||||||||||||||||||||||||||||||||||||||||||||||
| Digging a little further into the shape of the canopy, consider this comparison of the kit and real aircraft. It think it's pretty obvious that Kittyhawk have missed the mark. | |||||||||||||||||||||||||||||||||||||||||||||||||||||||||
 |
|||||||||||||||||||||||||||||||||||||||||||||||||||||||||
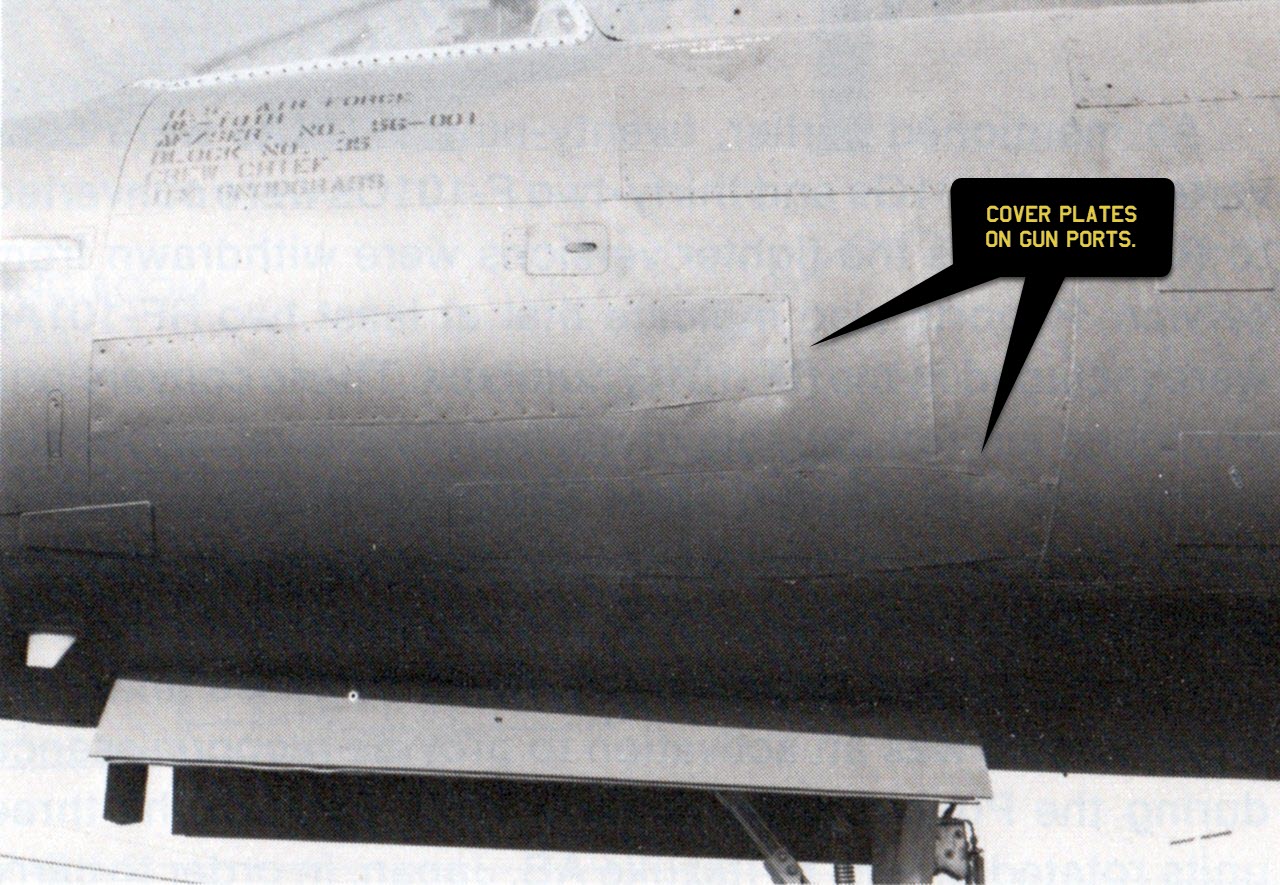
| A visible reminder that the G/H versions were converted from existing F-101A/C (fighter) airframes are things like the cover plates which were used to fair over the gun ports on the nose. Kittyhawk does not include little details like these but luckily they will be easy to scribe into the kit parts before fitting. | |||||||||||||||||||||||||||||||||||||||||||||||||||||||||
 |
|||||||||||||||||||||||||||||||||||||||||||||||||||||||||
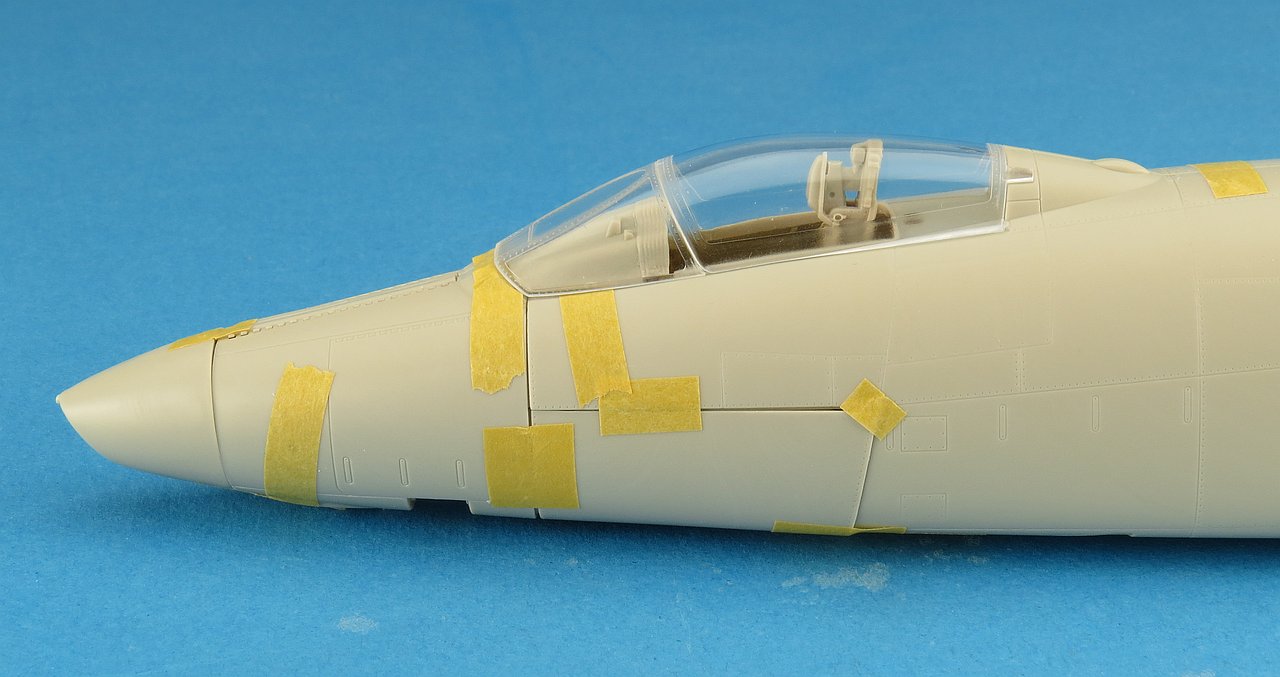
| A final overall look at the G/H nose once fully assembled. My final impression is that there are some fit issues that will need to be dealt with but overall it's not too bad. | |||||||||||||||||||||||||||||||||||||||||||||||||||||||||
 |
|||||||||||||||||||||||||||||||||||||||||||||||||||||||||
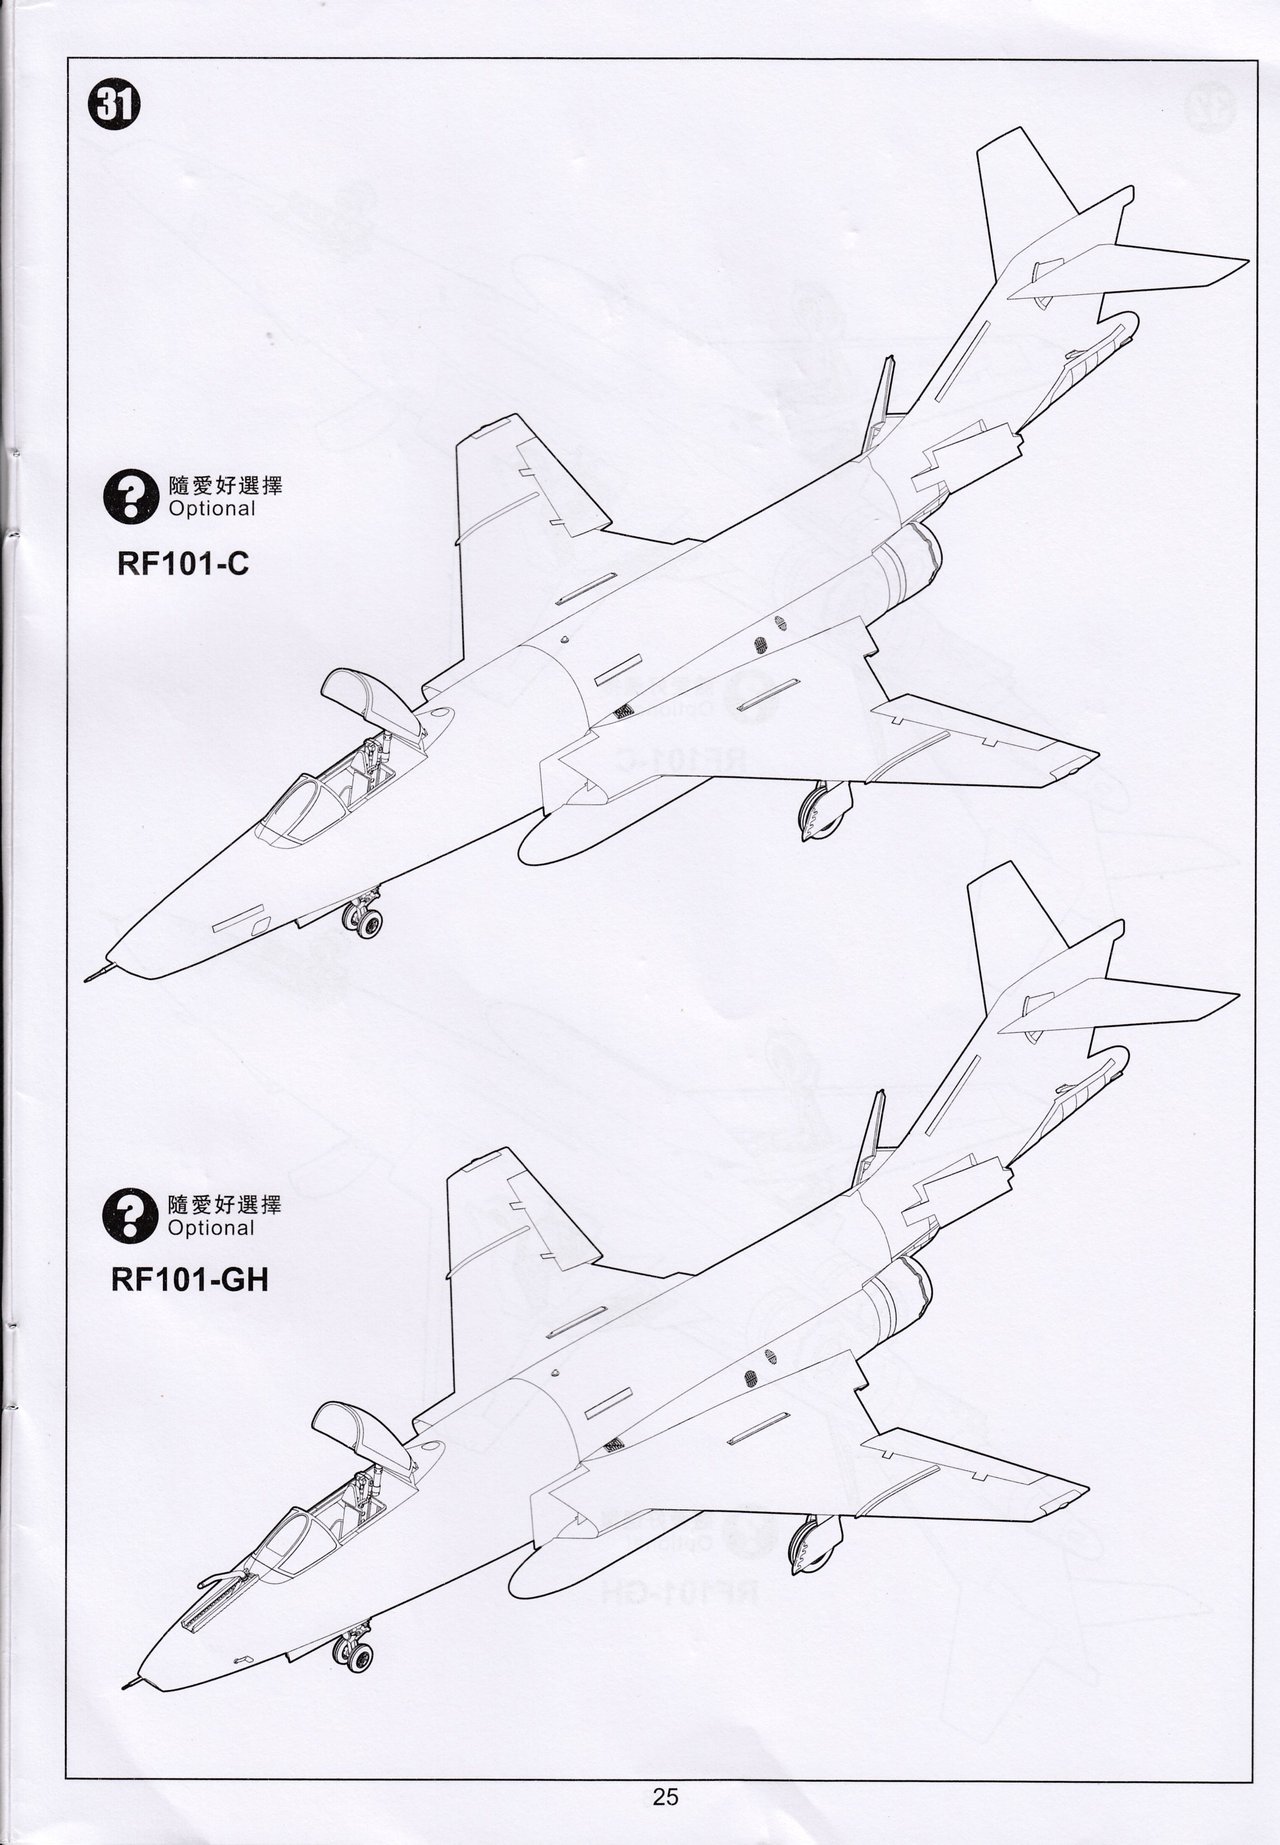
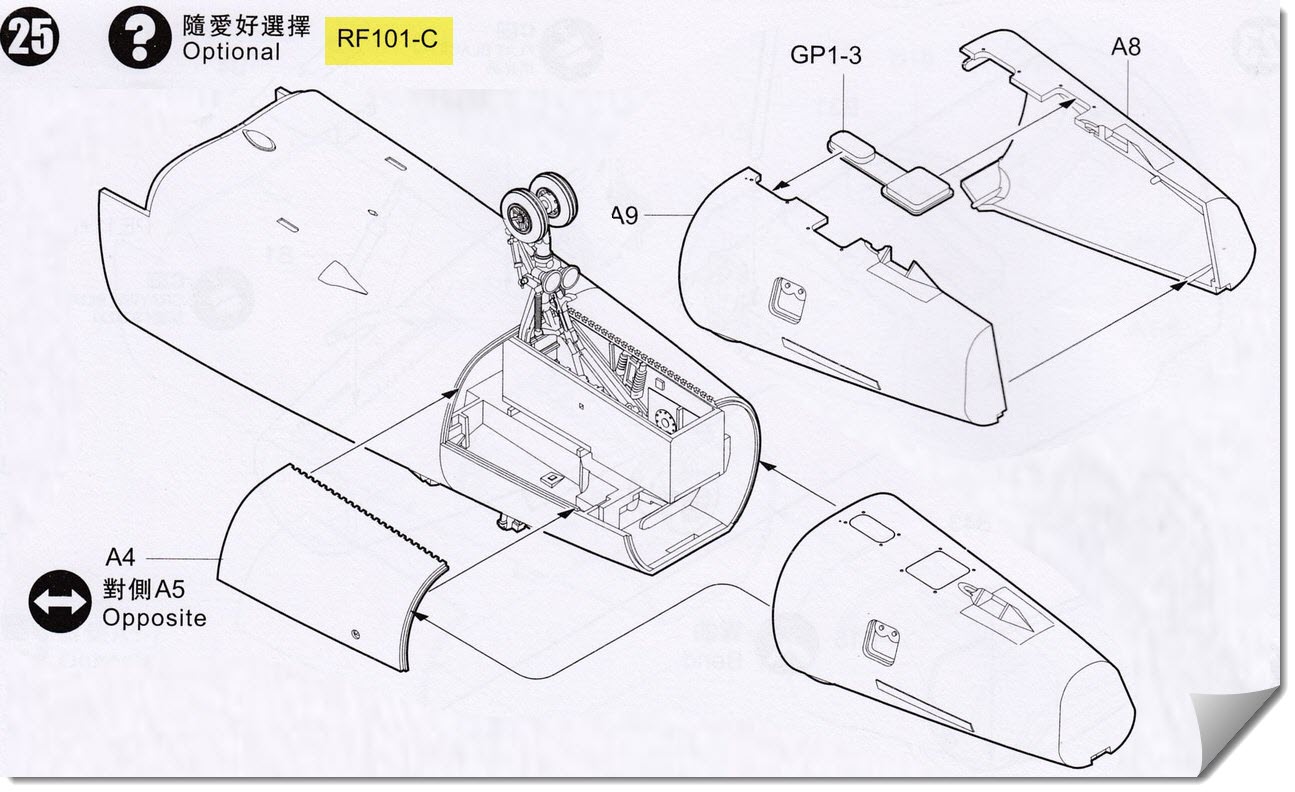
| Turning next to the RF-101C option and I suspect this will be the main variant that most modellers will be interested in. At first glance this looks to be an easier build as there are less parts than in the G/H nose. | |||||||||||||||||||||||||||||||||||||||||||||||||||||||||
 |
|||||||||||||||||||||||||||||||||||||||||||||||||||||||||
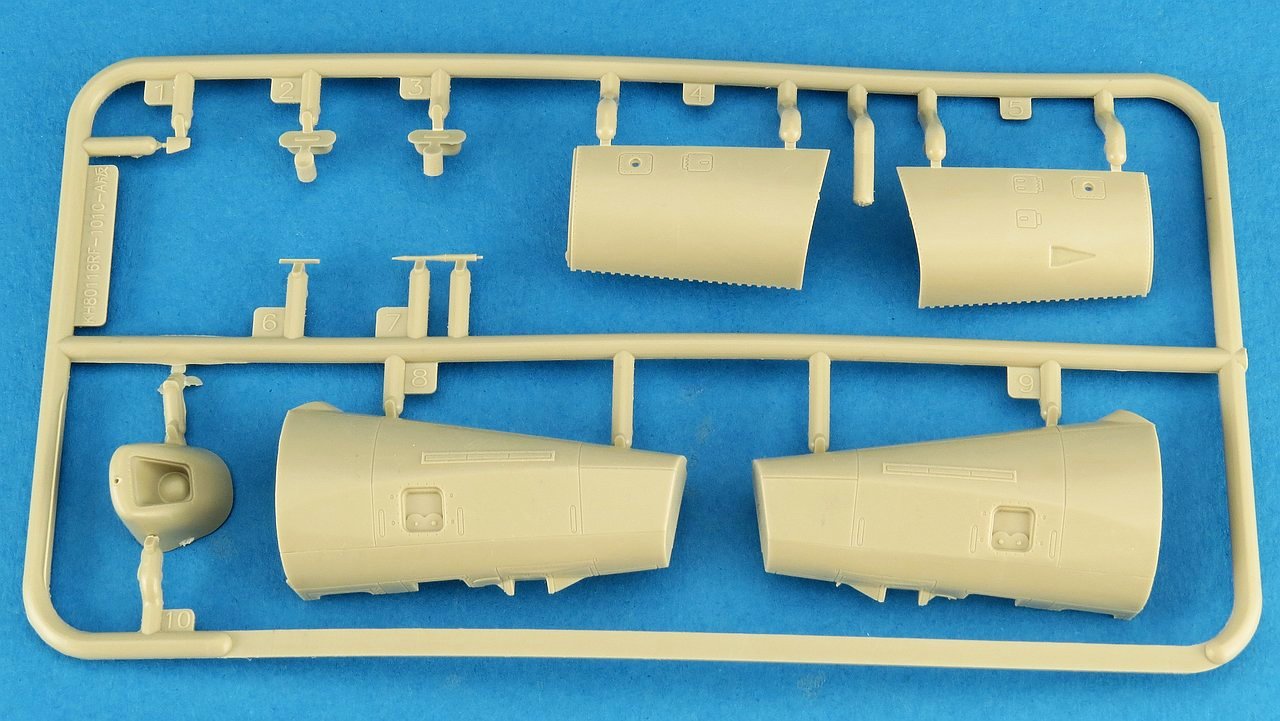
| All the parts specific to the RF-101C are contained in a single small sprue (A). My kit seemed to have some warping in the sprue but I expect that will be an isolated instance. | |||||||||||||||||||||||||||||||||||||||||||||||||||||||||
 |
|||||||||||||||||||||||||||||||||||||||||||||||||||||||||
| As suspected when I tried to join the two main nose halves together I had some major gaps issues due to warping of the parts. Happy to report that this was nothing a little brute force could not fix. | |||||||||||||||||||||||||||||||||||||||||||||||||||||||||
 |
|||||||||||||||||||||||||||||||||||||||||||||||||||||||||
| To ensure I achieved a strong (and properly aligned) bond on the nose I inserted a couple of internal plastic braces. These made the warped parts stayed aligned while the glue dried. | |||||||||||||||||||||||||||||||||||||||||||||||||||||||||
 |
 |
||||||||||||||||||||||||||||||||||||||||||||||||||||||||
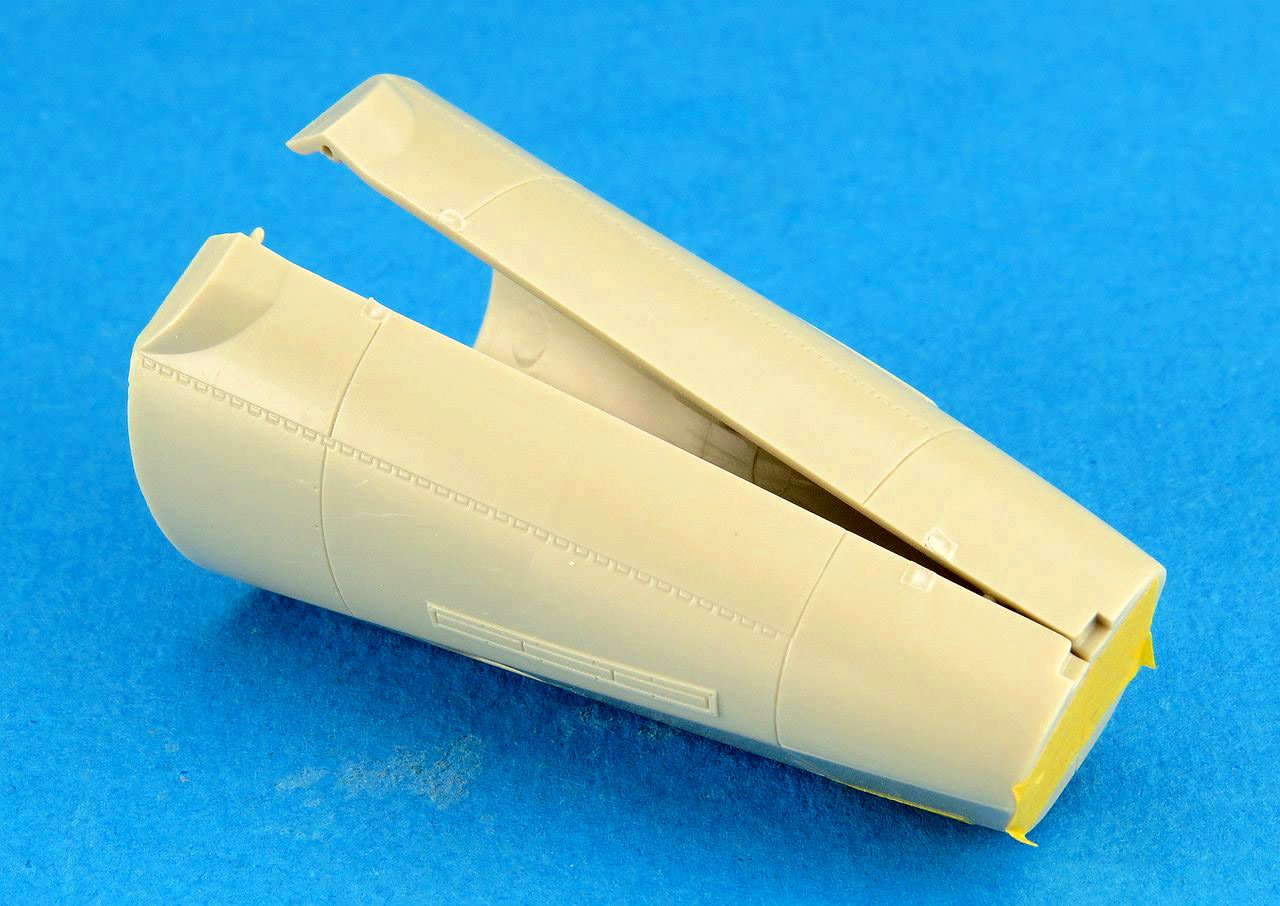
| With the aid of some tape and those internal braces the nose was glued with only minor seams left to tend to. | |||||||||||||||||||||||||||||||||||||||||||||||||||||||||
 |
|||||||||||||||||||||||||||||||||||||||||||||||||||||||||
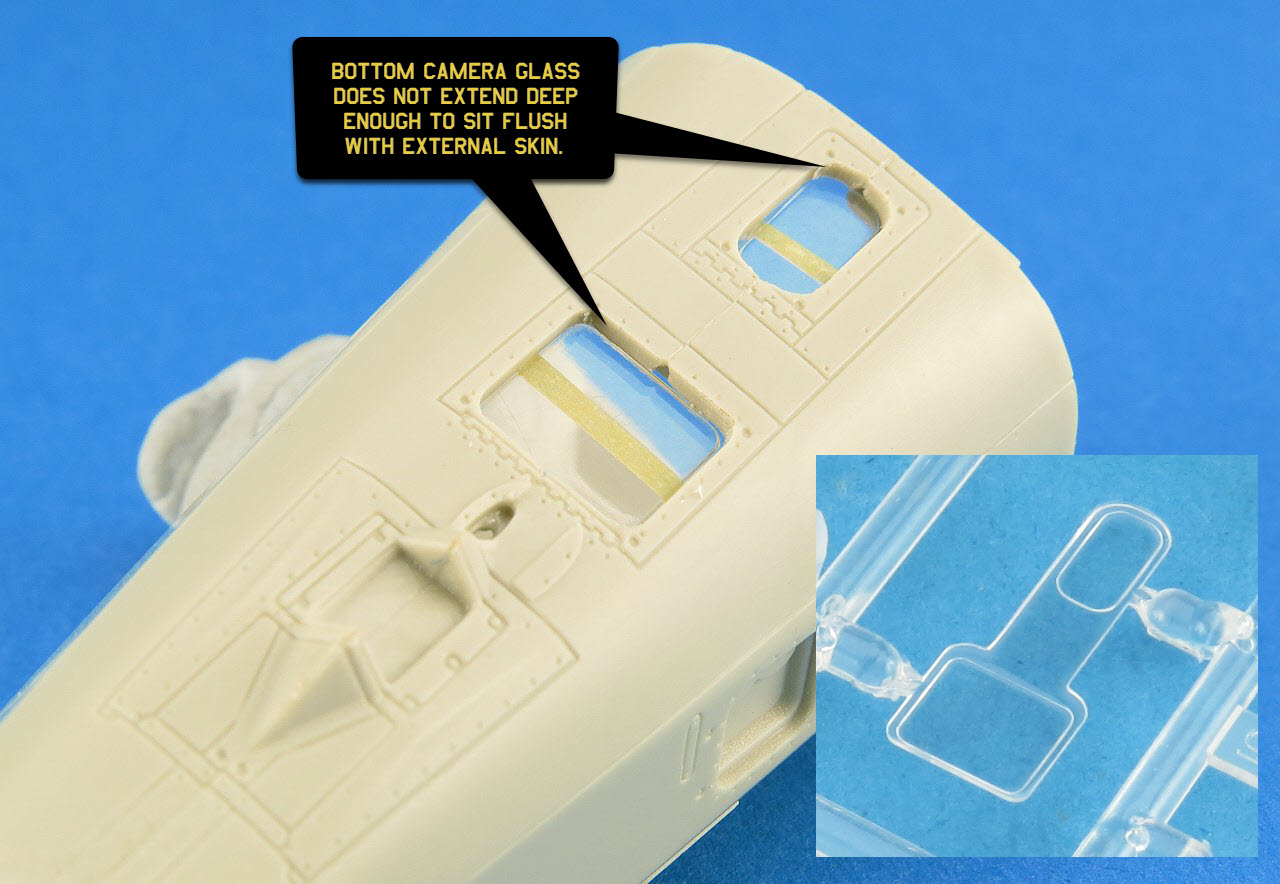
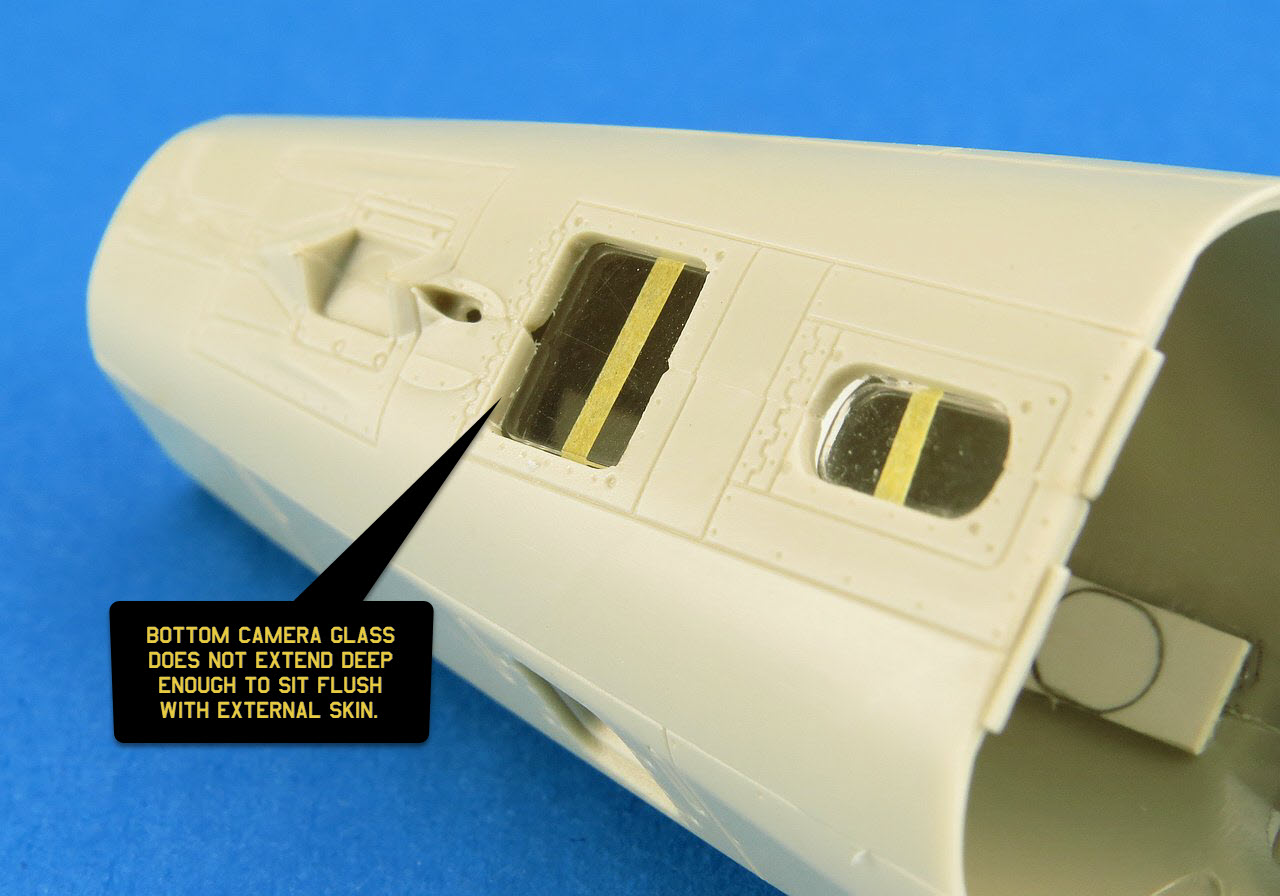
| The two main windows for the lower cameras are designed to be inserted from the inside as a single piece. Unfortunately KH have not made the clear parts thick enough to extend far enough and sit flush with the skin of the aircraft. What results is an odd looking recessed window. | |||||||||||||||||||||||||||||||||||||||||||||||||||||||||
 |
|||||||||||||||||||||||||||||||||||||||||||||||||||||||||
| Some useful reference photos of the camera port configuration of the RF-101C nose. KH looks to have designed this area fairly accurately. | |||||||||||||||||||||||||||||||||||||||||||||||||||||||||
 |
 |
||||||||||||||||||||||||||||||||||||||||||||||||||||||||
| Another pic showing that problem with the clear parts. Two options spring to mind on how to deal with this issue. 1) Use a dremel to thin down the fuselage plastic (from the inside) around the window so that the clear part will sit flush correctly or 2) Trim the edges of the clear parts so they fit completely into the hole and then push them through so they sit flush. | |||||||||||||||||||||||||||||||||||||||||||||||||||||||||
 |
|||||||||||||||||||||||||||||||||||||||||||||||||||||||||
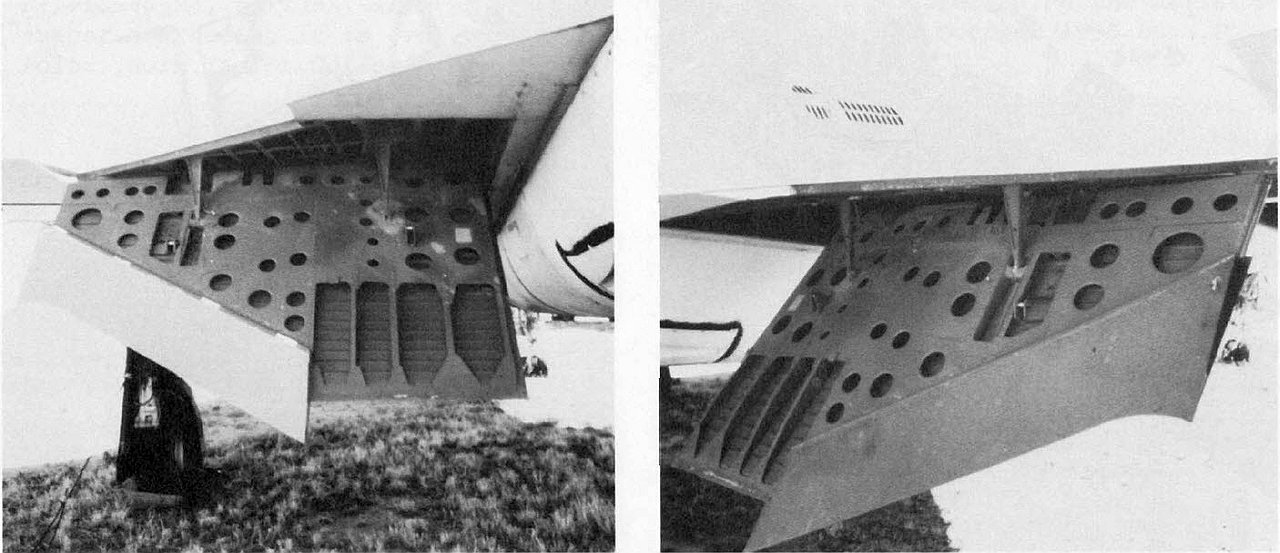
| Like the G/H nose cone the C model part results in a noticeable step that will need to be sanded down flush. Care will be needed doing this to avoid altering the faceted shape on the sides of the nose. | |||||||||||||||||||||||||||||||||||||||||||||||||||||||||
 |
 |
||||||||||||||||||||||||||||||||||||||||||||||||||||||||
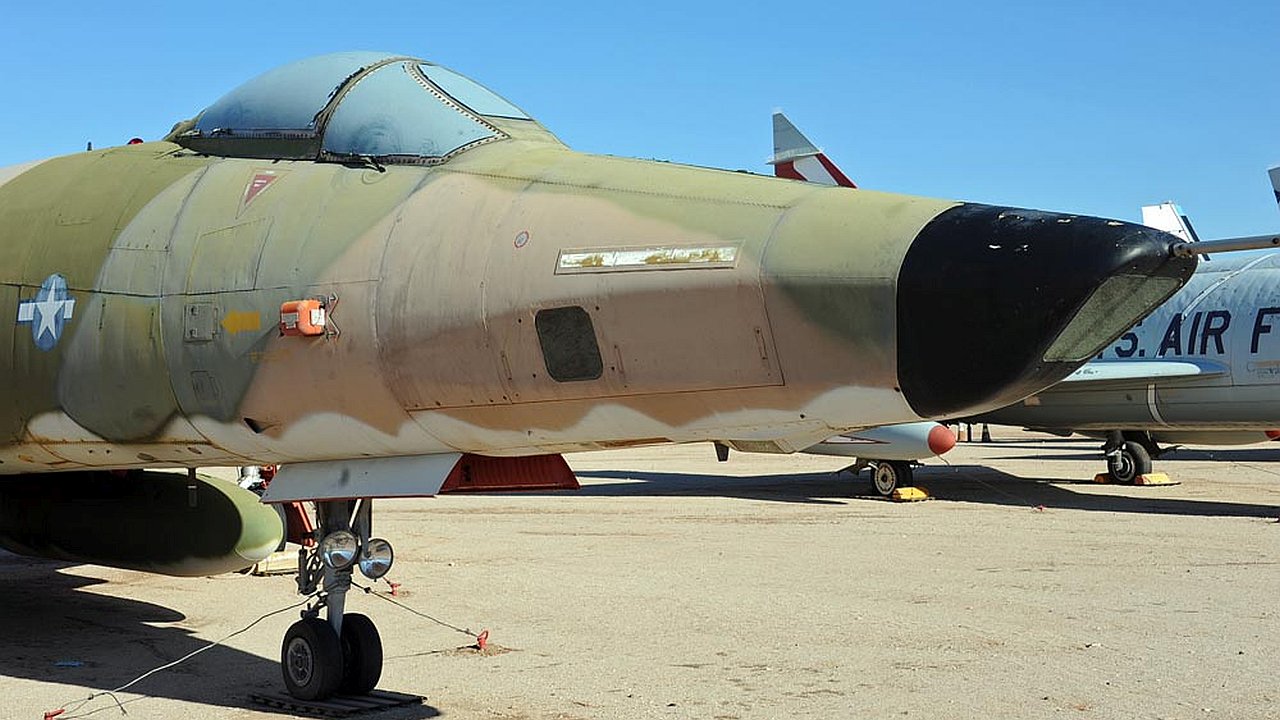
| A good photo of a museum RF-101C nose showing the faceted angles for the oblique camera ports. I think KH have done a pretty good job of capturing the shape of the nose in the kit. | |||||||||||||||||||||||||||||||||||||||||||||||||||||||||
 |
|||||||||||||||||||||||||||||||||||||||||||||||||||||||||
| I had a few challenges getting the nose section to mate squarely and securely to the forward fuselage. After some pushing and shoving (and some shaving around the seam) I was able to get a firm join with little or no steps or gaps. | |||||||||||||||||||||||||||||||||||||||||||||||||||||||||
 |
 |
||||||||||||||||||||||||||||||||||||||||||||||||||||||||
| A close up of the nose join showing the end result. The windscreen fits well and you can see that KH have not provided an option to open the refueling probe door on the nose forward of the windscreen. In fact looking closer at where the door should be reveals no evidence of it at all. I'll probably just scribe some panel lines (not try and reproduce the piano hinges) in the right spot once I sand the seam. | |||||||||||||||||||||||||||||||||||||||||||||||||||||||||
 |
|||||||||||||||||||||||||||||||||||||||||||||||||||||||||
| Here are a couple of reference photos of what the refueling probe and its door should look like. The extended probe actually looks kinda cool, pity that KH did not consider that option for the RF-101C as well. | |||||||||||||||||||||||||||||||||||||||||||||||||||||||||
 |
 |
||||||||||||||||||||||||||||||||||||||||||||||||||||||||
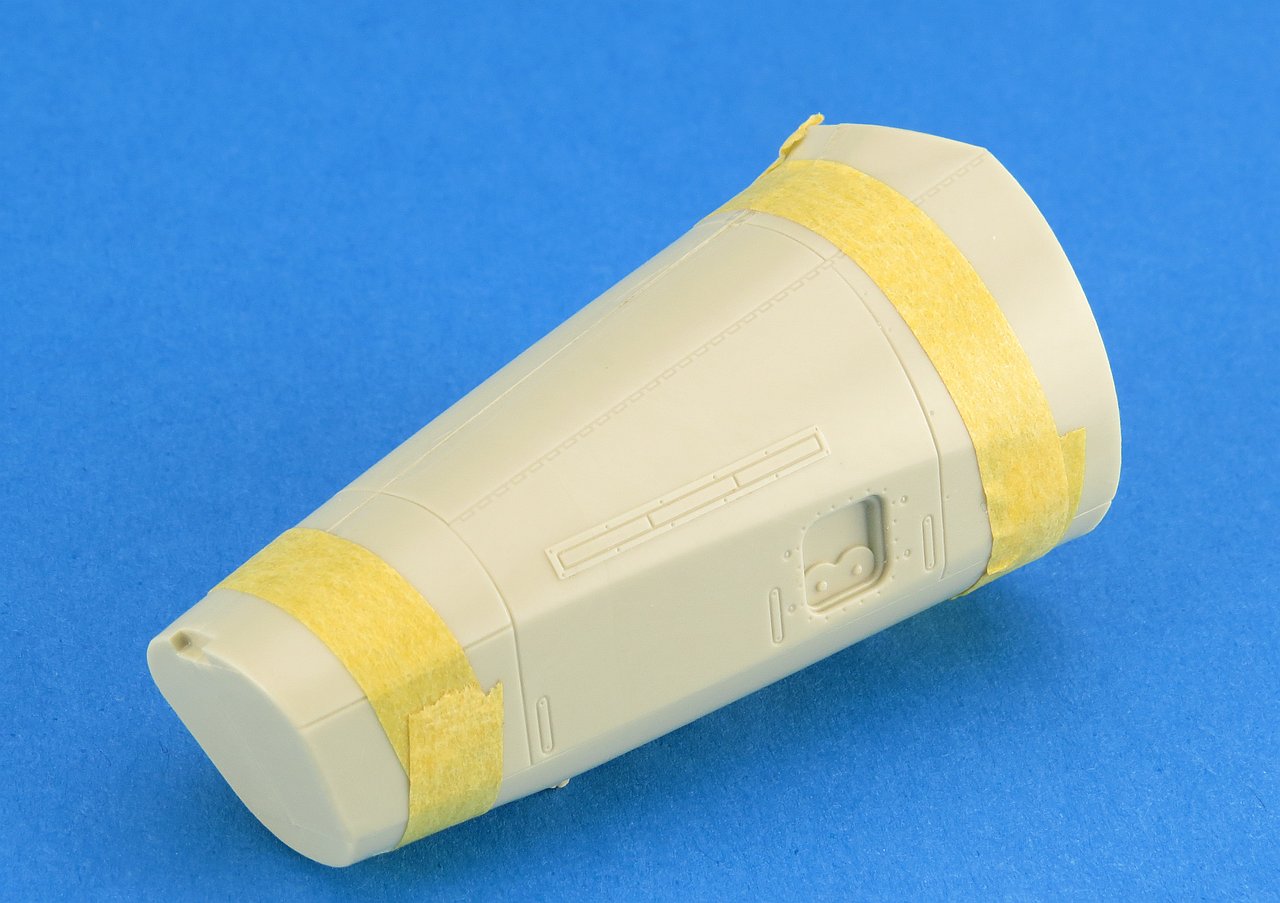
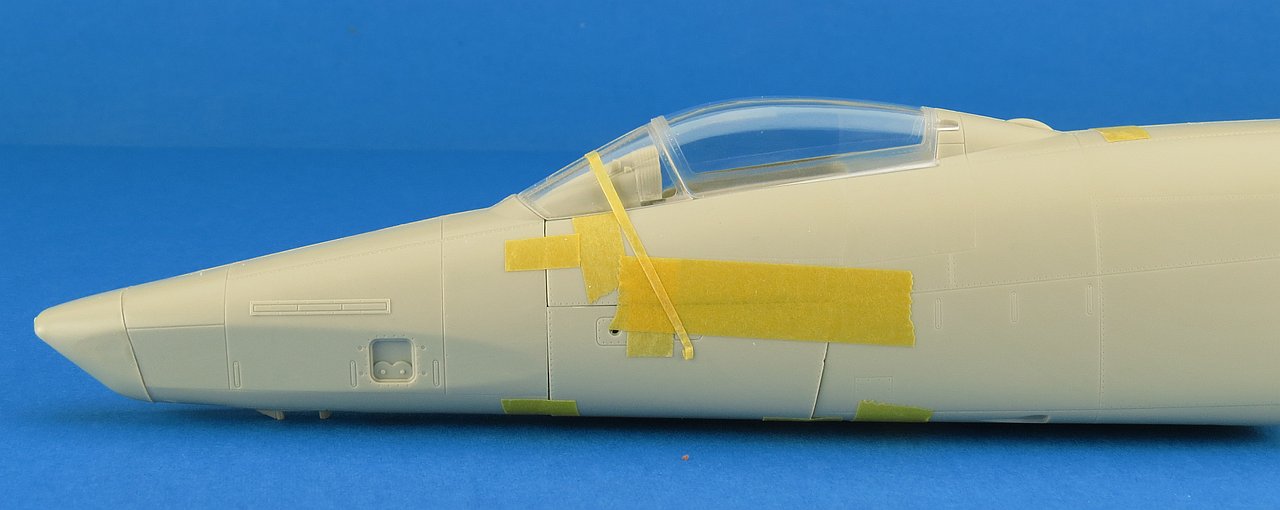
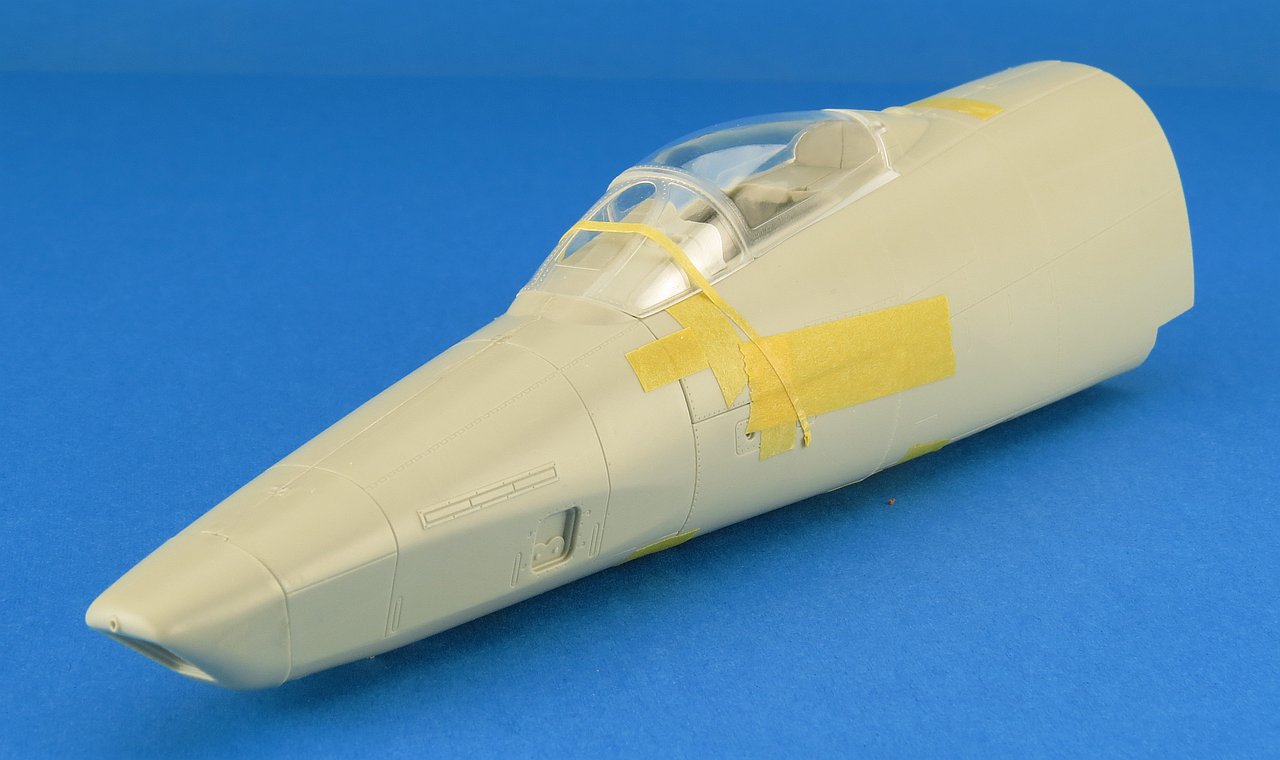
| A side profile of the fully assembled RF-101C nose parts. I think this captures quite well the graceful shape of the reconn nose. | |||||||||||||||||||||||||||||||||||||||||||||||||||||||||
 |
|||||||||||||||||||||||||||||||||||||||||||||||||||||||||
| In this angled shot of the nose you can once again see the squashed shape of the canopy and windscreen. It's doubtful that anyone will manufacture a vacform replacement so most of us will have to live with it I suspect. | |||||||||||||||||||||||||||||||||||||||||||||||||||||||||
 |
|||||||||||||||||||||||||||||||||||||||||||||||||||||||||
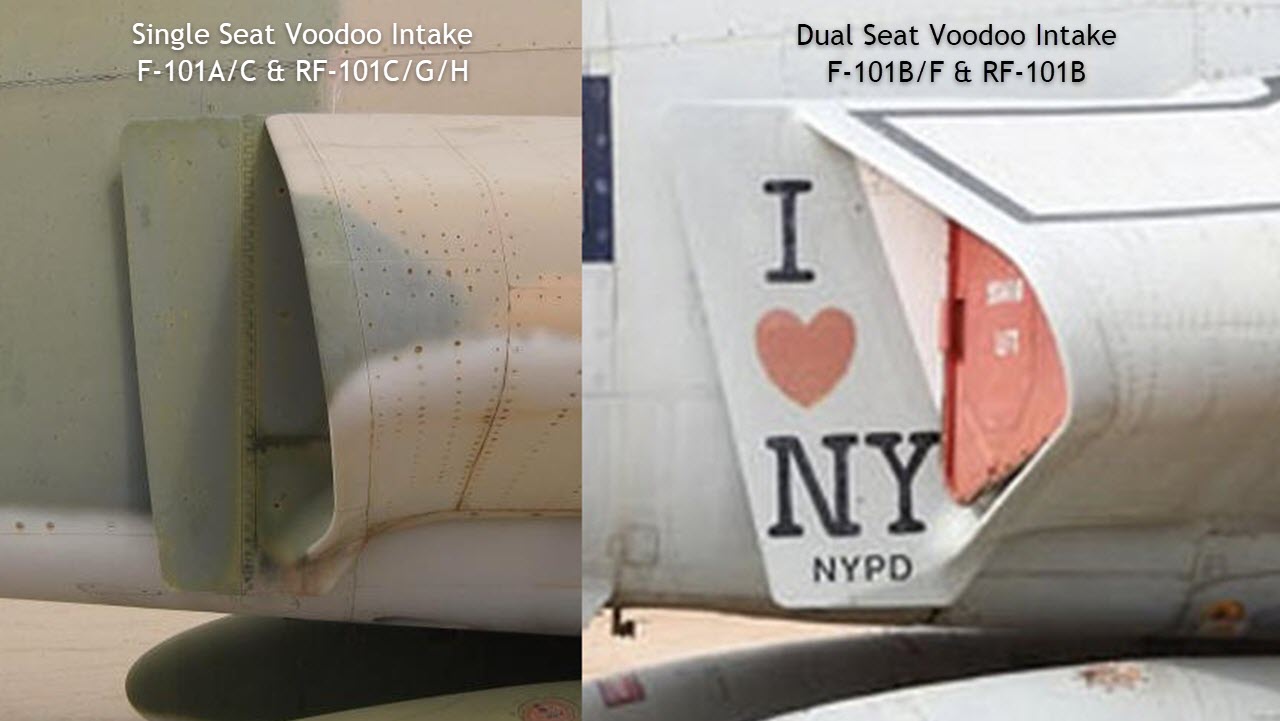
| One of the roadblocks to building an accurate single seater Voodoo from the Kittyhawk kit is the intake shape. As can be seen from these comparison photos the single seaters had a squarer shape to the intake lips and a smaller, less angled splitter plate. Kittyhawk provide the same intake parts across all three kits and they have only reproduced the F-10B two seater intakes. This means if you want your intakes to look correct for a single seater some work is needed. | |||||||||||||||||||||||||||||||||||||||||||||||||||||||||
 |
|||||||||||||||||||||||||||||||||||||||||||||||||||||||||
| When viewed from above you can clearly see the more squared off shape to the RF-101C intake compared to the angled shape of the F-101B intake. | |||||||||||||||||||||||||||||||||||||||||||||||||||||||||
 |
 |
||||||||||||||||||||||||||||||||||||||||||||||||||||||||
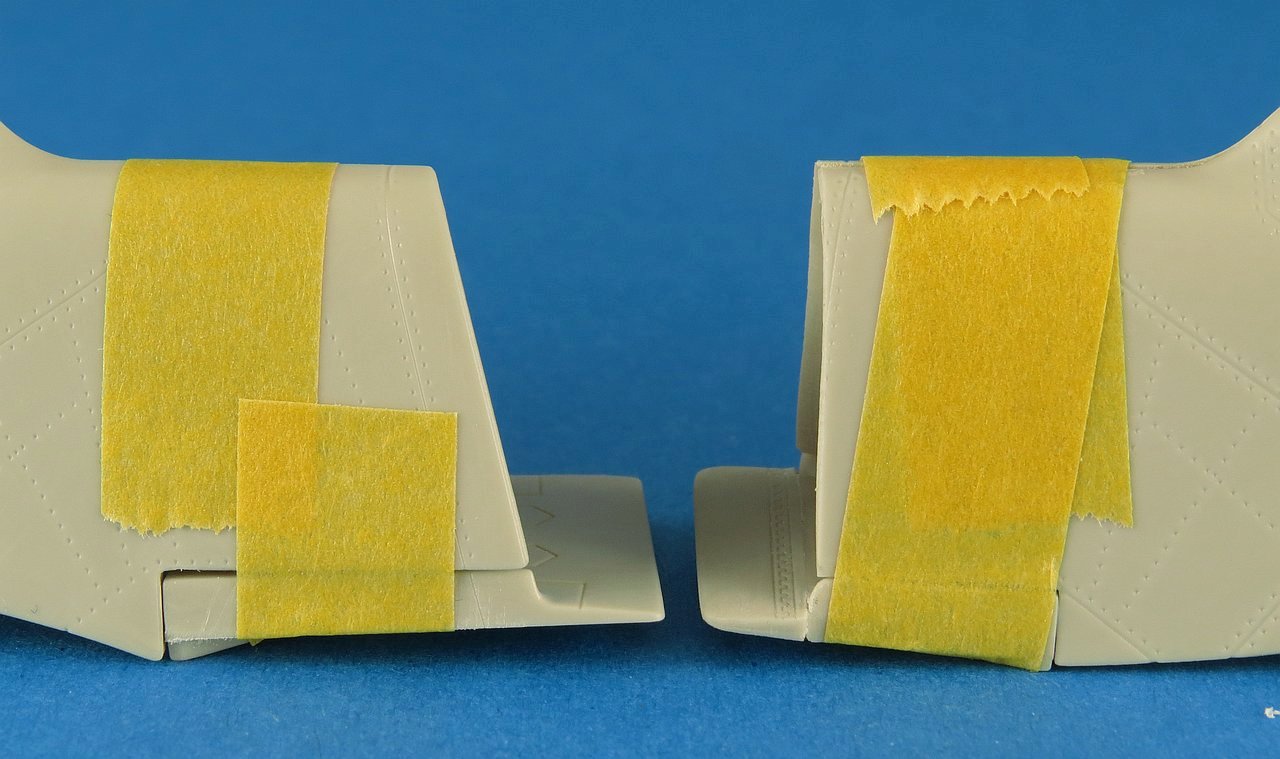
| I was curious if it would be practical to modify the kit parts to better represent the earlier squared intake and smaller splitter plate. Here is the starting point which shows the kit provided "angled" intake and large splitter plate (suitable for the F-101B only) | |||||||||||||||||||||||||||||||||||||||||||||||||||||||||
 |
|||||||||||||||||||||||||||||||||||||||||||||||||||||||||
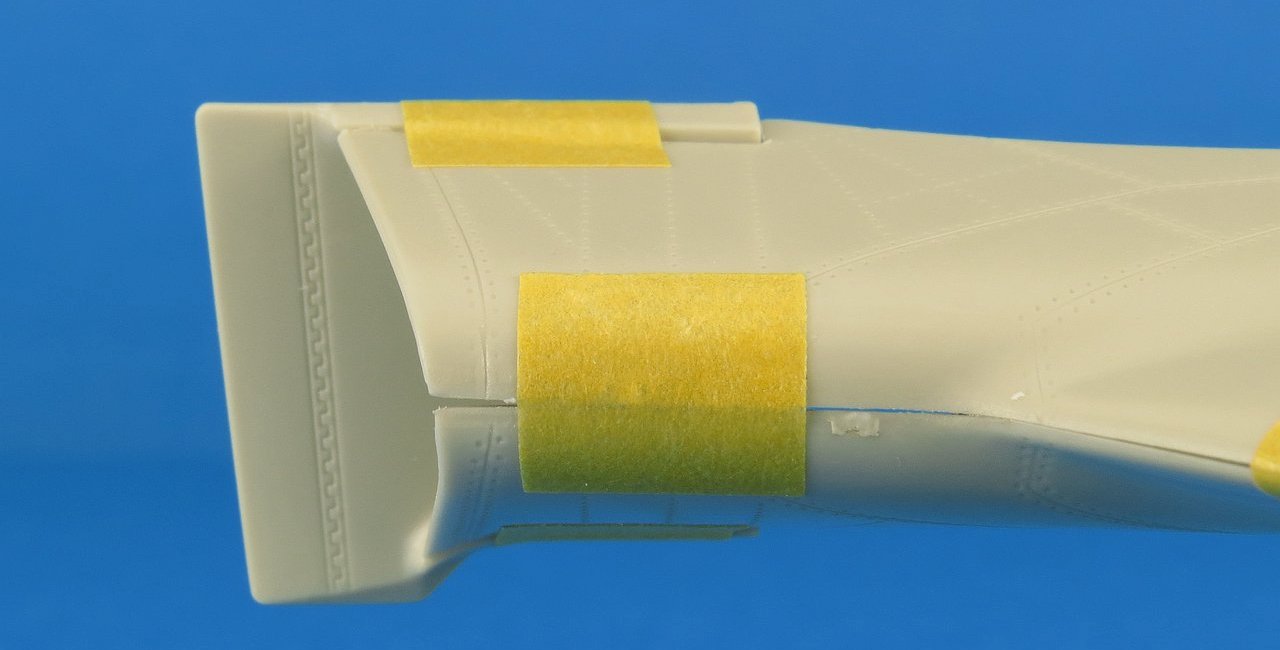
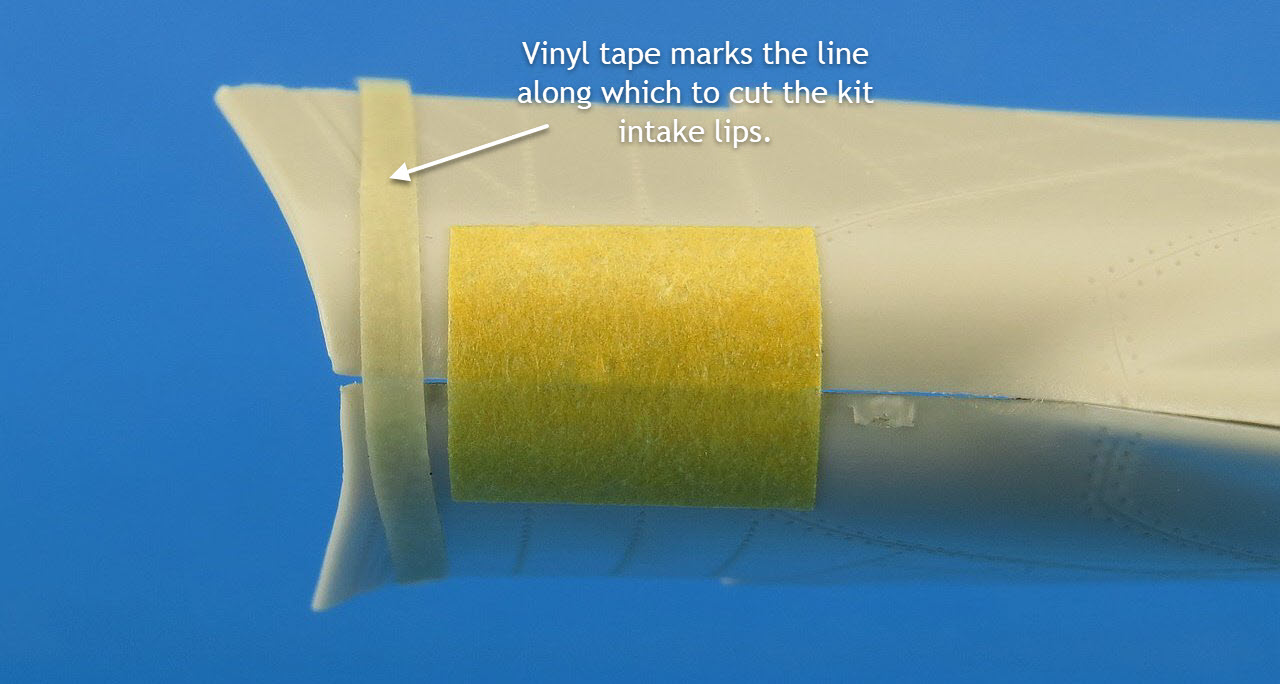
| Step 1 is to mark the line where I want to cut the kit intake to form the new squarer shape. For this I applied some vinyl tape (Pactra) around the intake to give me a reference line. I like vinyl tape for this purpose as it bends to complex shapes easily and provides a good edge for scribing or cutting. It did occur to me that another option to change the shape of the intake would be to build up the kit lips rather than cut them. This would end up being a lot more work and not be particularly practical for most modellers. | |||||||||||||||||||||||||||||||||||||||||||||||||||||||||
 |
|||||||||||||||||||||||||||||||||||||||||||||||||||||||||
| Seen from above and below this was the angle I settled for. I intentionally set the line to not be perfectly perpendicular (90 degrees) to the fuselage. Reference photos showed that there was some rake to the intake, just not as much as the later intakes. | |||||||||||||||||||||||||||||||||||||||||||||||||||||||||
 |
 |
||||||||||||||||||||||||||||||||||||||||||||||||||||||||
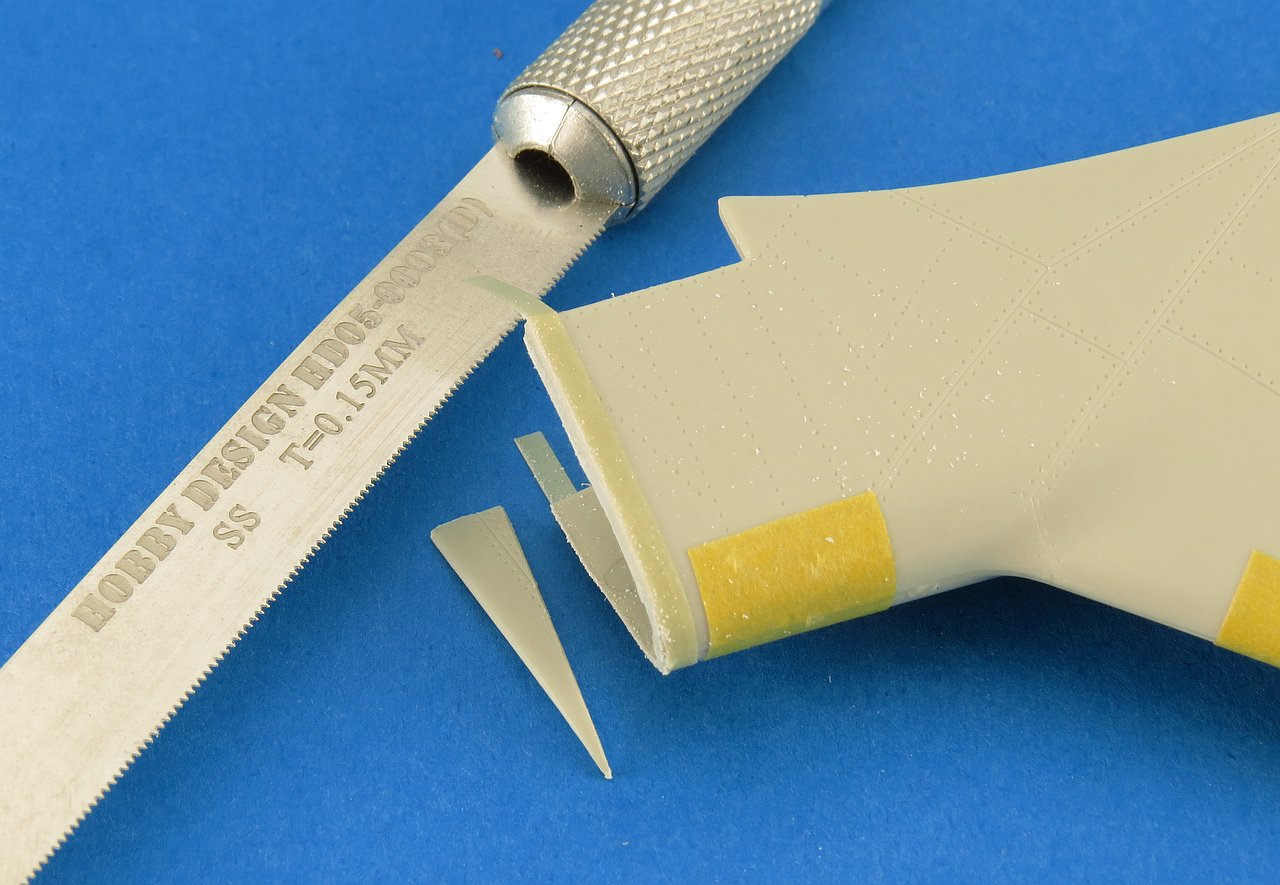
| Step 2 is to use a PE razor saw to cut along the tape line. I used a scriber first to start the cut and ensure I had a proper guideline along which to use the saw. So far so good. | |||||||||||||||||||||||||||||||||||||||||||||||||||||||||
 |
|||||||||||||||||||||||||||||||||||||||||||||||||||||||||
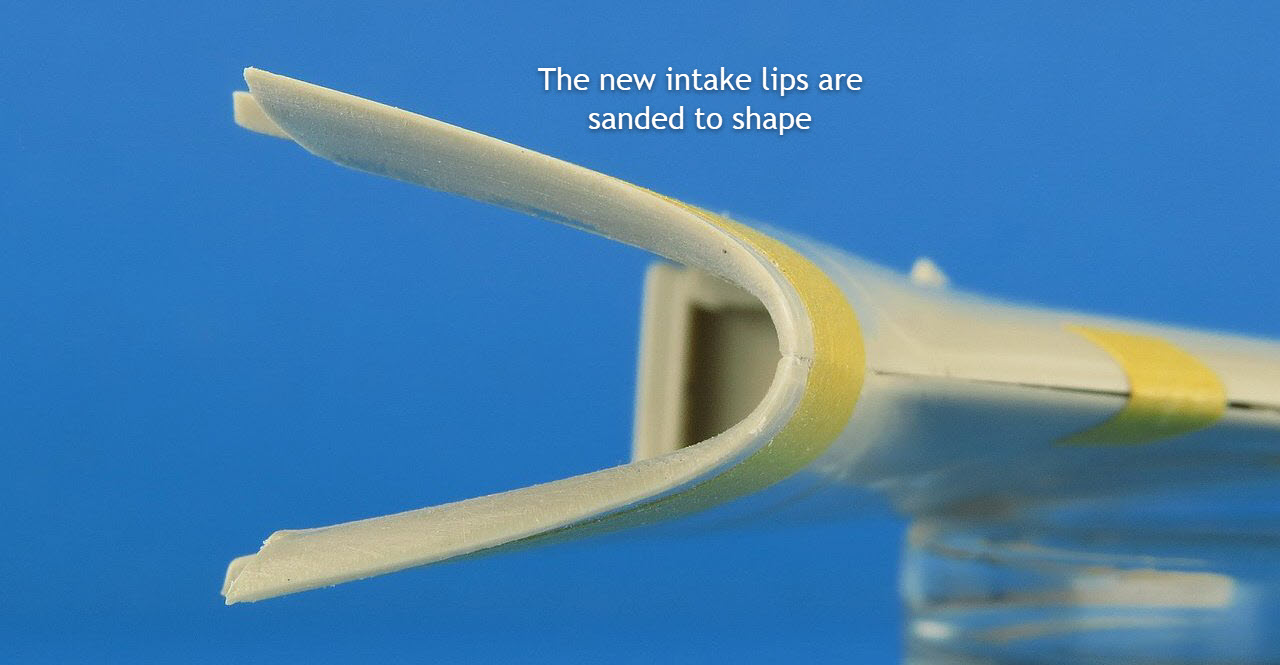
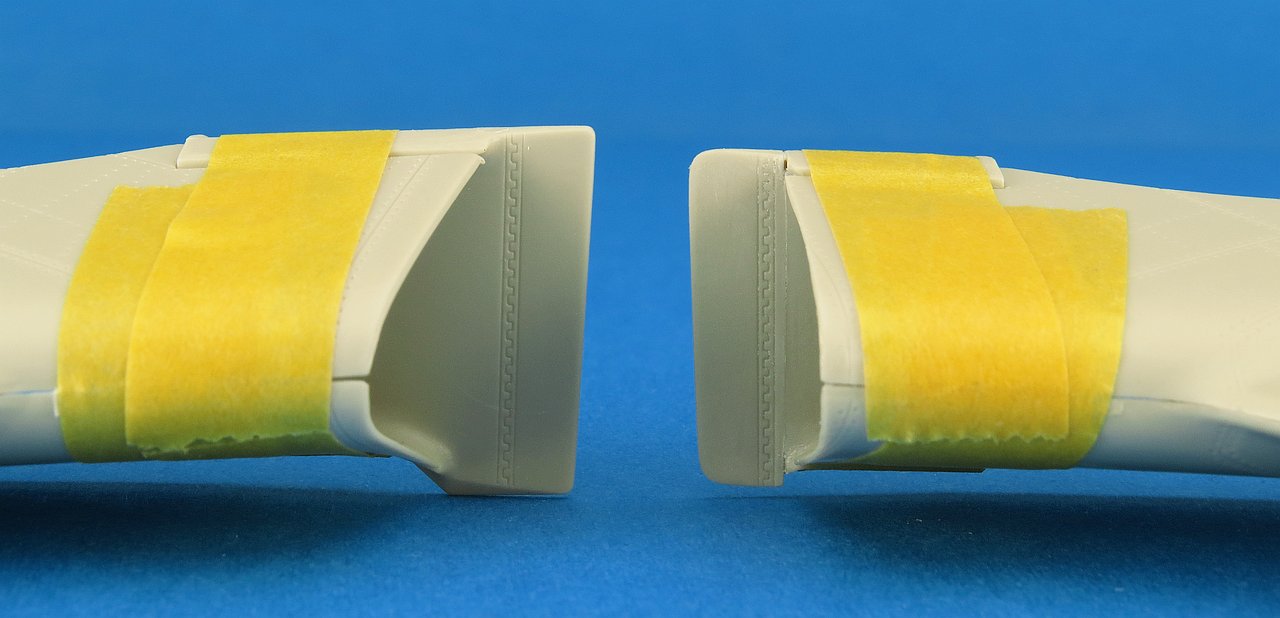
| Step 3 is reshaping the new lip along the cut line. I used a sanding stick and sharp blade to taper the forward edge as shown. | |||||||||||||||||||||||||||||||||||||||||||||||||||||||||
 |
|||||||||||||||||||||||||||||||||||||||||||||||||||||||||
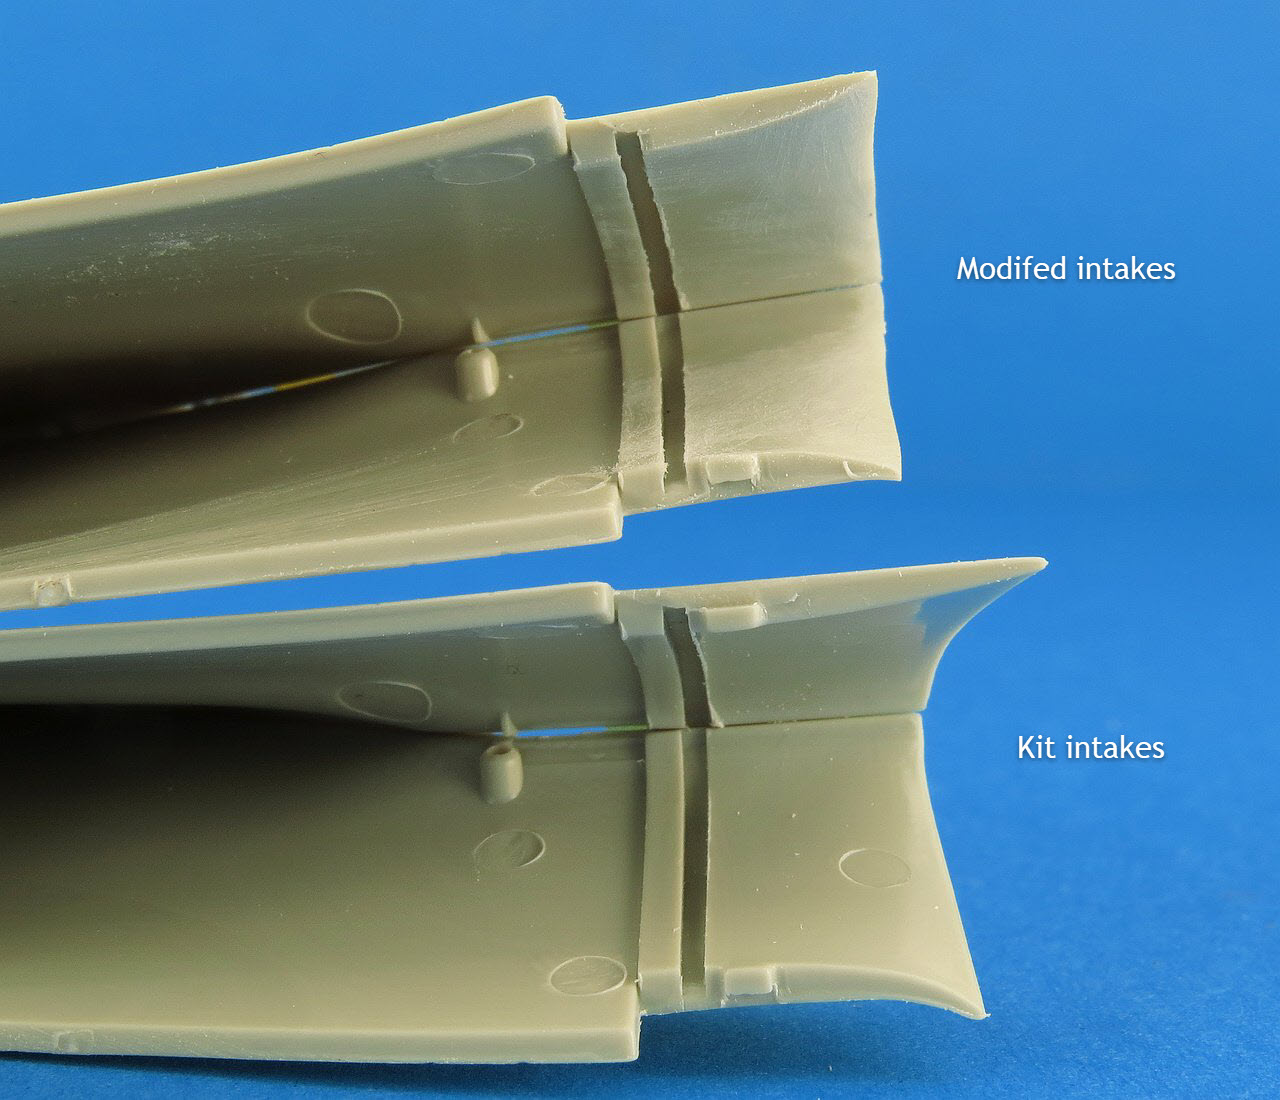
| A quick side by side comparison between the modified and unmodified kit intakes to check my work. | |||||||||||||||||||||||||||||||||||||||||||||||||||||||||
 |
|||||||||||||||||||||||||||||||||||||||||||||||||||||||||
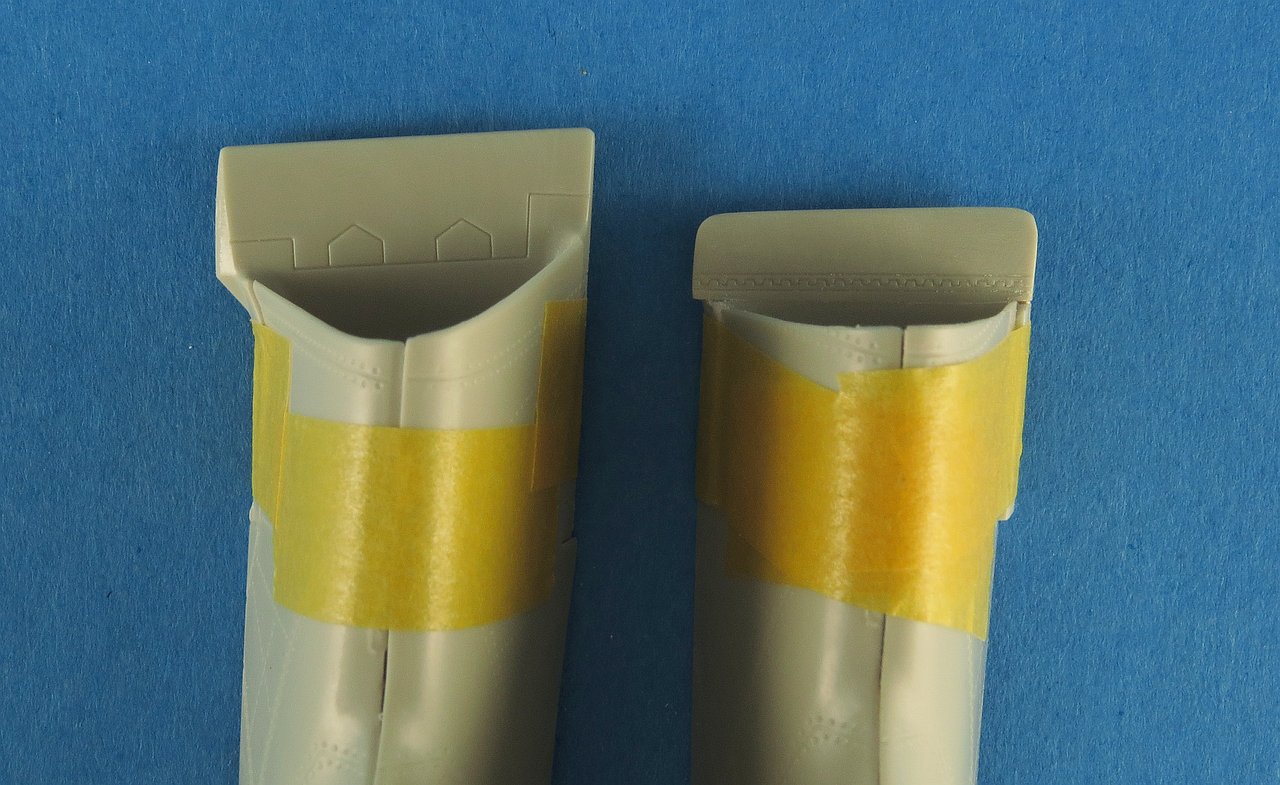
| Another comparison from the top and bottom to show how much has been removed to square up the shape. These photos also highlight that there will need to be some panel line adjustments on the new intakes. | |||||||||||||||||||||||||||||||||||||||||||||||||||||||||
 |
 |
||||||||||||||||||||||||||||||||||||||||||||||||||||||||
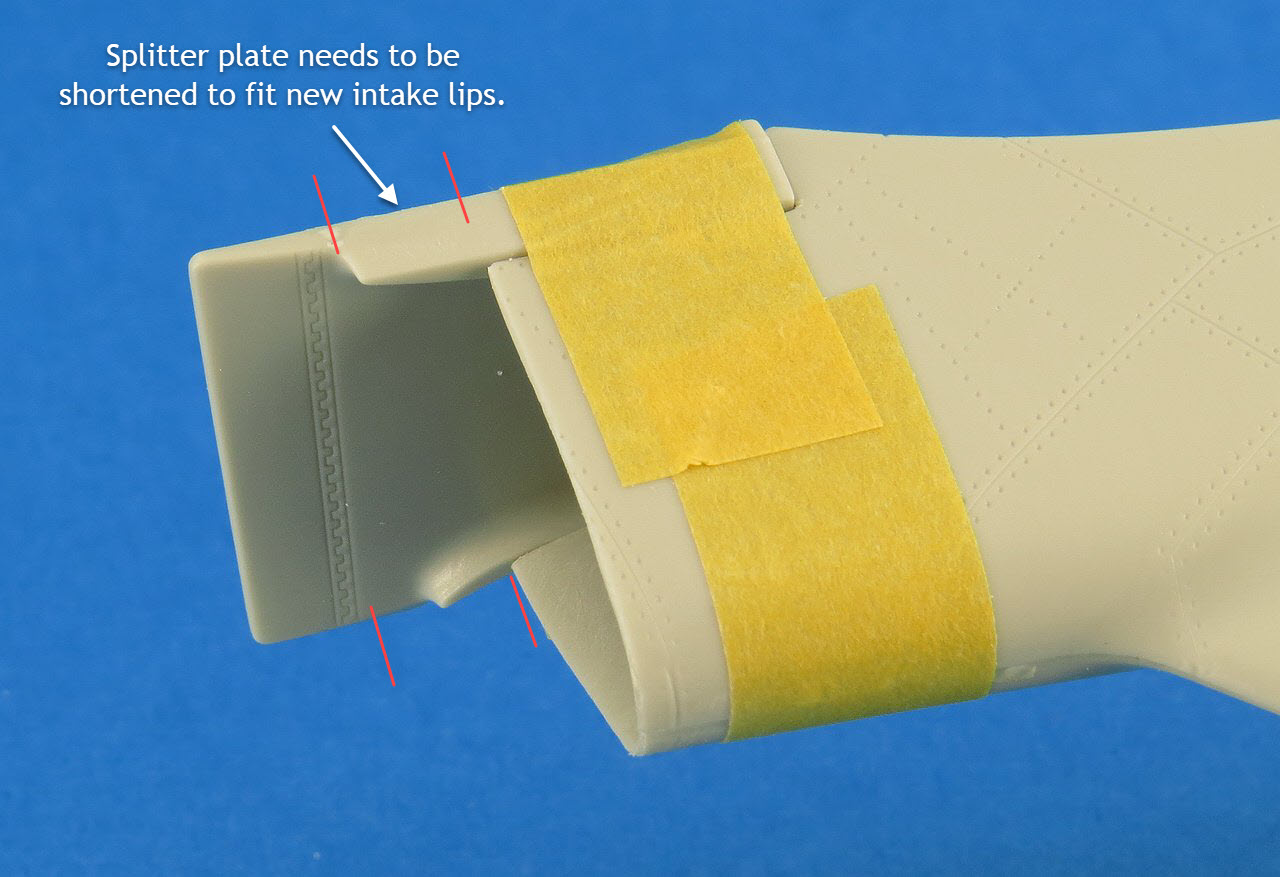
| With the intake lips dealt with, the next step is to adjust the splitter plate to fit the new intake position and shape. The red lines indicate how much needs to be removed to bring the splitter plate back to meet up with the intake. | |||||||||||||||||||||||||||||||||||||||||||||||||||||||||
 |
|||||||||||||||||||||||||||||||||||||||||||||||||||||||||
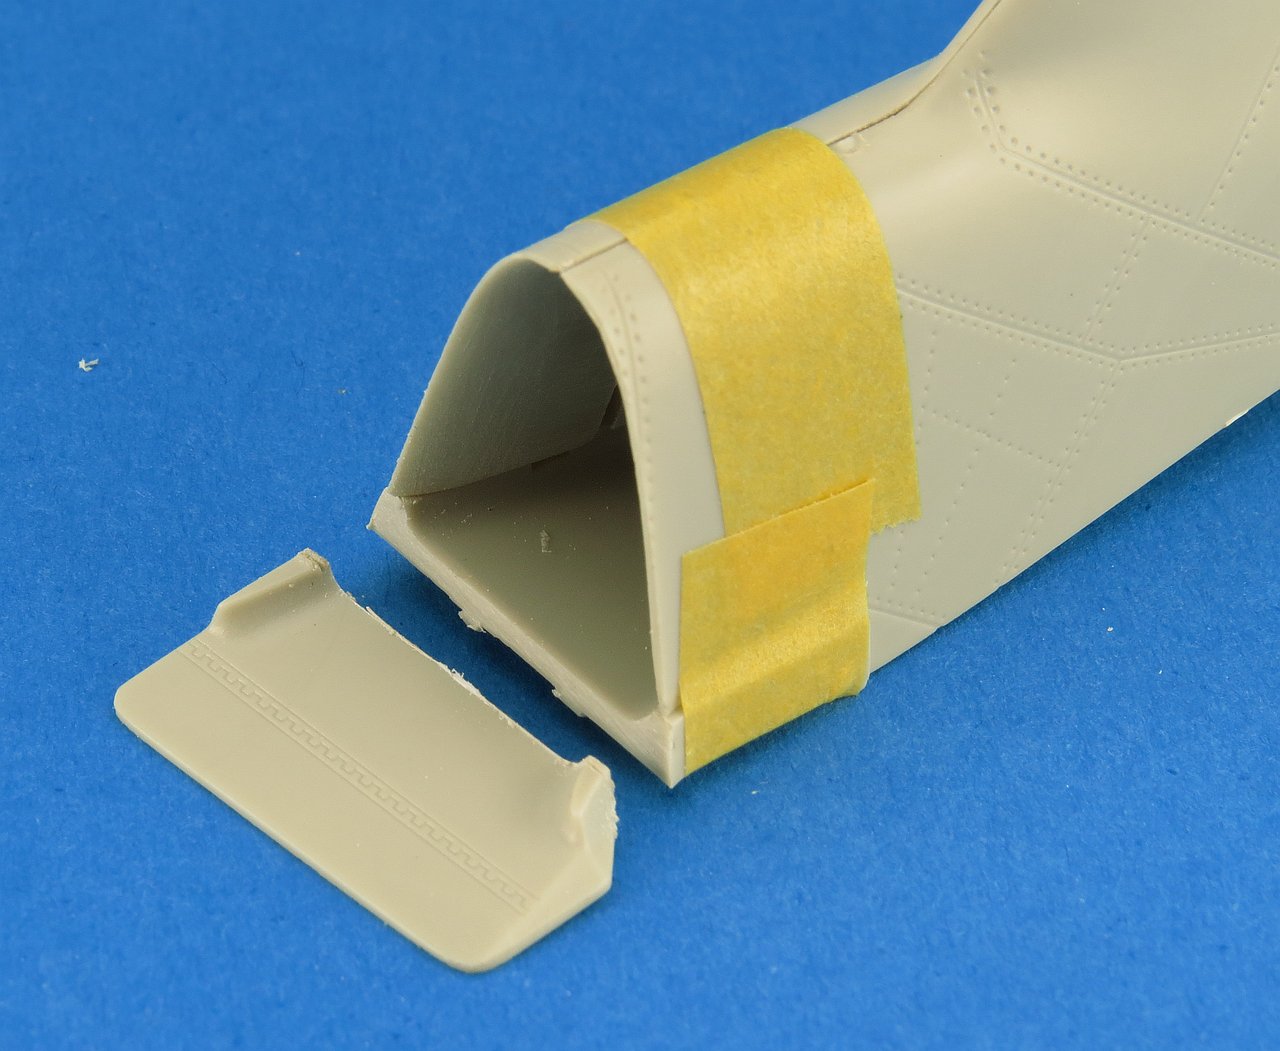
| Step 4 is to cut the splitter plate part (B28) in-line with the new edge of the intake lips. For this I used a new #11 blade in my knife and laid it against the intake and pressed down on the splitter plate to mark the cut line. I then used the saw to complete the cut. | |||||||||||||||||||||||||||||||||||||||||||||||||||||||||
 |
|||||||||||||||||||||||||||||||||||||||||||||||||||||||||
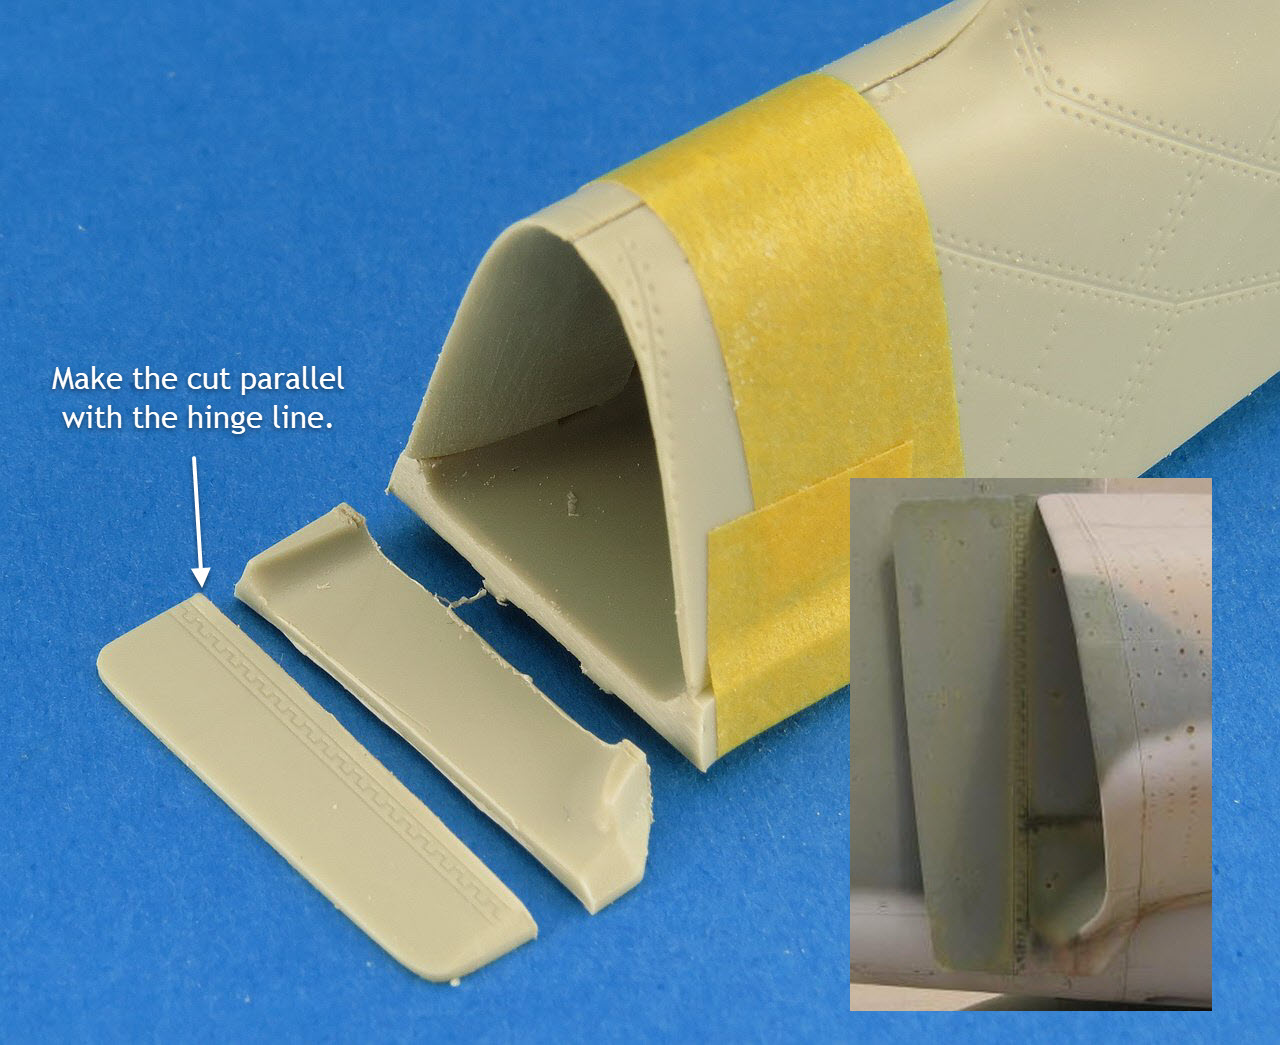
| Step 5 is to cut the front of the splitter plate just behind the engraved hinge line. I once again used some vinyl tape as a guide for my cut to be 100% sure it was parallel to the hinge line and about 2mm offset. | |||||||||||||||||||||||||||||||||||||||||||||||||||||||||
 |
|||||||||||||||||||||||||||||||||||||||||||||||||||||||||
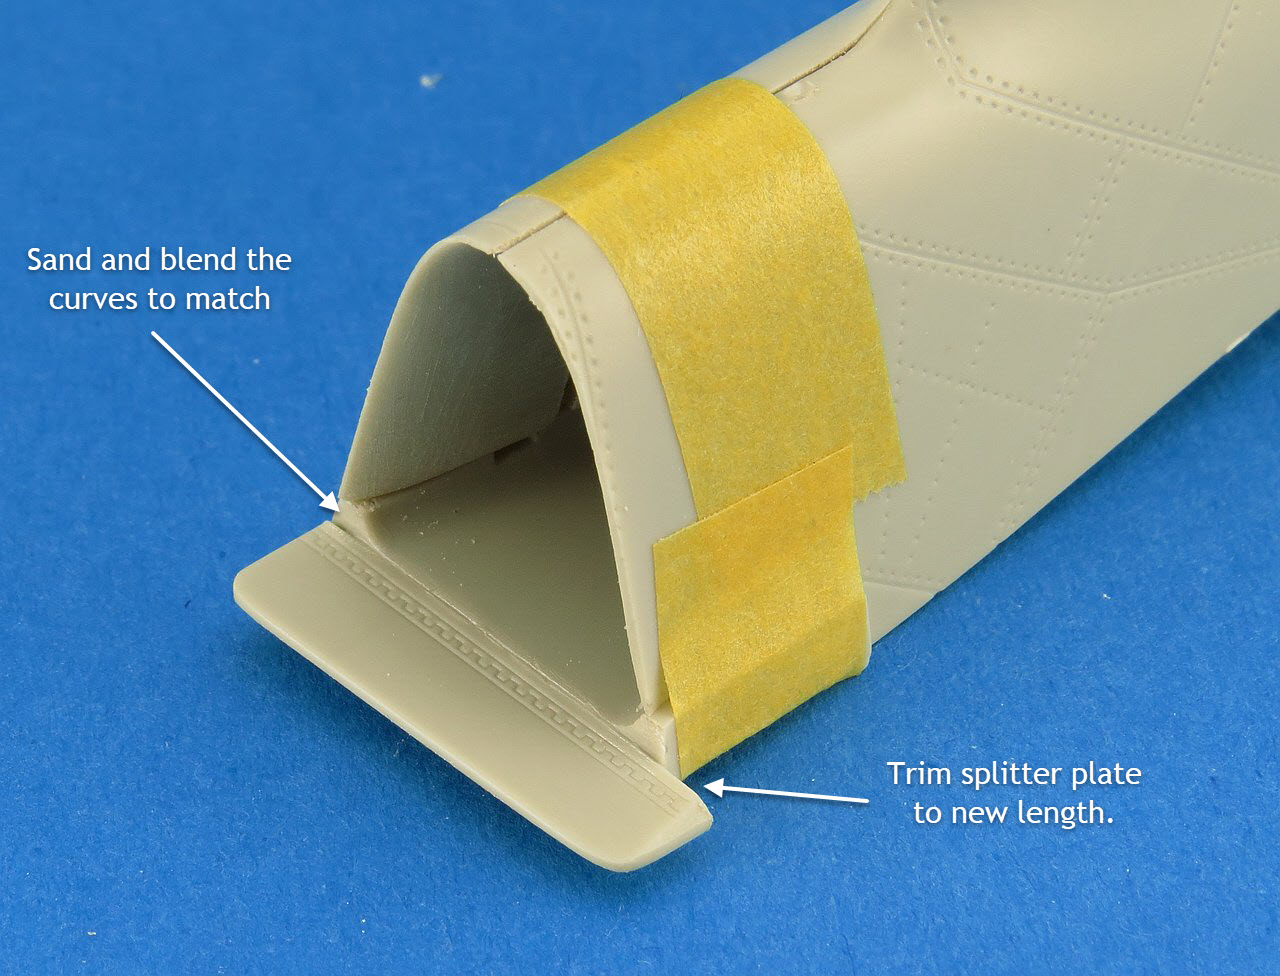
| Step 6 is to now glue the shortened splitter plate back together. You can see that it's now too long but can easily be trimmed and re-shaped to match photos. The only remaining task is to blend in the curves of the intake interior to account for the cuts we made. | |||||||||||||||||||||||||||||||||||||||||||||||||||||||||
 |
|||||||||||||||||||||||||||||||||||||||||||||||||||||||||
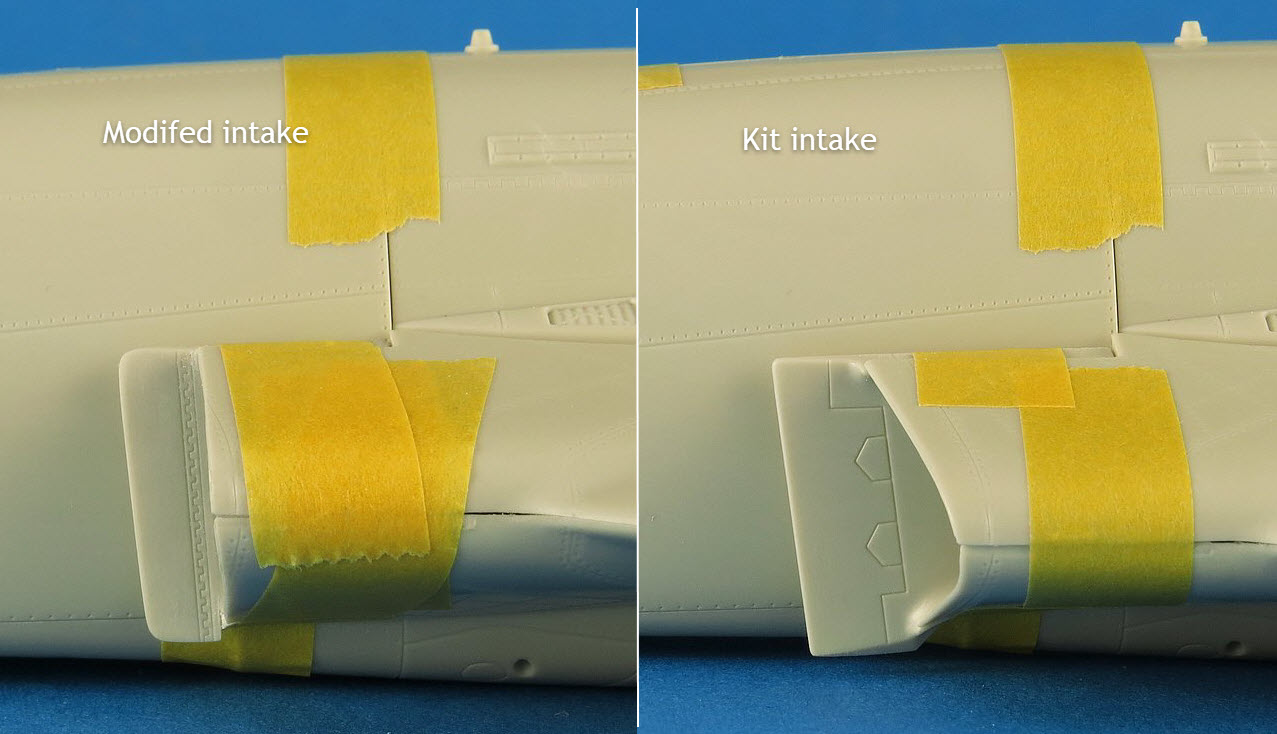
| Here are a bunch of side by side comparison pics next to an unaltered kit intake to show the end result from different angles. I don't think it's perfect but looks to be a better option than just leaving the kit intakes unmodified for your single seaters. I also think it achievable by most experienced modelers as you really are only cutting and shaping. There is no major fabrication work needed to get these results. | |||||||||||||||||||||||||||||||||||||||||||||||||||||||||
 |
|||||||||||||||||||||||||||||||||||||||||||||||||||||||||
 |
|||||||||||||||||||||||||||||||||||||||||||||||||||||||||
 |
|||||||||||||||||||||||||||||||||||||||||||||||||||||||||
| A final comparison photo to see how close I got. I feel the shape is pretty good but am a bit concerned that the length of the intake is now shorter by about 7mm. Not sure this is accurate but it's a compromise I am happy to accept. | |||||||||||||||||||||||||||||||||||||||||||||||||||||||||
 |
|||||||||||||||||||||||||||||||||||||||||||||||||||||||||
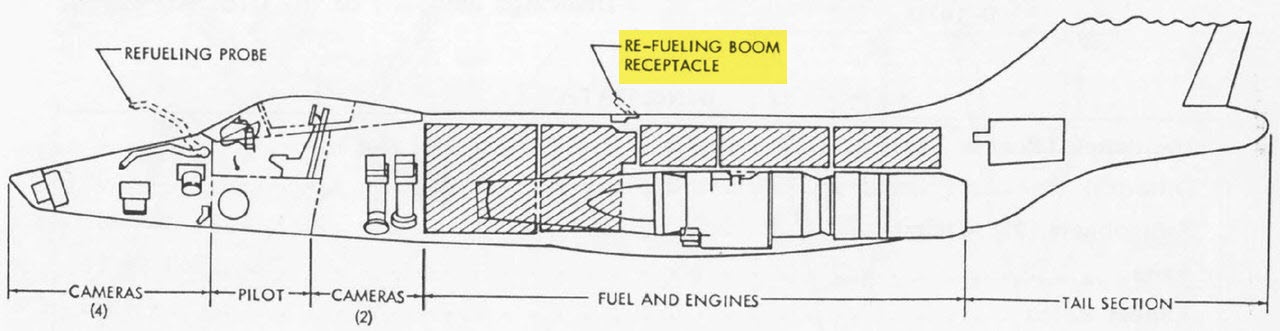
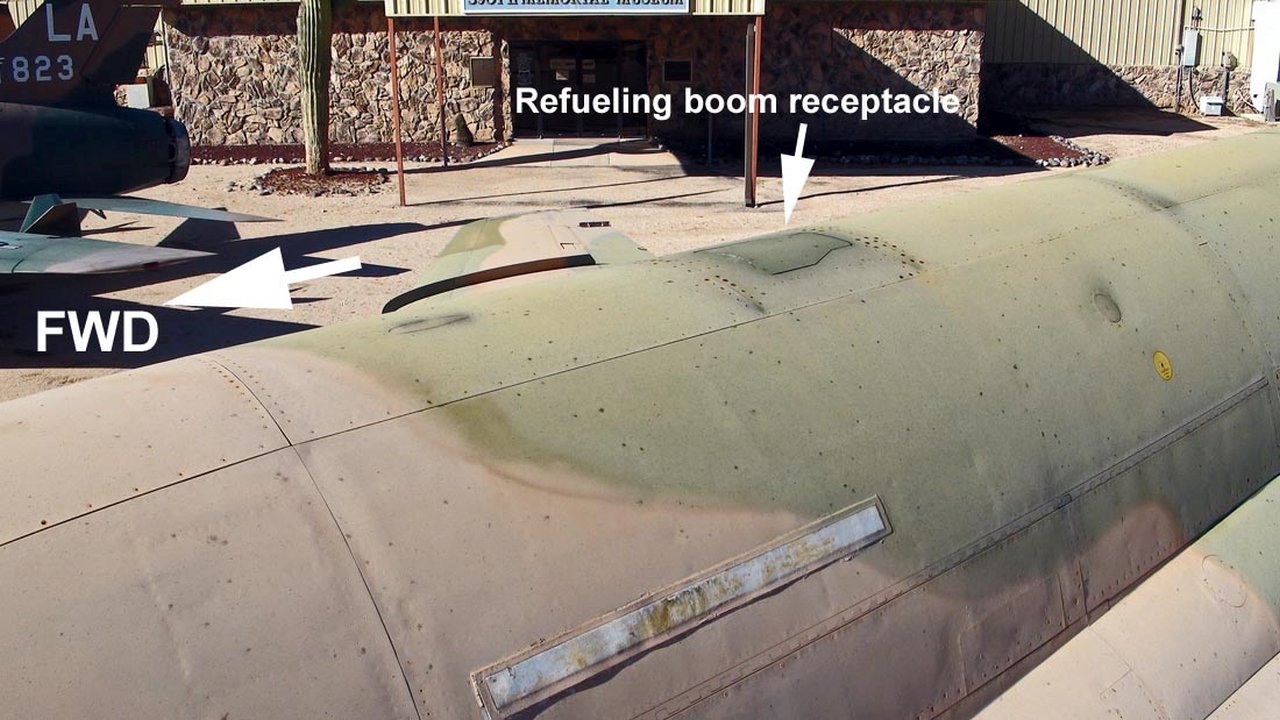
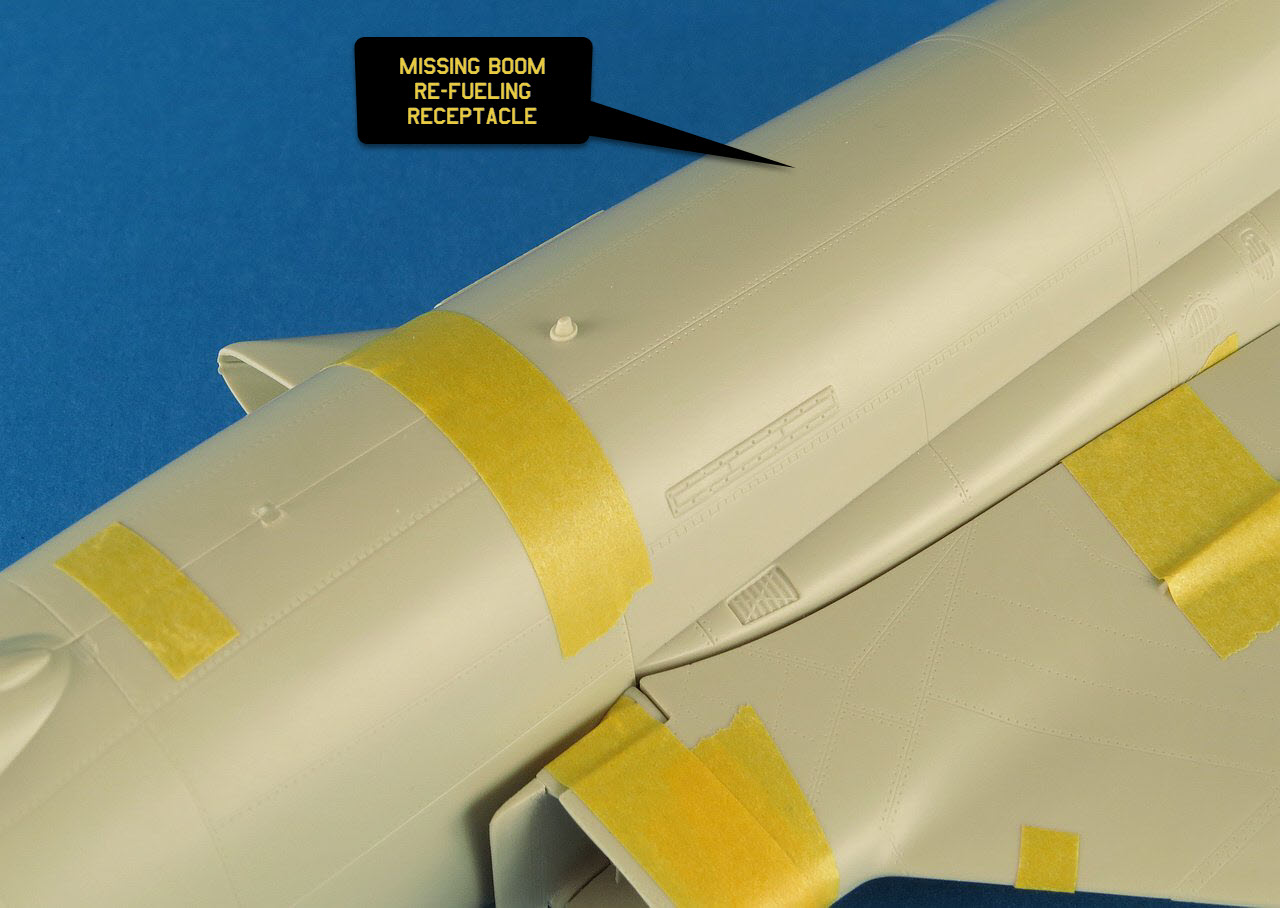
| Another small issue I wanted to highlight was the missing "Boom Refueling Receptacle Door" on the fuselage spine. As can be seen from the below drawing and photo, the reconn Voodoo's were capable of both boom and probe style aerial refueling (somewhat unique I expect). Kittyhawk has failed to include the boom receptacle door. | |||||||||||||||||||||||||||||||||||||||||||||||||||||||||
 |
|||||||||||||||||||||||||||||||||||||||||||||||||||||||||
 |
|||||||||||||||||||||||||||||||||||||||||||||||||||||||||
| The boom receptacle door can be added by scribing or cutting some thin (10 thou) plastic card to shape and gluing to the top of the spine. | |||||||||||||||||||||||||||||||||||||||||||||||||||||||||
 |
|||||||||||||||||||||||||||||||||||||||||||||||||||||||||
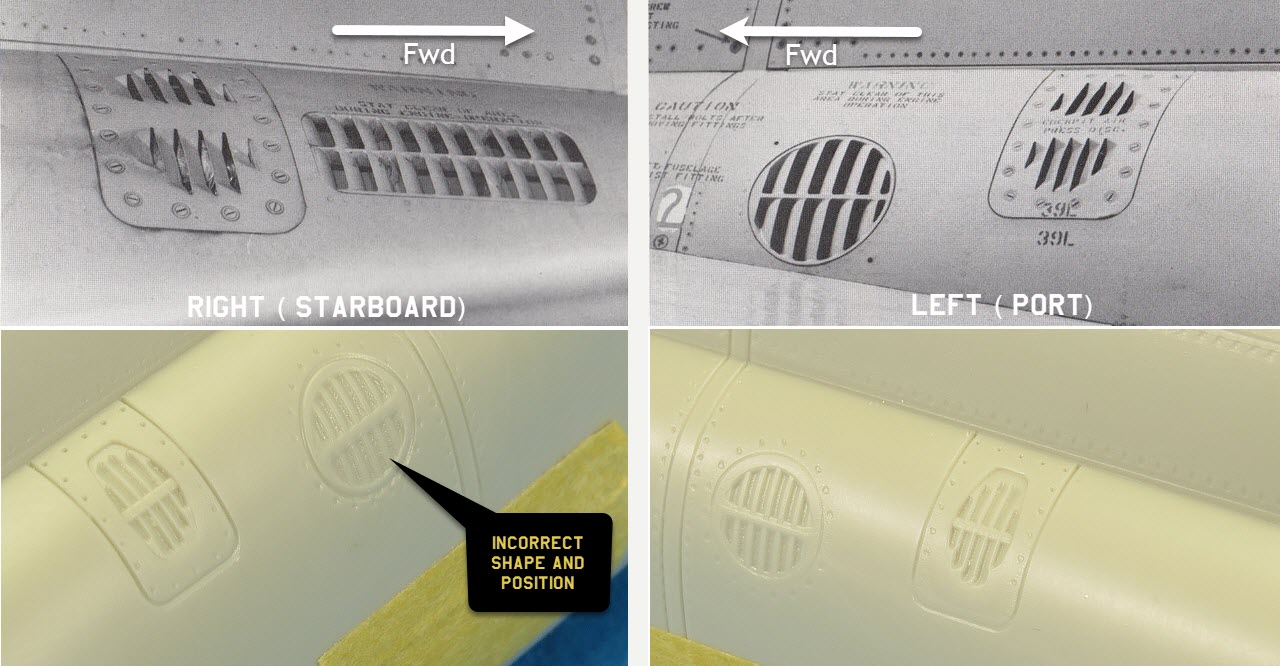
| The last small issue worth mentioning is the hot air bleed vents on each fuselage side. As you can see from the photo the left side vents are pretty good, but the right side vent should be rectangular and not circular. Not that it's any excuse but Monogram also got this wrong on their Voodoo kits. | |||||||||||||||||||||||||||||||||||||||||||||||||||||||||
 |
|||||||||||||||||||||||||||||||||||||||||||||||||||||||||
|
COLOURS & MARKINGS - KittyHawk 1:48 McDonnell RF-101C & G/H (KH80116) |
|||||||||||||||||||||||||||||||||||||||||||||||||||||||||
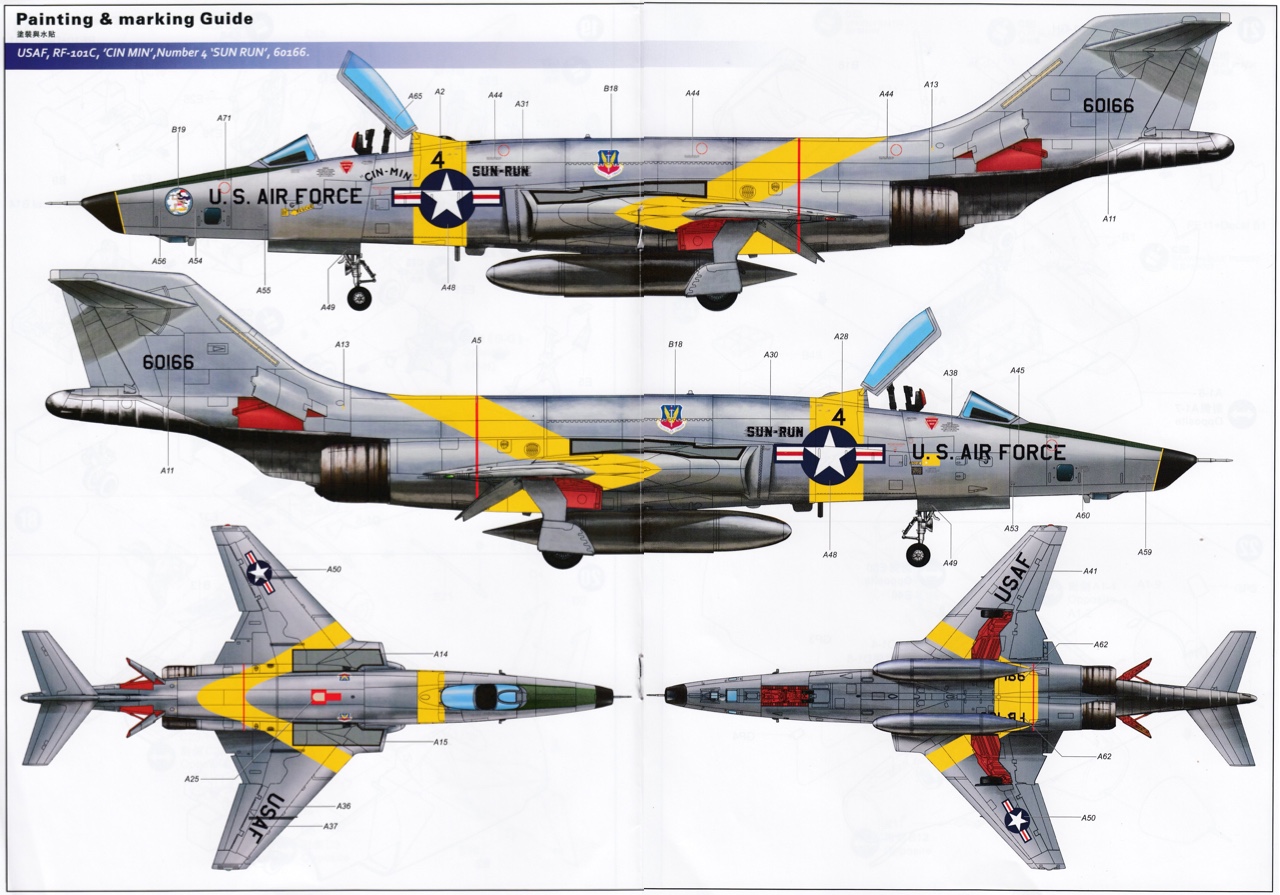
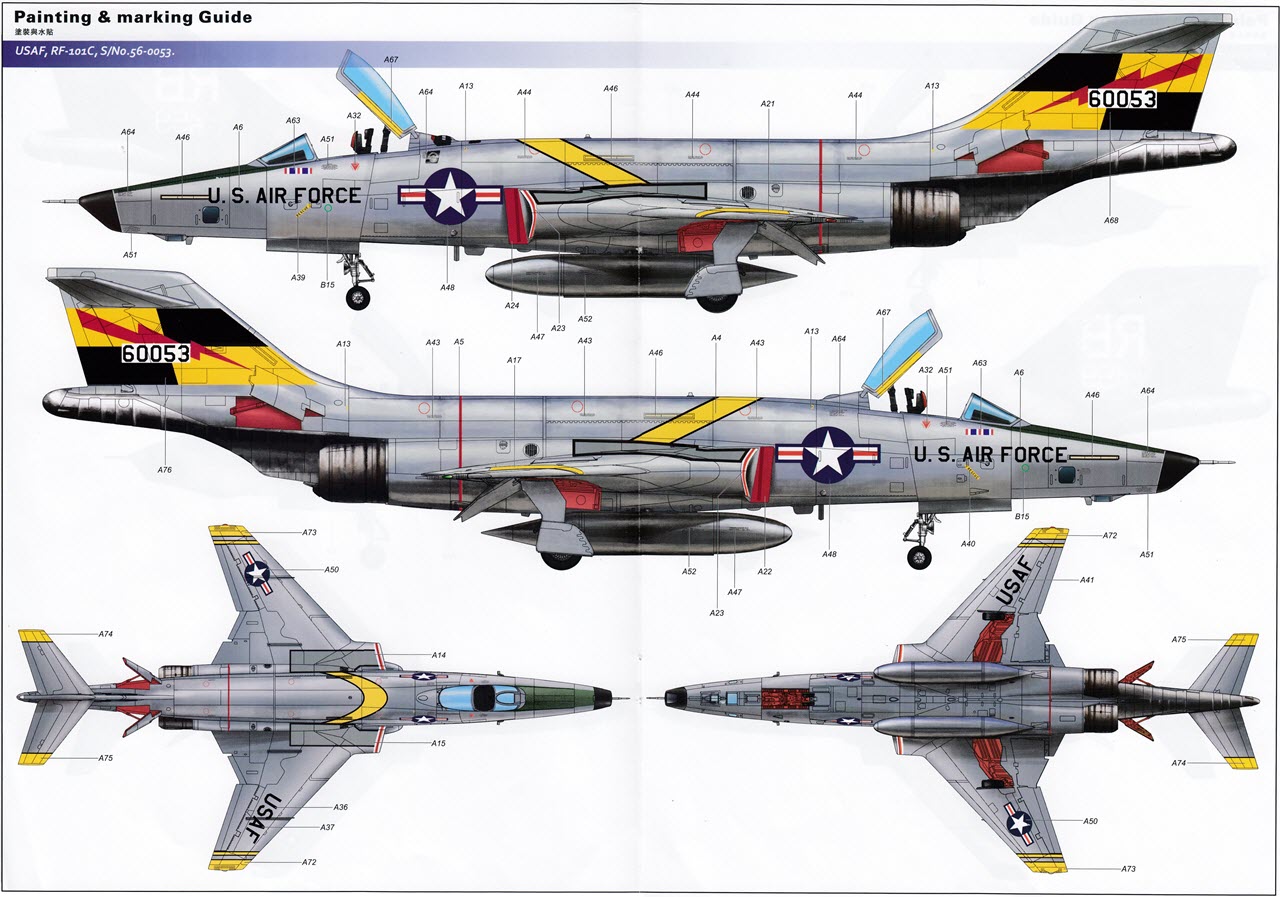
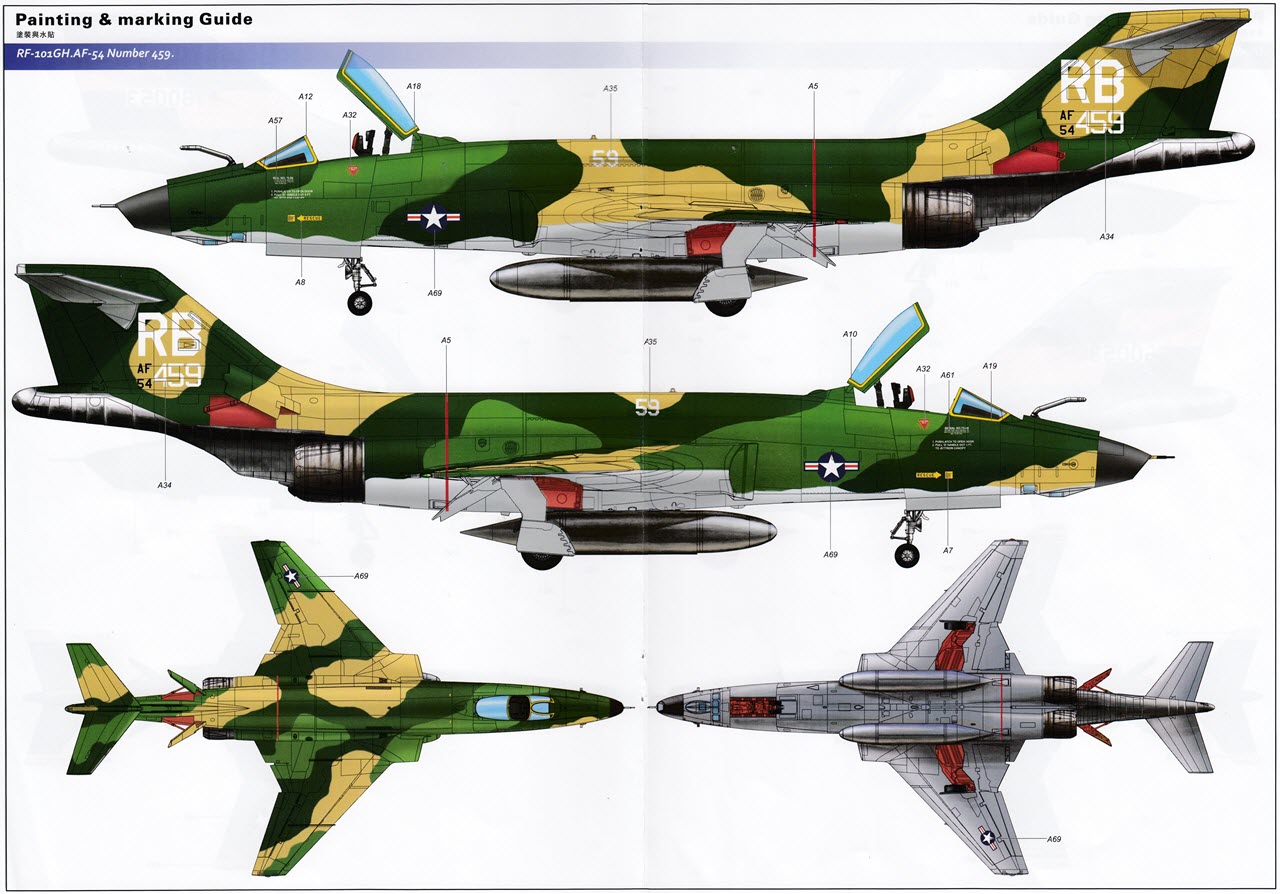
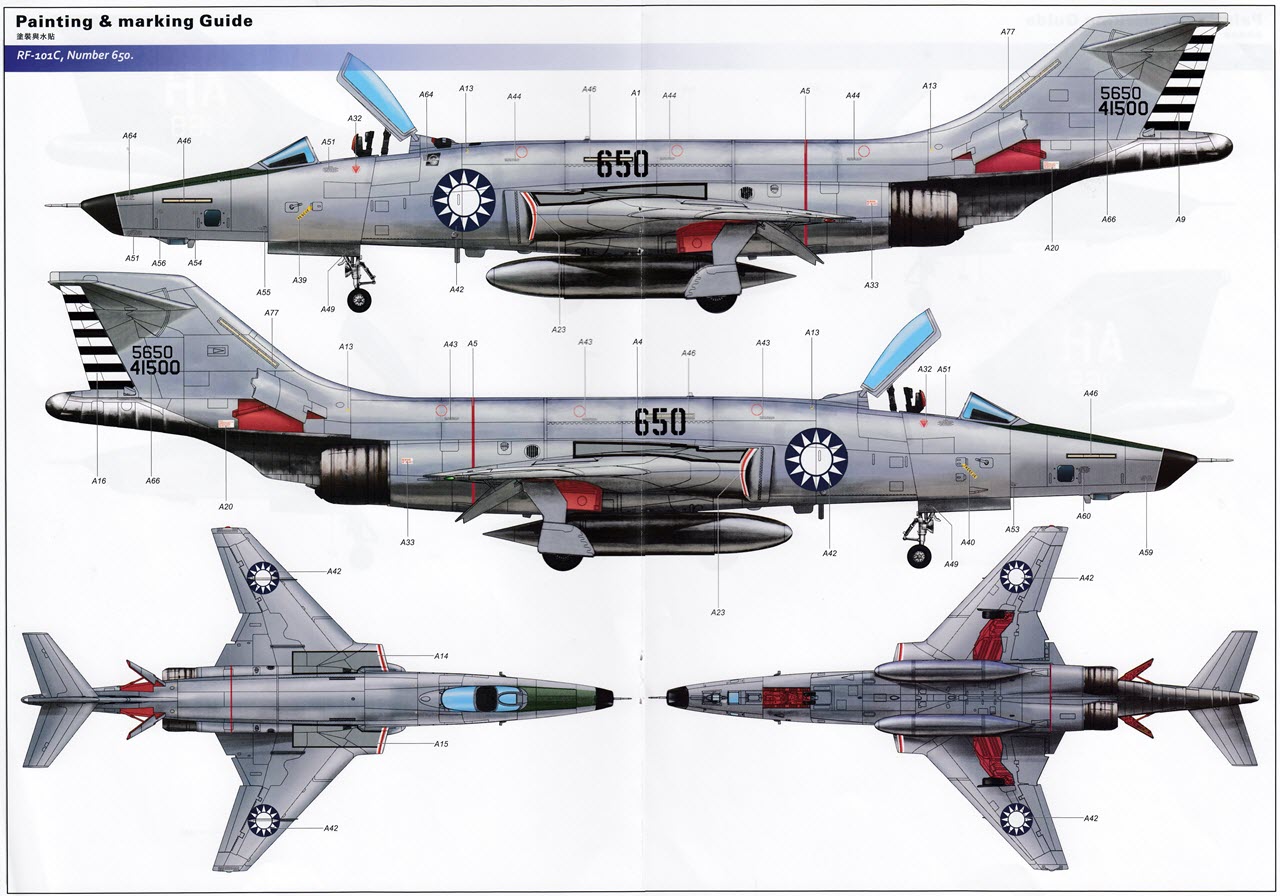
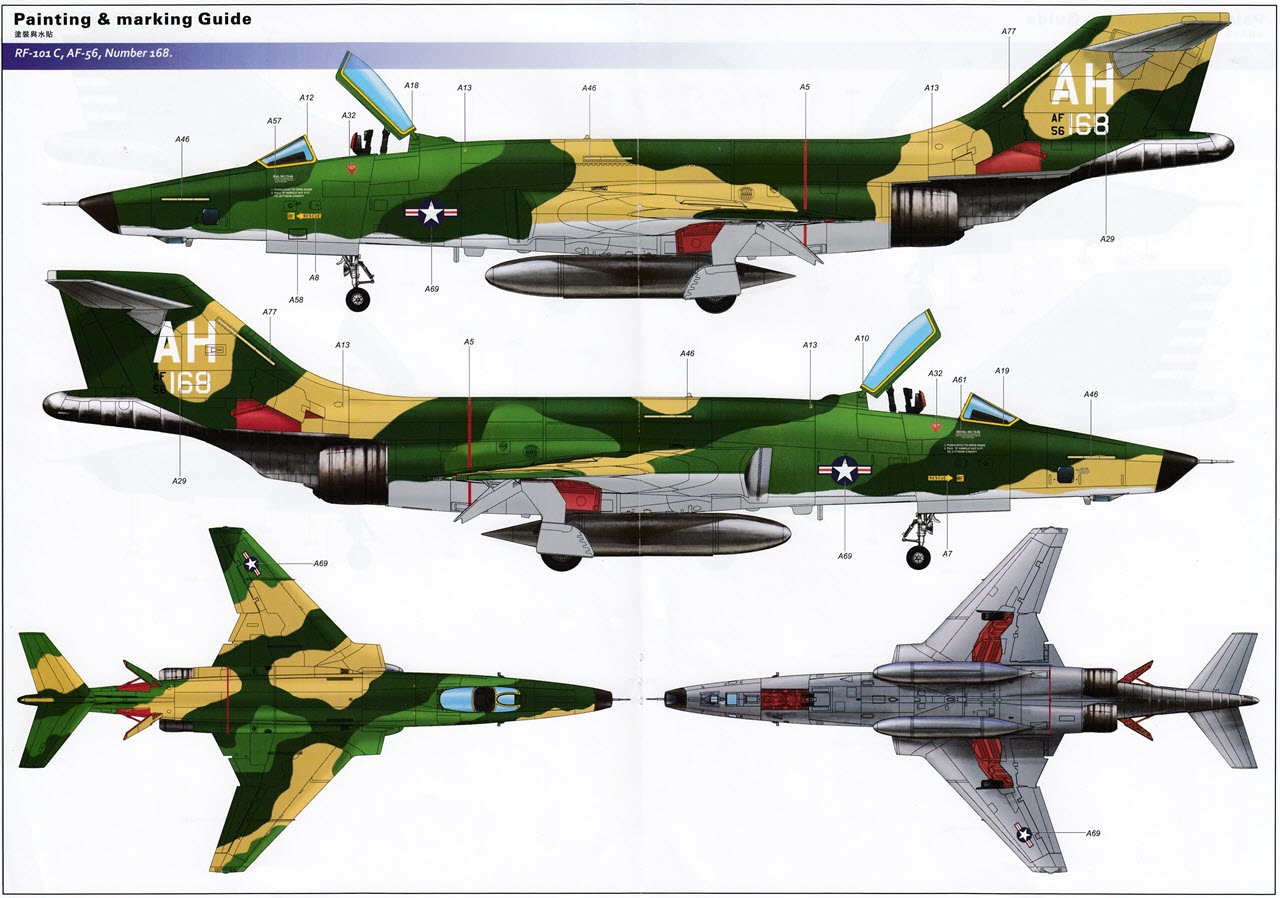
| Kittyhawk provide a total of five marking options in the kit. Based on previous experience with KH's accuracy when it comes to research I have tried this time to better validate each of the schemes authenticity. One thing I have observed is that KH does not put much effort into altering the drawings they provide to suit each scheme. They obviously just copy and paste the drawings and change the colors and markings as needed. In reality however there are often more differences between each aircraft than just color and decals. An example of this would be the formation strip lights shown incorrectly on several of the schemes. Kittyhawk needs to do better in this regard. | |||||||||||||||||||||||||||||||||||||||||||||||||||||||||
| Each paint scheme is provided in a full color glossy spread across two A4 pages (so nice and big). Color callouts are all using Gunze Mr Color paints. I would advise caution when using the colors indicated and do a healthy amount of testing to match sure the match is optimal based on actual reference photos. | |||||||||||||||||||||||||||||||||||||||||||||||||||||||||
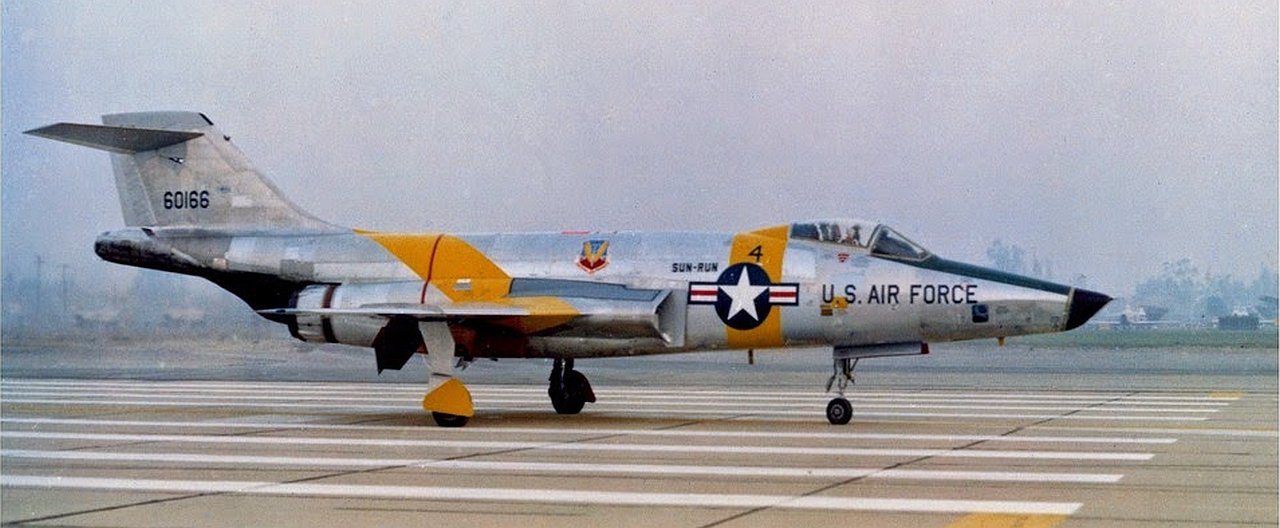
RF-101C-40-MC s/n 56-0166
Notes:
|

|
||||||||||||||||||||||||||||||||||||||||||||||||||||||||
 |
|||||||||||||||||||||||||||||||||||||||||||||||||||||||||
RF-101C-60-MC s/n 56-0053
Notes:
|

|
||||||||||||||||||||||||||||||||||||||||||||||||||||||||
 |
|||||||||||||||||||||||||||||||||||||||||||||||||||||||||
RF-101G s/n 54-1459
Notes:
|

|
||||||||||||||||||||||||||||||||||||||||||||||||||||||||
 |
|||||||||||||||||||||||||||||||||||||||||||||||||||||||||
RF-101A-25-MC s/n 54-1500
Notes:
|

|
||||||||||||||||||||||||||||||||||||||||||||||||||||||||
 |
|||||||||||||||||||||||||||||||||||||||||||||||||||||||||
RF-101C-40-MC s/n 56-0168
Notes:
|

|
||||||||||||||||||||||||||||||||||||||||||||||||||||||||
 |
|||||||||||||||||||||||||||||||||||||||||||||||||||||||||
| Much like previous KH releases, the kit decals seem to be well printed with no obvious registration issues. Though not as thin as you would expect from a set printed by say Cartograph or Microscale, I can confirm from previous KH builds, that the kit decals work well and respond as expected to setting & softening solutions. Some of the more colorful schemes have a lot of large and complex multi layer decals to be applied so bear that in mind when deciding on which option to go with. As you can see the decal sheet itself is very crowded so be mindful of this when cutting each decal out. | |||||||||||||||||||||||||||||||||||||||||||||||||||||||||
 |
|||||||||||||||||||||||||||||||||||||||||||||||||||||||||
 |
|||||||||||||||||||||||||||||||||||||||||||||||||||||||||
|
FINAL THOUGHTS - KittyHawk 1:48 McDonnell RF-101C & G/H (KH80116) |
|||||||||||||||||||||||||||||||||||||||||||||||||||||||||
| |||||||||||||||||||||||||||||||||||||||||||||||||||||||||